
- February 8, 2022
- Posted by: Surender Kumar
- Categories: Windows 10, Windows 11
Create bootable USB for Windows 10/11 without any third-party tool
Table of Contents
Gone are the days when you would burn the bootable ISO image on a DVD drive. Now the CD/DVD drives have been replaced by USB flash drives since these are faster and more convenient. Whenever you’re going to perform a clean installation of Windows 10 or Windows 11, you need to prepare a bootable USB drive. You can use Rufus – a free and portable tool to create the bootable USB easily, but if you don’t want to use any 3rd party tool due to any reason, you are on the right page.
In this article, I will show how you can manually create a bootable USB drive for Windows 10 or Windows 11 without using any 3rd party software. All you need is a USB flash drive (8GB), an ISO image, and a computer running Windows 10 or Windows 11.
Downloading Windows 10/11 ISO File
To download the latest version of Windows 10 (or Windows 11) directly from Microsoft servers, you can use the official Media Creation Tool. To learn more about how to download the ISO file using media creation tool, please read Downloading Windows Enterprise Edition article.
Creating Bootable USB Drive
Once you have the ISO file ready, follow these steps to create your bootable USB drive for Windows 10 or Windows 11:
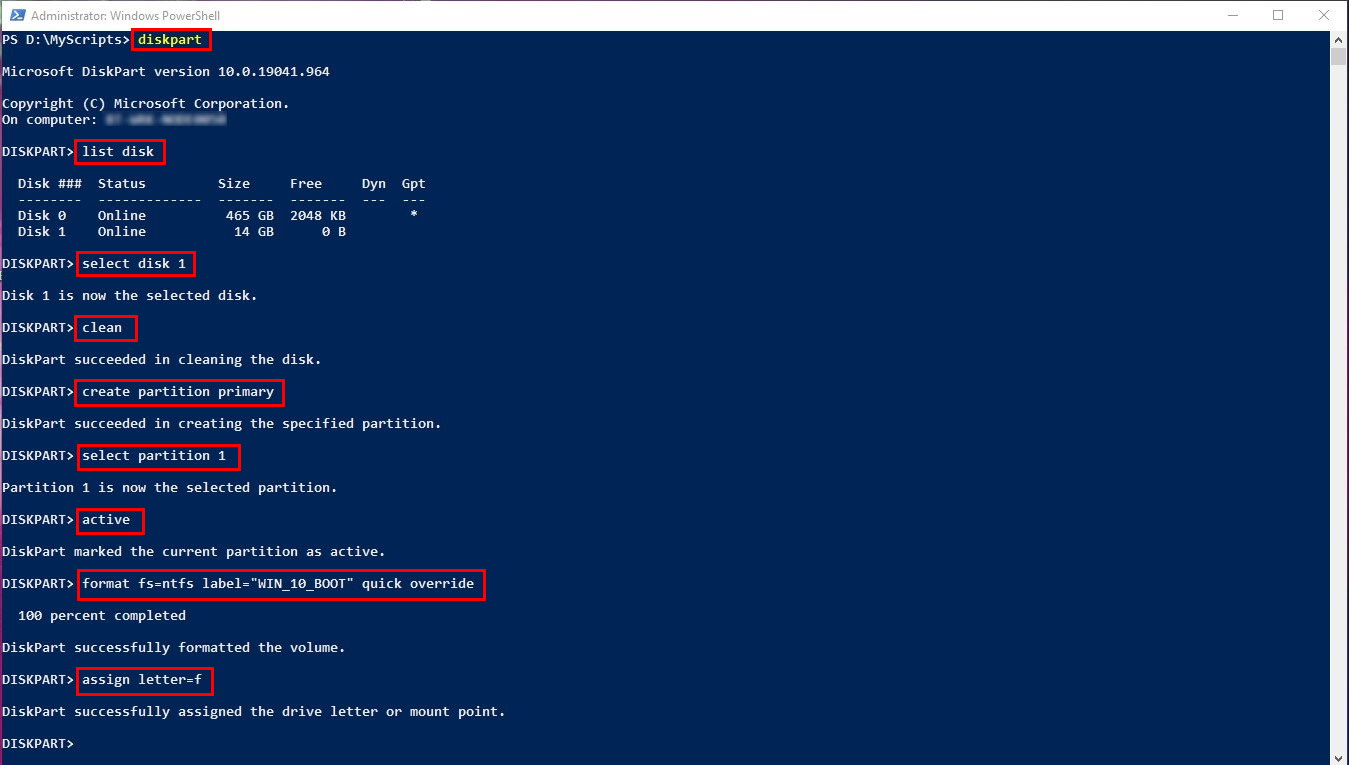
- Launch the Windows PowerShell console with Administrator privilege.
- Type
diskpartand hit enter. - You will see the prompt changed to DISKPART. Now type
list diskand hit enter.

This command will show you a list of all drives connected to your PC. Looking at the “Size” column, you can determine that your USB drive is listed as “Disk 1” whereas “Disk 0” is your main hard disk.
- Based on the output of above command, you need to select the USB drive. To do that, type
select disk 1and hit enter. If your USB drive was listed as “Disk 2” in previous step, please modify this command accordingly.This command will change the active disk to “Disk 1” which is your USB drive.
- Now type the following commands in right order:
clean
create partition primary
select partition 1
active
format fs=ntfs label="WIN_10_BOOT" quick override
assign letter=f
exit
A brief explaination of each command:
clean: Removes any and all partition or volume formatting from the selected disk.create partition primary: Creates a primary partition.select partition 1: Selects the newly created primary partition.active: Marks the selected primary partition as Active.format fs=ntfs label="WIN_10_BOOT" quick override: Quickly formats the disk with NTFS file system, sets the volume label. The “override” option forces the file system to dismount first if necessary.assign letter=f: Assigns the drive letter F: to the selected volume. If your system has F: already in use, you can use another letter or just useassigncommand to let the system automatically choose a free drive letter for you.exit: Exits the diskpart utility and returns to PowerShell console.
- You are now out of diskpart and your USB drive is now bootable. You need to mount the ISO file so that you can copy everything from it. To mount the ISO file, run the following command:
Mount-DiskImage -ImagePath "D:\ISO\Windows_10_ENT_21H2.iso" | Out-Null
This command mounts the ISO file and automatically assigns a drive letter. Please change the path of ISO file as per your system.
- To see the drive letters for your mounted ISO file and USB drive, you can use the following command:
Get-CimInstance Win32_LogicalDisk | Format-Table DeviceId, VolumeName, @{n="Size (GB)";e={[math]::Round($_.Size/1GB,2)}}This command will show all the drives in a nice tabular format with assigned drive letter, VolumeName, and Size. Looking at the “VolumeName” and “Size” columns, you can determine the current drive letters assigned to your mounted ISO file and USB drive. Memorize these drive letters as you will need these in the next command.


- Now that you know the drive letters for mounted ISO and USB drive, you need to copy all the content from mounted ISO drive to your USB drive. In my case, I’ll be copying everything from
G:drive toF:drive. To do that, run the following command:Copy-Item G:\* -Destination F:\ -Recurse -Force -PassThru
This command will copy all the contents from mounted ISO file to my USB drive. The
-Recurseparameter enables the recursive copying,-Forceparameter enables copying the hidden and read-only files, and-PassThruparameter enables verbose output of copy-item process.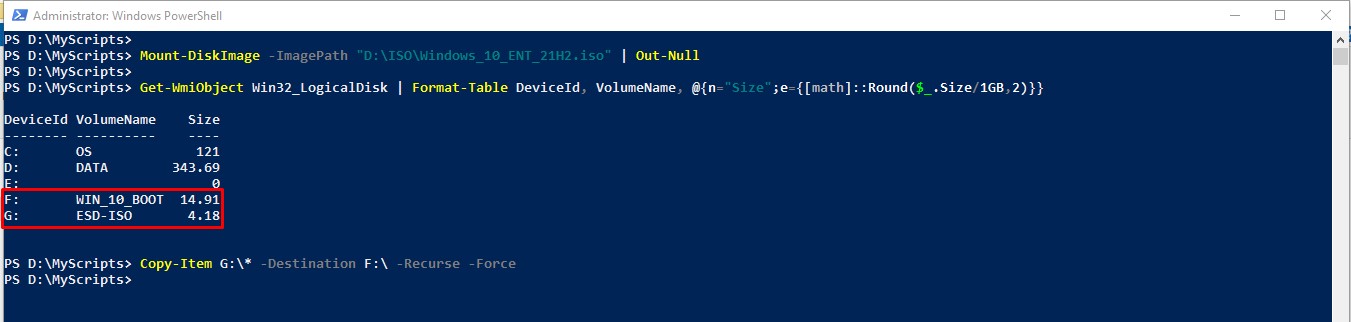
- Once everything is copied successfully, your USB drive is ready as a bootable installation media. You can now use
DisMount-DiskImage -ImagePath "D:\ISO\Windows_10_ENT_21H2.iso"command to unmount the ISO file and eject your USB drive.The following image shows all the diskpart commands in action.
After following these steps, your USB drive is ready as a bootable installation media for Windows 10 or Windows 11 without using any 3rd party tool or software.
this is one of the best and easy to follow explanations on the use of the diskpart tool, and the whole process of creating a boot drive without any external tools.
Thank you!
Superb! Thanks so much!
Yes, thank you for this detailed explanation! I have one little question, although I looked it up. At Step 7 you say: “Use command “Get-CimInstance Win32_LogicalDisk….”, but in the picture is says “Get-WmiObject Win32_LogicalDisk …”. I guess its the same, isn’t it?
That is because “Get-WMIObject” cmdlet is now officially deprecated and we should use “Get-CimInstance” instead.
Read more about it here: https://techcommunity.microsoft.com/blog/windows-itpro-blog/wmi-command-line-wmic-utility-deprecation-next-steps/4039242