
- August 20, 2015
- Posted by: Surender Kumar
- Category: Windows Server
Group Policy Management
Table of Contents
Group Policy is an infrastructure that allows you to implement specific configurations for users and computers on several systems from one central location. You can have a single group policy that controls all of the systems within your organization; you can have multiple group policies controlling all of your systems; or you can have multiple group policies that are targeted at managing different groups of systems. You can design a group policy infrastructure that is as granular as you need it to be so that you can manage your systems. And if you are a control freak, you will be glad to know that the policies that you implement are continually re-evaluated and reinforced.
Group Policy settings are contained in Group Policy Objects (GPOs), which are linked to the active directory sites, domains, or organizational units (OUs). Group Policy is one of the top reasons to deploy active directory because it allows you to manage user and computer objects from one place.
Group Policy Object (GPO)
GPO stores the settings related to group policy. Two parts make up a Group Policy Object (GPO): the Group Policy container and Group Policy template. Even though the two parts of the GPO are stored in different locations, both must be available for group policy processing to work. The Group Policy container is a construct of Active Directory. The container is used to control permissions for the GPO and to store attributes that allow us to identify the GPO. The permissions that we can set control who can manage the GPO, as well as the systems and users that will have the GPO applied to them. Whenever we look at the properties of a GPO, we are actually looking at the Group Policy container object within Active Directory.
Group Policy Container Attributes
You can view the attributes for a GPO in a couple of different ways. The easiest is to open the Group Policy Management Console (GPMC) and select a group policy. Figure 1.1 displays what you will see when you expand the forest, domain, and Group Policy Objects levels, select a group policy, and then click the Details tab.

You will find the domain and owner, two date and time fields let you know when the policy was created and the last time that it was modified. You can also see how many changes the user and computer settings have gone through. The nicest thing about the version numbers is that you can see if the container and template are at the same revision level. The first number for either the user version or computer version is the container, denoted by the (AD) suffix, and the second number is the template, denoted by the (sysvol) suffix.
The Unique ID field displays the globally unique identifier (GUID) of the policy. While this may seem like just a nice bit of information to have when you are documenting the group policy, it is actually a very useful piece of information. As you can tell, working with the Group Policy container is not very hard; you can simply open the GPMC and view the information. Finding the actual template within the file system is, however, a little more difficult. The template is identified only by the group policy’s GUID. Figure 1.2 shows the policy that we have been looking at in the GPMC, highlighted in the %systemroot%\SYSVOL\sysvol\domain_name\Policies directory.
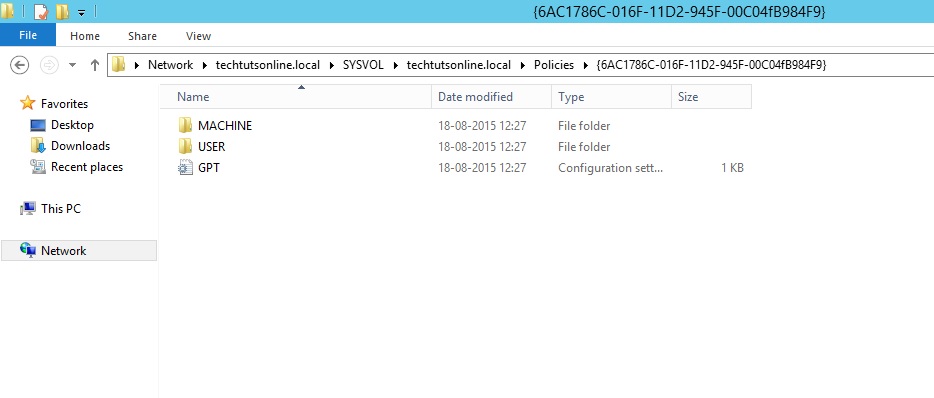
Group Policy template shown in the sysvol
The GPO Status drop-down, seen expanded in Figure 1.3, allows you to control how the group policy will function.
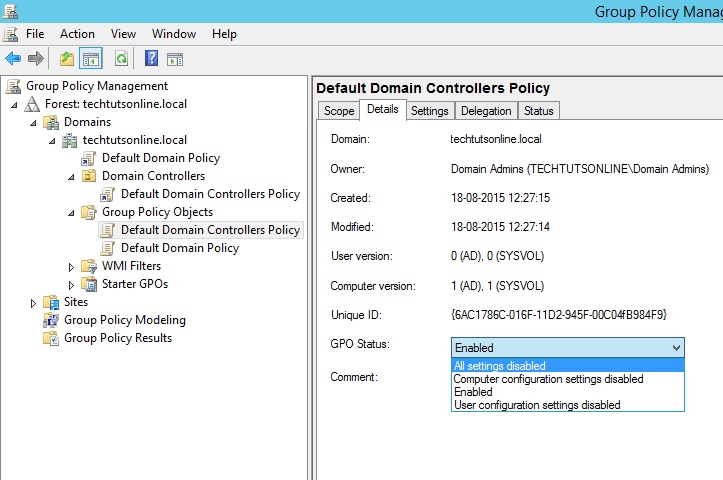
GPO Status Settings
The first of the four settings, All Settings Disabled, allows you to completely stop the group policy from taking effect. Once selected, it will no longer be applied against any of the systems where it is linked. This is a very handy setting to have if you want to temporarily stop a group policy from being applied within the domain but you do not want to remove any of the links that you have already configured. You may want to enable the group policy later on, and you don’t want to have to remember where the group policies were linked.
That brings us to the third option in the list, Enabled. This is probably the most common setting you will find. As it sounds, when this setting is selected, the group policy is enabled and will be applied where applicable. Being the polar opposite of All Settings Disabled, Enabled is used to have the group policy turned on and working.
The Computer Configuration Settings Disabled option will keep the user setting enabled while not allowing the computer settings to be applied. User Configuration Settings Disabled does just the opposite. But why would you turn off the part of a group policy?. The simple answer is, to make the group policy more efficient. Whenever a group policy is applied, every setting within the group policy is evaluated to determine what affect it has against the user or system. In an environment where several group policies are applied, there could be so many group policies being evaluated that the system startup or user logon could take a long time.
When you are creating group policy and you are not configuring any user-configuration settings, you can use the User Configuration Settings Disabled option to alleviate a little of the processing burden. When the computer starts up, it will not evaluate any of the user settings. The same goes for the computer side. If there are not any computer settings within the group policy, use the Computer Configuration Settings Disabled option, and the computer settings will not be evaluated.
Group Policy Object Link
When you create a group policy, you can configure it so that its settings do not affect any systems or users. When you do want your settings to affect them, you need to link the GPO to the domain, site, or organizational unit (OU) where the systems or users are located. When the link is enabled, the GPO is evaluated and the settings are enforced. The benefit of using GPO link is that you can link single GPO to multiple OUs and deleting the GPO link does not delete the actual GPO.
Figure 1.4 highlights the actual Group Policy Objects (GPO) and Group Policy Link in group policy management console.
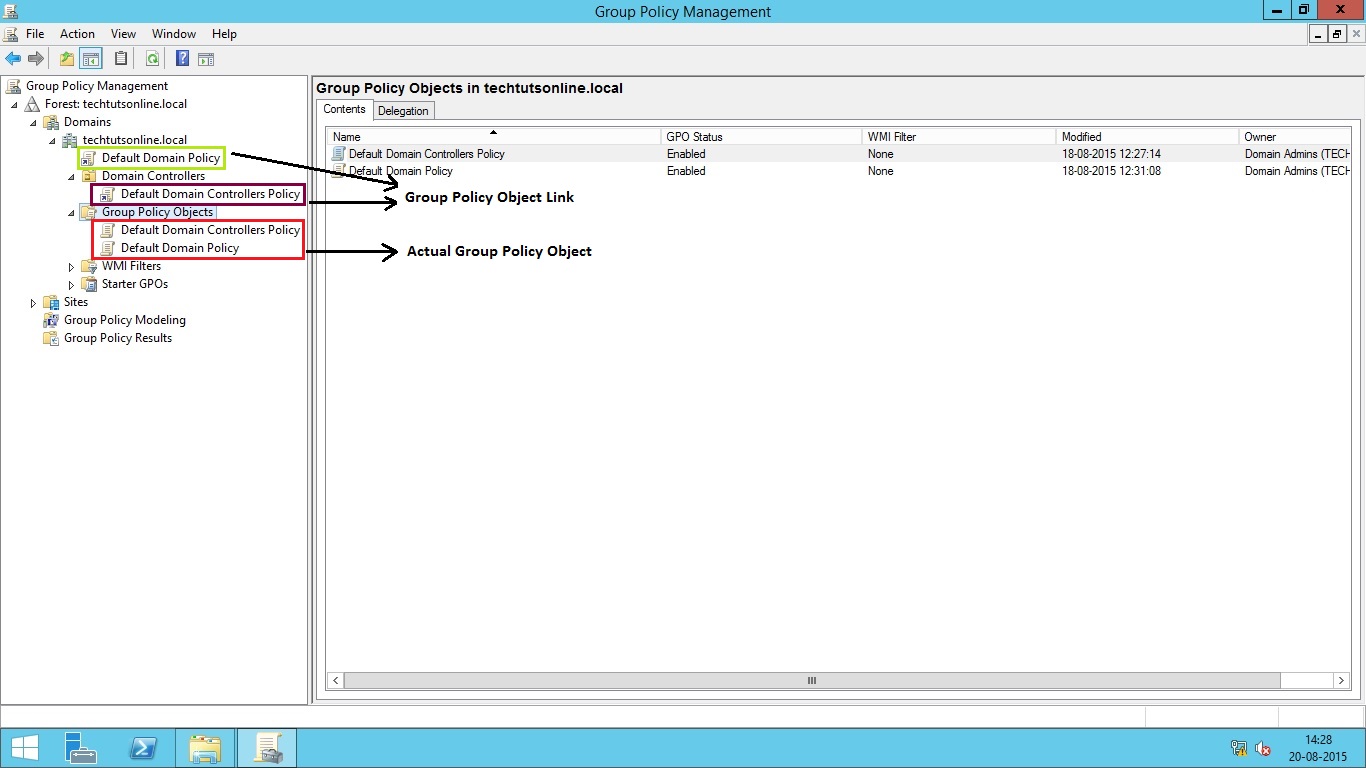
GPO and GPO Link
It is easy to confuse the link with the actual GPO that is found in the Group Policy Objects container—they are named the same, and you will see many of the same functions when you select or right-click either them. However, there are differences between the two objects. Right-clicking the link will not display any options for backing up and restoring the group policy. Right-clicking the GPO will not display the options for enabling and enforcing the link. Note the difference between the icons for the link and the actual GPO: the link has the small arrow on it.
Looking at the context menu, you will find four options to work with a link: Edit, Enforced, Link Enabled, and Save Report. If you select Edit, you are taken to the Group Policy Management Editor (GPME), where you can make changes to the settings within the GPO.
The Enforced option configures the GPO to have superhuman powers. Actually, the Enforced option configures the GPO to have the highest priority over any other GPO when there is a conflicting setting. It also allows the GPO settings to remain in effect when a Block Inheritance setting is configured beneath it in the OU structure. In other words, if you configure a GPO with the Enforced option, the enforced GPO’s settings will always take precedence over every other GPO in the hierarchy and the settings cannot be blocked.
Link Enabled allows you to control whether the GPO is configured to affect the systems or users within the location where it is linked. For instance, if you have a GPO linked to an OU, the computers and users that are placed within that OU would be affected, by default, by the settings within the GPO. If you clear the Link Enabled setting, the GPO would no longer apply at the OU. If it were linked at other OUs, the GPO would still be applied in those OUs. This is different from disabling the GPO
within the GPO settings. When you disable the GPO, it is disabled wherever it is linked. Using the context menu to turn off the link allows you more granular control over where the group policy is applied.
Finally, the Save Report option allows you to generate an HTML-based report of the settings that are configured.
Order of Precedence
You can link multiple GPOs at once to a domain, site, or OU. So which group policy will actually affect the computer or user when multiple GPOs are linked at one place? We need to discuss the order of precedence when evaluating group policies. To start off, you need to understand where a group policy can be linked. Group policies are evaluated in the following order:
- OU
- Site
- Domain
If you have a policy linked at the domain level and another linked at the site level, the site GPO settings will take precedence. The same holds true for group policies linked at an OU; conflicting entries from the OU’s GPO will take precedence over those set at the domain and site levels.
Conflicting entries mean a setting that is configured at each level. For instance, look at Figure 1.5; if you configure folder redirection at the domain level so that all users in the domain have their My Documents folders redirected to a central file server in the corporate office, and you have another group policy that is linked to an OU so that users in a branch office will have their My Documents folders redirected to the file server at the branch office, the GPO linked at the OU will take effect for all users that are placed in that OU. They will not use the settings configured in the GPO linked to the domain. So, in Figure 1.5 the Delhi Folder Redirection GPO (marked green) will take precedence over the Domain Folder Redirection GPO (marked red).
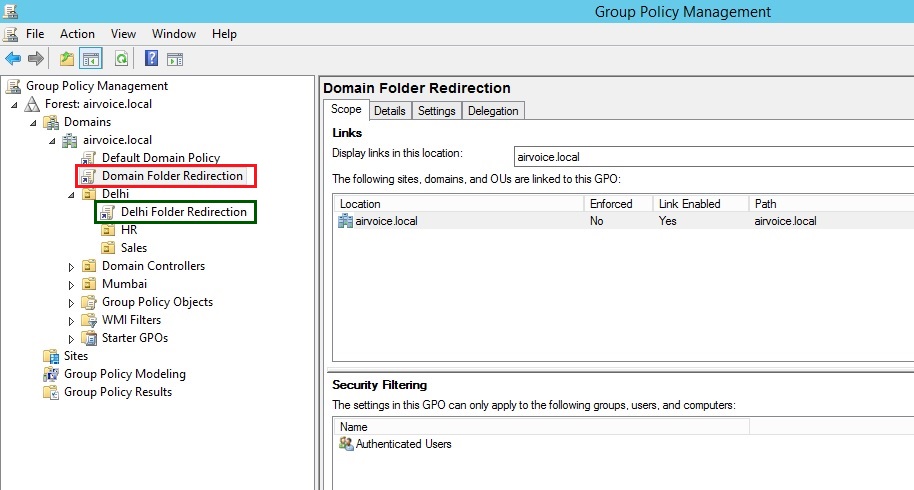
GPO Linked to Objects in Domain
When you link more than one GPO to the same object, for example on OU, you need to set the order of precedence yourself. This is an easy configuration task, but planning which policies will take precedence over others may not be as easy. Once you have decided the processing order for your GPOs, open the GPMC, create and link the required GPOs, and then select the object where they are linked. Figure 1.6 shows three GPOs that are linked at the Mumbai OU. When you select one of the GPOs from the Linked Group Policy Objects tab in the details pane, you will be able to change the link order, or processing order, by clicking the arrow to move them up or down.

Setting the Link Order
GPOs linked to the domain are processed as per link order from highest to lowest, with the lower link orders taking precedence when there is a conflict. Then the GPOs linked to the site are processed, again with the lower link number taking precedence over any conflicts within the site and with GPOs linked to the domain. Finally, GPOs linked at the OUs are evaluated the same way, with the lower order number GPOs taking precedence over any linked GPOs at the site and domain objects when there are conflicts.
Of course, we need to take this one step further. As you know, you can nest OUs to create a nice organized administrative structure. GPOs that are linked at OUs within the hierarchy take precedence over those that are linked at the parent OUs. Setting the order of precedence is easy, but planning out the GPOs that you will need, linking them at the correct object, and making sure they have the correct link order can take a lot of work.
Overriding the Default Order of Precedence
There are a few ways to alter the default GPO-processing order. Do note that if you do override the default processing order, troubleshooting may become a little more difficult. There are more steps you have to take to determine if a policy is being applied, and which policy settings are being applied. You have three options to work with when changing the default behavior: Block Inheritance, Enforced, and Security Filtering.
1). Block Inheritance: Blocking inheritance negates any of the settings that should be applied at an upper level from being applied to the object where the inheritance is blocked. For instance, in Figure 1.7 the Chandigarh (Head Office) OU has been configured to block the inheritance of any GPOs from the domain or site level. The blue exclamation mark on the OU object denotes the blocked Inheritance. At this point, only the GPO set at the OU level would be applied to the computers and users within the Chandigarh (Head Office) OU, with the exception of the account policies that are configured for the domain. You can see in Figure 1.8 the blocking of the other policies by that would occur if you selected the OU and then selected the Group Policy Inheritance tab.
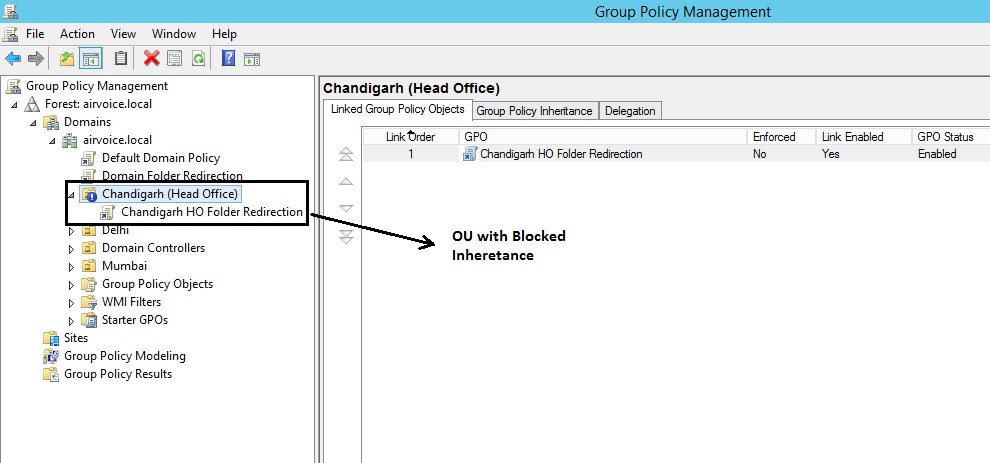
OU with Blocked Inheritance
The Group Policy Inheritance tab will only list the GPO links that will be effectively applied on users and computers under this OU. The settings of GPOs linked at Domain and Site level will be blocked from inheriting.

Viewing Inheritance
2). Enforced : When you set the Enforced option, the GPO on which you configure the setting becomes king of the hill. Essentially, you are saying that no other GPO that is processed after this GPO will take precedence when a conflict in settings occurs. The enforced GPO will also ignore any blocked inheritance settings. You are creating a GPO that will break through the blockade and become the champion over any other GPO. To Enforce a GPO, simply right click on the GPO link and select the option Enforced from context menu. In Figure 1.9 you can see that the Domain Folder Redirection GPO has been configured with the Enforced option, and the inheritance settings on the Chandigarh (Head Office) OU reflect the setting. The Domain Folder Redirection GPO icon now shows a lock symbol (marked red), and the GPO is given a precedence of 1 in Group Policy Inheritance tab (marked green).
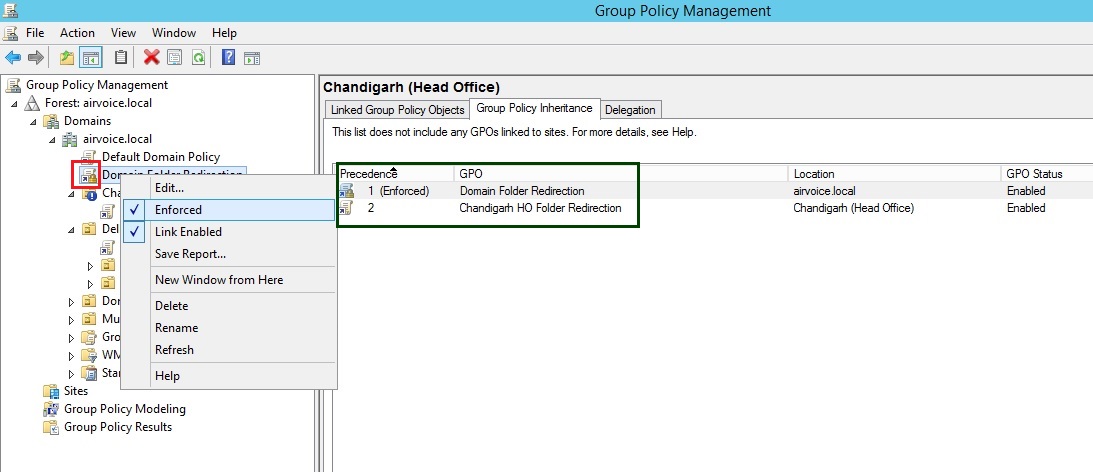
Enforcing a GPO
3). Security Filtering: By default, all of the computers and users within the location where the GPO is linked will have the GPO applied to them. But what happens if you have a user that needs to be in that OU, but you do not want the GPO to apply? In this case, you need to configure the Security filtering option. Security filtering can be applied in a couple of ways. If you select a GPO, you can manipulate the accounts that appear within the Security Filtering pane as shown in Figure 1.10. You will notice the default setting of Authenticated Users. Any user that is placed within the OU (using the Add button) is a member of the Authenticated Users group, and you cannot change that membership.
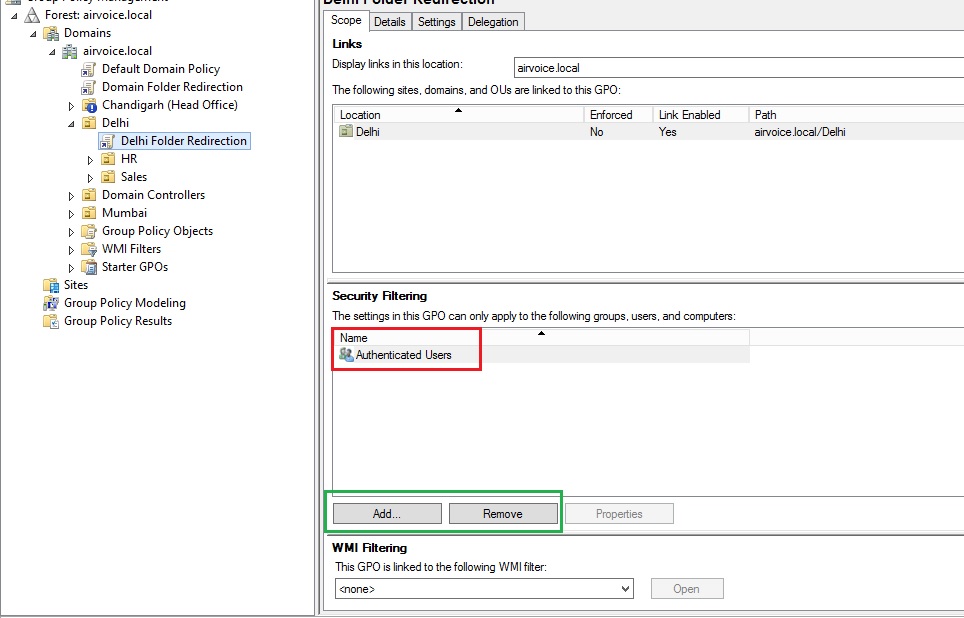
Security Filtering Defaults
You can remove the Authenticated Users group from this list and reconfigure the settings as needed, though, using the Remove button. In Figure 1.11 the security filtering has been reconfigured to include only the group membership to which we want to apply the GPO. We have removed the Authenticated Users group and added the Delhi Admins group. Now if someone inadvertently adds a user who is not a member of the Delhi Admins group to the OU, the GPO will not be applied to them.
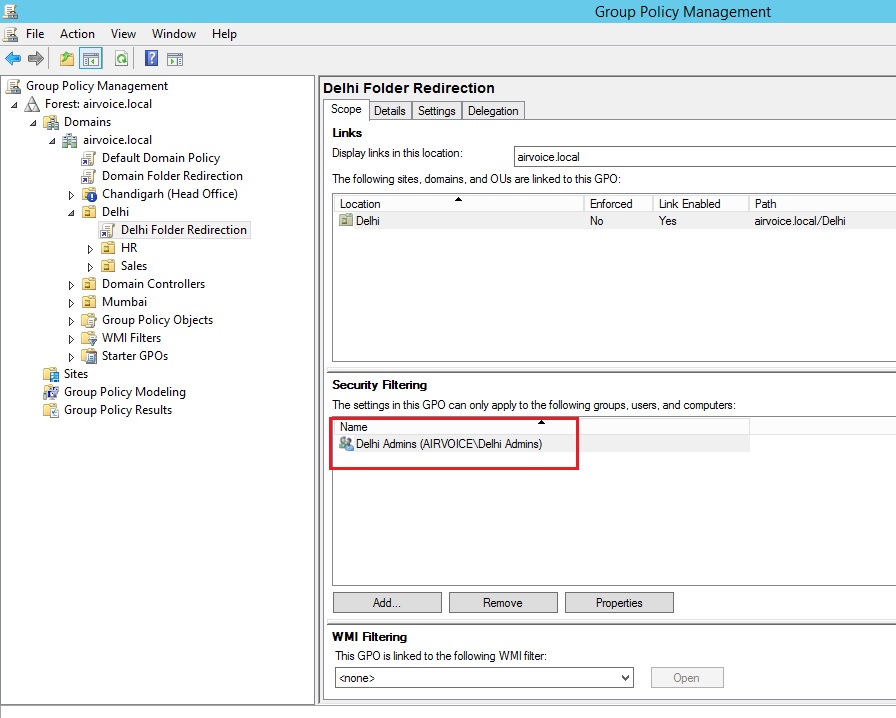
Security Filtering to Specific Group only
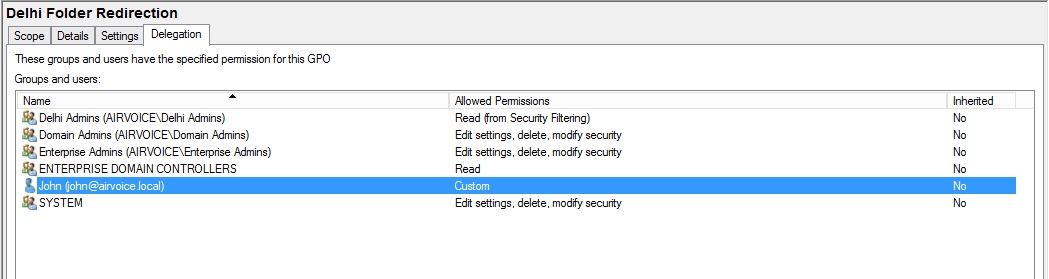
But what if you have a user who is a member of the group that you have listed within the Security Filtering pane, but you don’t want the GPO to apply? To get even more granular with your security, you need to open the access control list for the GPO and manage the permissions. To do so, click the Delegation tab when you have a GPO selected, then click the Advanced button at the bottom of the window. You will be presented with an access control list that looks like the one in Figure 1.12. Notice that a user John has been added into the list and the Read and Apply Group Policy settings have been set to Deny. Now he will not have the GPO applied to his account when he logs on.

Deny GPO to Specific User
Be careful when using the access control list to manage the GPO. When you set a Deny permission, you are overriding any Allow. If the user or group of users on which you are setting the permission needs to be able to read the GPO for administrative purposes, you will need to make sure they have the Read permission set to Allow. In our example, we were assuming the user John was not allowed to administer the GPO, so we denied the Read permission. This works out as a twofold benefit; John can manipulate the GPO and the GPO will not be evaluated when he logs on. If he did need to be able to manipulate the GPO, leaving the Read permission at Allow would let him make changes and manage the GPO if necessary. However, the GPO would still be read and evaluated even though it could not be applied to his account because of the Deny setting on the Apply Group Policy permission. Be aware that when you configure the settings within the access control list, you will not see those entries reflected within the Security Filtering pane, which could make troubleshooting a little more troublesome.
Delegation
While we are talking about the Delegation tab of the GPO, let’s take a look at what delegation does. If you select a GPO and then select the Delegation tab, up comes a list of users and groups, the permissions they are assigned, and the inheritance status of the permission. Whenever a user, computer, or group is added to the Security Filtering section, it is automatically added to the Delegation tab. Other accounts can be added and permissions can be applied so that those accounts can manage the GPO.
As shown in Figure 1.13, you can control the settings to allow just the right amount of access to manage the GPO. Anyone who needs to be able to read the GPO, whether for managing or to have the GPO applied to them, will appear with the Read permission. Read permission comes in two varieties: Read (from Security Filtering) and Read. As you may guess, when the account is added to the Security Filtering section of the Scope tab, the Read (from Security Filtering) permission is applied automatically. The other option, Read, has to be defined explicitly.
Delegation Permissions
The Edit Settings permission allows anyone who has been granted that permission to make changes to the settings within the GPO by using the GPME. The Edit Settings permission does not allow the account to make changes to the permissions on the GPO or to delete the GPO.
The final setting that you can use is the Edit Settings, Delete, Modify Security option. As it sounds, anyone who has been granted this permission can change any of the settings, modify the security on the GPO, and get rid of the GPO. Make sure the users who have this permission are well-versed in all things Group Policy before you let them loose to make drastic changes to your network.
Group Policy Template Settings
The actual settings that are applied to accounts are stored in the SYSVOL container within the Group Policy template. The easiest way to view all of the settings is to open the group policy within the GPME. Figure 1.14 shows a group policy that has been expanded to display some of the settings. Notice that there are two major sections to the group policy: Computer Configuration and User Configuration. Settings within each section control how the computer and user accounts are managed when they start up or log on.

Group Policy Settings
Computer Configuration
When the computer starts up, the settings that are configured within the Computer Configuration section are applied. The settings in this section typically are targeted toward the settings for manipulating the operating system and toward applications that are specific to the computer. For instance, the Software Settings section allows you to install software on systems, making the software available to anyone who uses the system. The Computer Configuration section of a GPO manages most of the security settings that control the way the computer and the user can access the network as well as the local system.
When you expand the Computer Configuration section of a group policy, you will find two toplevel containers: Policies and Preferences. One side note about Preferences is that they will not be found in Windows 2000 or Windows Server 2003–based Active Directory environments. They were introduced with Windows Server 2008. You can add them into a Windows Server 2003 environment as long as you have access to the Microsoft Desktop Optimization Pack for Software Assurance.
Policies section is used to control the system and maintain the settings so that an administrator can be assured that the computer is configured according to the organization’s standards. When you configure policy settings, you are, for the most part, locking down those settings so that a user cannot make changes to the settings, thus altering the way the system functions.
Preferences are configuration settings that the user can change. When using preferences, you want to configure a baseline of settings that the system will use; once changed by the user, however, the preference from the GPO will no longer be applied to the system. This allows you to configure the systems with default settings that are used when they are deployed initially, but still allow the users to have control over how they work with their computers.
User Configuration
As you might have guessed, the User Configuration section of a group policy is processed when the user logs on to the system. Settings that are found in this section typically affect only the user’s session, not settings for the system. Just as in the Computer Configuration section, there is a Software Settings container; but the settings that are applied on the User Configuration settings apply to only the current user. If you were to assign software to a user in this manner, only the user who had the GPO applied against them would receive the software; other users that use the system would not have the software available to them.
When you expand the User Configuration section you will find the same two top-level containers as in the Computer Configuration section: Policies and Preferences. You can use the policies to control the systems, and use Preferences to set the user-configured settings to an initial value.
Processing of Group Policy Objects
We have already discussed how GPOs are processed when there are multiple GPOs linked at the domain, site, and OU levels. We also need to discuss how the processing of GPOs occurs when the computer starts and the user logs on. Local Group Policies are applied first. Typically, the computer settings from the GPOs apply to the computer as it starts, and the user settings apply to the user’s profile when the user logs on. The processing of settings works remarkably well when the user and the computer are in the same OU. The same hierarchy of GPOs exists for both user and computer.
But what happens when the user’s account is not in the same OU as the computer account to which the user is logging on (which is typically the case)? As the computer starts, the computer settings in the GPOs are evaluated from the GPOs that make up the hierarchy to the OU where the computer resides. When the user logs on to the computer, the user settings within all of the GPOs in the hierarchy leading to the user’s OU are evaluated. Neither user settings for the computer nor computer settings for the user are evaluated. Earlier we mentioned that the computer user settings could be disabled. This would be a good time to start thinking about disabling the user settings for all of the GPOs that affect only the computer, and disabling the computer settings for GPOs that affect only the user.
But it’s not always be as simple as that. What if you want to control a user setting on a computer so that you can restrict a profile option for anyone who may log onto that system? Take for instance a computer that is used as a kiosk system. You want that system to be completely locked down so that none of the configuration options can be seen and only a specific program can run. No one should be able to perform any actions on the system except running that one program. The settings that control the profile for the user settings are stored in the user section of the GPO. If a user were to log on to the kiosk, that user’s settings would apply to his or her profile, which you don’t want to happen.
In the Computer Configuration options there is a setting for loopback processing. Loopback processing is used to force the user settings from the computer’s GPOs to take precedence over the user settings from the user’s GPOs. To do this, the computer’s computer settings are applied at startup and the user’s user settings are applied when the user logs on, but the computer’s user settings are applied before the user is presented with a profile.
There are two settings available for loopback processing: Merge and Replace. When Merge is used, the settings are merged between the user and computer GPOs. When there is a conflict between the user’s user settings and the computer’s user settings, the computer’s user settings will take precedence. When Replace is used, the user’s user settings are completely ignored in favor of all of the settings within the computer’s user settings.
Periodic Group Policy Processing
Periodic processing is one of the nicest capabilities of group policies. We know that a GPO is applied to a computer when it starts and to a user when the user logs on. But that is not the last time the GPO is applied. To make sure that the computer settings and the user profile have the latest settings and that the settings remain enforced, GPOs are processed and applied periodically. This reevaluation is called the refresh interval. By default, the refresh interval is 90 minutes plus a random value that can be as much as 30 minutes. Thus one computer could have a refresh interval of 98 minutes, and another could have a refresh interval of 112 minutes. This random offset frees the network and domain controller from having all of the systems and users refreshing their GPOs at the same time. As with nearly anything else within group policies, the refresh interval can be configured to meet your needs.
Editing Group Policy
Group Policy templates are the parts of the GPO that are stored within the SYSVOL container of domain controllers, and the parts of the GPO that the GPME can manipulate. When you are editing group policies, make sure you plan how and when you will make the changes. Any change that you make to a GPO goes into effect immediately. Of course, chances are that you will not see the change affect a system as soon as you make it, but the change will be available the next time the periodic processing cycle runs. Many of the settings that we discussed in the previous section can be manipulated with the Group Policy Management Editor (GPME).
In versions of Active Directory prior to Windows Server 2008, the Group Policy Object Editor was the only mechanism to work with group policies unless you installed the GPMC. Therefore, most of the settings for the container as well as for the template were exposed from this console. There are a few exceptions, however, such as the filtering options. To work with the links for the GPO, you had to use either Active Directory Users and Computers or Active Directory Sites and Services. The GPMC allowed you to work with all aspects of GPOs and made them easier to manage.
In Windows Server 2008, the GPMC is included with the base installation and does not have to be installed as a separate product. The Group Policy Object Editor has been replaced by the GPME, although most of the functionality is the same in both products.
Using Group Policy Management Editor
The Group Policy Management Editor (GPME) allows you to directly edit a group policy and configure the settings that will affect computers and users. You can open up the GPME by right-clicking any of the group policies within the GPMC and selecting Edit. The group policy that you selected will appear within a new window. Figure 1.15 shows a group policy open and ready to be edited. We have already talked about the sections you can work with— Computer Configuration and User Configuration. So we will move on to some of the settings that you can manipulate.

GPO Open for Editing
Managing Settings
The settings you can manipulate come in a few flavors. Depending on what a setting does, you will be presented with different configuration options. The most basic of the settings simply enable or disable an option. More advanced settings allow you to configure the values that will be used. Figure 1.16 shows a simple policy item that can be either enabled or disabled. The Not Configured option is default which keeps the setting unchanged.
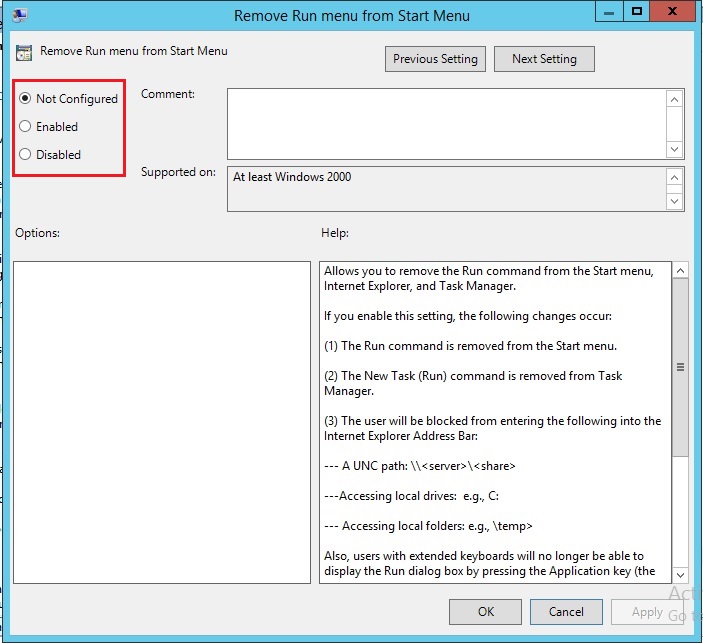
Example of Enable Disable a Setting
Figure 1.17 displays a setting that has more information that you can enter when enforcing a policy.
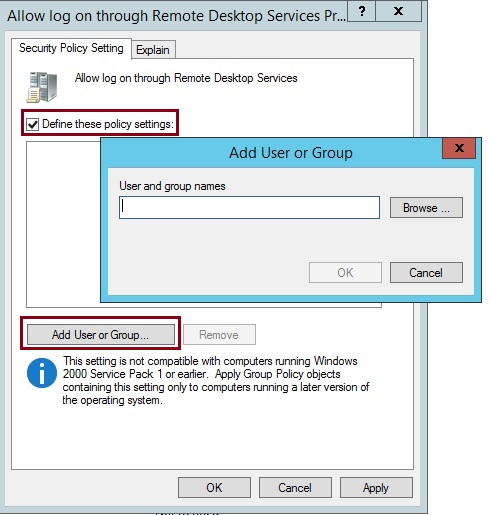
Setting with more configurable options
Filtering Administrative Templates
Those who have worked with group policies know that one of the hardest things to do is find the correct group policy setting to use when managing systems. Because there are hundreds of configurable settings, it can be overwhelming to find the one setting you need to configure. Microsoft has always offered the Group Policy Settings Reference, which is a spreadsheet you can use to find the settings you want to work with. The spreadsheet was configured with easy search options that allow you to filter out any non-matching options. But this required you to leave the Group Policy Object Editor and open up the spreadsheet to find the setting, then go back to the Group Policy Object Editor and follow the path to the setting. Included in the GPME is an administrative template filter. You can essentially hide any of the settings that do not meet the filter criteria, making it easier to find settings directly within the editor.
Right-clicking any of the containers within Administrative Templates under either Computer Configuration or User Configuration displays two options on the context menu: Filter On and Filter Options, as shown in Figure 1.18. Selecting Filter On applies the current filter settings to the administrative templates. Clearing Filter On returns the view to the default, which displays all of the administrative template settings.
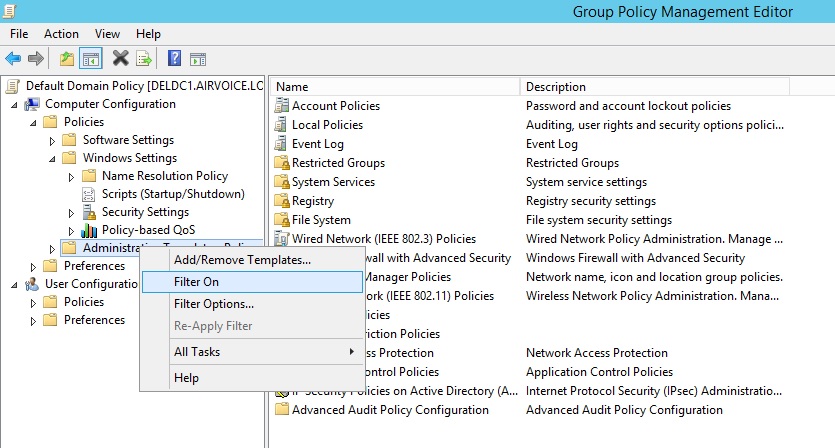
Filter GPO Options
You will see a window that looks like Figure 1.19.
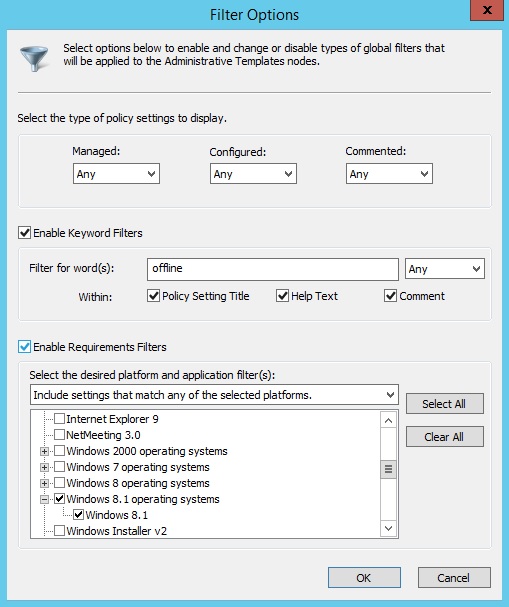
Filter Configuration
The three sections help you create the filter that you will use to view the configuration settings. The first section allows you to search for settings that meet just basic criteria: Managed, Configured, and/or Commented. Managed settings make changes to registry settings. Configured settings are those that are set to either Enabled or Disabled. Commented settings are those that have entries within the Comments section.
The second section allows you to search for keywords within the settings. Once you enable this section, you can type in keywords to search for and the search parameters. You can select to search in the title, in the explain text, and/or in the Comment sections of the settings. Using keyword filters, you can perform a very powerful search through the settings.
The final section allows you to limit the operating-system and application criteria through which you are searching. If you are looking for settings that apply to only Windows 8.1 systems, you can simply select the Microsoft Windows 8.1 Family option, and settings that apply to any version of Windows 8.1 will appear.
After we configure the filter, we have turned on the filter setting, and as you can see in Figure 1.20, the policy settings that meet our requirements are shown.
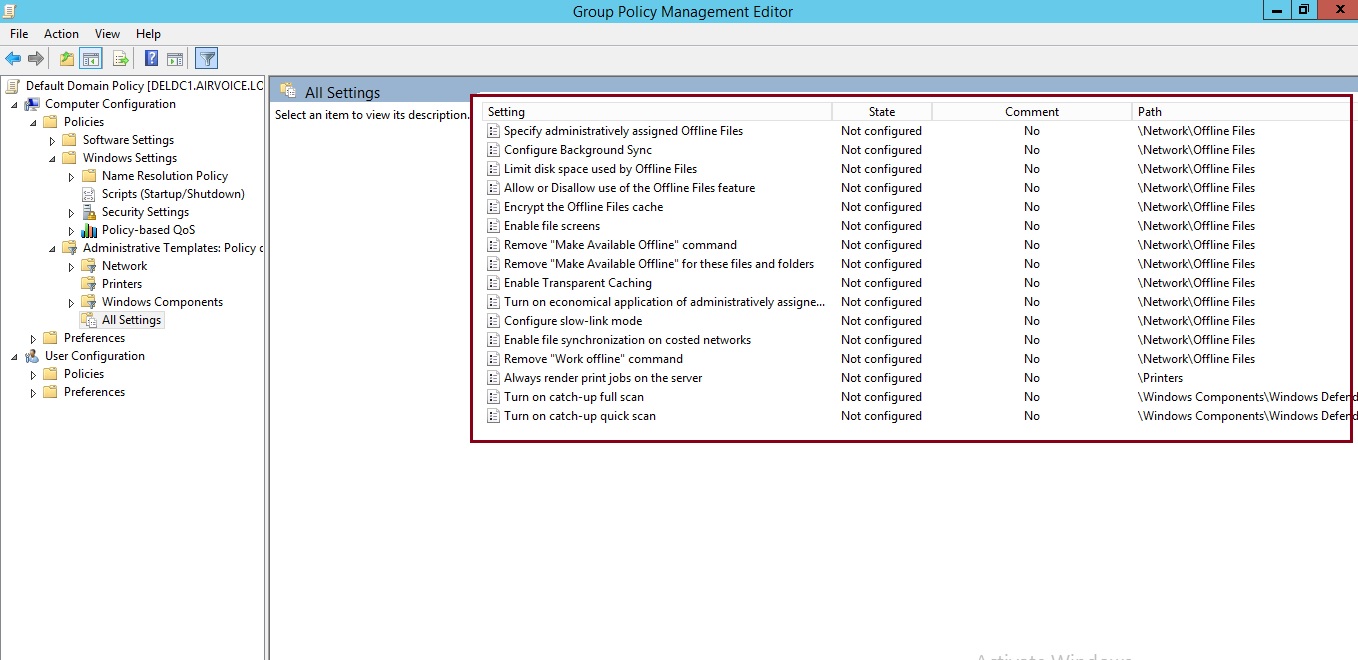
Viewing the results of Filter
Policies and Preferences
Earlier we discussed the fact that an administrative template is made up of policies and preferences. Policies have always been available in Active Directory. Preferences were originally added through a product called PolicyMaker, which Microsoft acquired. You can now manage preferences natively within the Group Policy Management Console included with Windows Server 2008, or the with Remote Server Administration Tools. Using both of these constructs allows you to manage your organization’s resources better than if you had only the policies in place.
The main difference between policies and preferences is the way that they are applied. Policies are mandated settings that users are not allowed to change. This is accomplished by writing the settings for the policy in the Policy branches of the registry. These branches are protected by permissions that do not allow standard users to access them. Once the settings are applied in the registry, applications that are group policy–aware will review the Policy branches of the registry for enforcement settings. If a given setting is not configured by a GPO, the application will look to the standard registry branches for application-specific settings.
Preferences are not written to the Policy branches, however. Policy settings are written to the same registry locations that the applications and operating system use. Because these branches are not locked down by permissions, users can make changes to the settings through the operating system management tools, through the applications themselves, or even through some registry tweaks. As an added bonus, applications do not have to be group policy–aware to take advantage of preferences, because they don’t need to understand how to access the Policy branches of the registry.
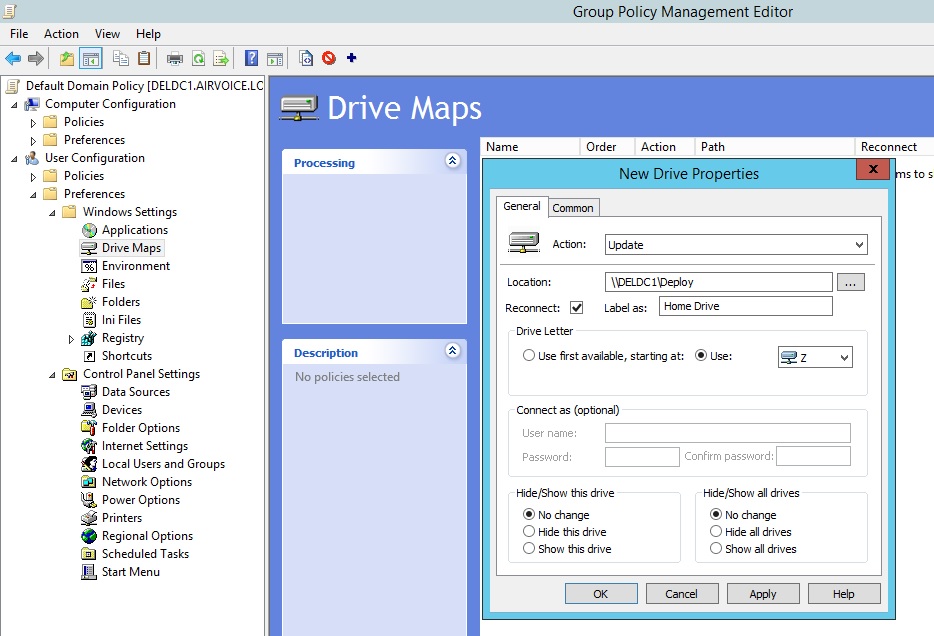
Drive Mapping using Preferences – General Tab
Both policy and preference settings are refreshed according to the refresh interval, but you have the ability to specify that a preference setting will not refresh. This way you can allow users to make changes to their systems, and the settings will not be overwritten when the refresh occurs. If you look at Figure 1.22, you will see the setting for Apply Once and Do Not Reapply that can be configured within the Common tab.

Drive Mapping using Preferences – Common Tab
There is also a check box labeled Item-Level Targeting. When you select this option, the Targeting button becomes available. Clicking the button will activate a window, shown in above Figure 1.22, that allows you to create a filter. This filter is used to identify the computer account or user account to which the preference will apply. This is quite different from policies. With preferences, each preference item you create can have a different filter.
As shown in Figure 1.23, you can new Power Plan the filter using Preferences. Choosing the Item Level Targeting option as shown in Figure 1.24, you can select the options that if the target computer is a notebook and is docked or not.
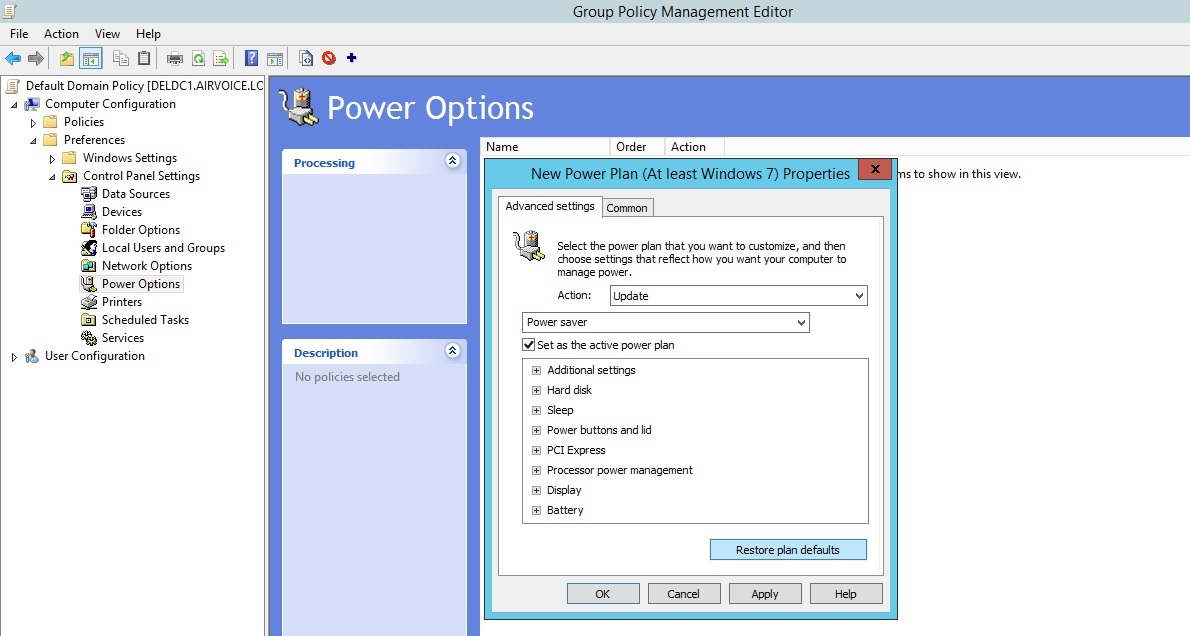
Set New Power Plan for Portable Computers
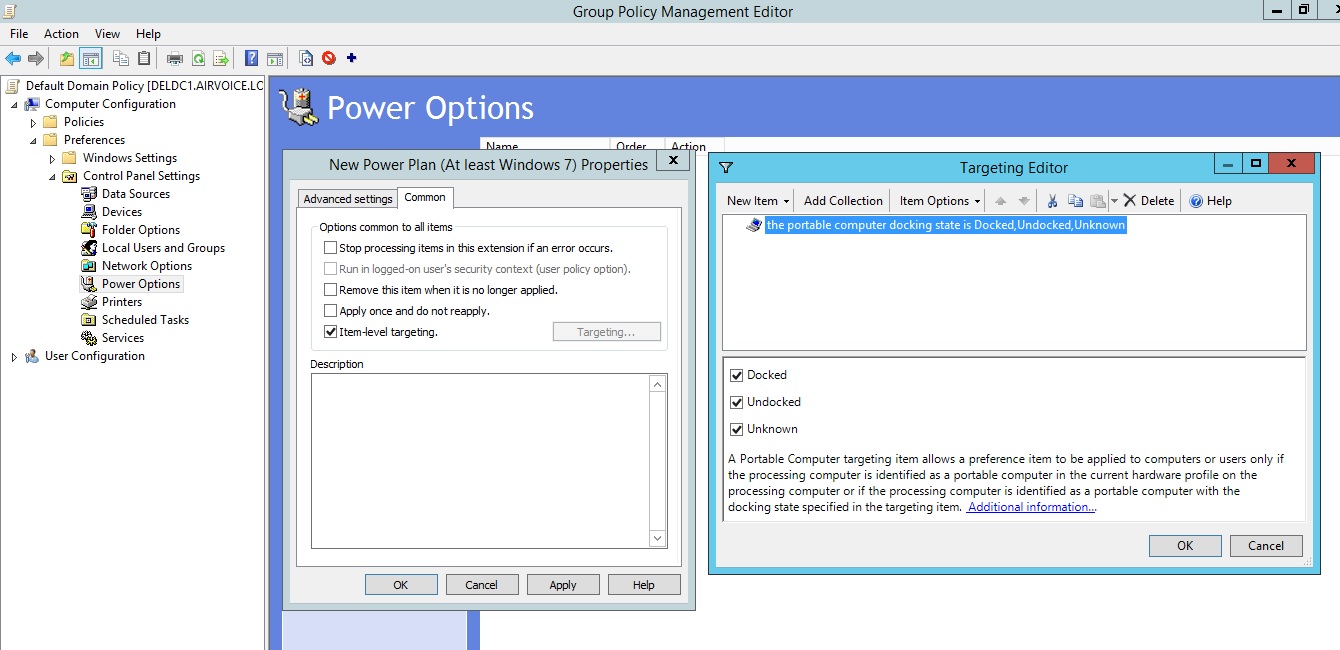
Set New Power Plan for Portable Computers
Backing Up and Restoring Group Policy Objects
As you do with anything else within your infrastructure, you need to safeguard all of the group policy settings you have put into place. This means you need to back up the group policies and have the backup available to restore if needed. Any good backup program will back up the container as part of the Active Directory backup, and the template will be backed up when the SYSVOL is backed up. Having these two components stored in different locations makes for a slightly more difficult restore. Both components need to exist for the GPO to work properly.
The GPMC has its own backup component that will allow you to back up both parts of the GPO and restore them when necessary. Using the backup option from within the GPMC allows you to back up GPOs and store them in a convenient location. When you need to restore the GPO, you don’t have to worry about finding the correct backup set from the backup utility your organization uses, you can simply go to the network location where you keep your GPO backups.
You can back up GPOs in two ways: all GPOs at once, or individually. If you right-click on the Group Policy Objects container within the GPMC, you will see the option Back Up All as shown in Figure 1.25.

Backup Group Policy Objects
To restore any GPO, right click on to the name of GPO and select Restore from Backup as shown in Figure 1.26.
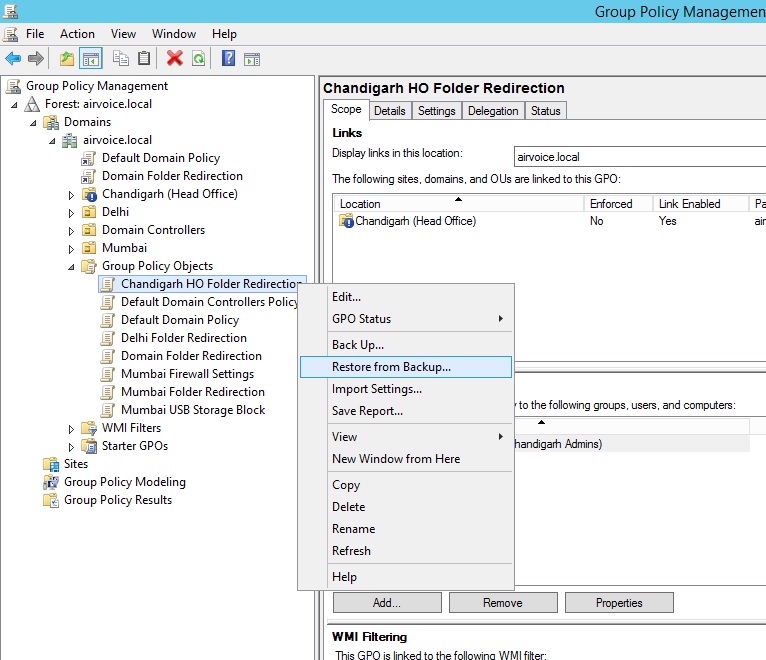
Restore Group Policy Object
Managing Group Policy in Your Environment
Being able to determine what might happen when you link a GPO to a domain, site, or OU might not sound difficult, but what if you are in an environment where you have several hundred GPOs and hundreds of users and computers spread out through many OUs? As your environment grows and becomes more complex, you may have a difficult time documenting all the settings for the GPOs and figuring out the correct processing order, depending on where the user and the computer are located.
If you have the ability to create GPO “templates,” you can save yourself a lot of time and headaches. In Windows Server 2008 and above, you can use the new Starter GPOs to create these template files. Essentially you are configuring settings that will be applied to other GPOs when they are created so that you don’t have to invest additional time in recreating settings that should be applied to other GPOs that you are creating.
At the bottom of the GPMC are two nodes: Group Policy Modeling and Group Policy Results. Using these two tools, you can determine not only what happened the last time a user logged onto a computer, but also the effects of changes you’ve made to your organization. Group Policy Modeling allows you to evaluate changes before you make them. Group Policy Results will display the settings that were applied the last time the computer started and the user logged on.
Starter GPOs
Starter GPOs were introduced with Windows Server 2008. The basis of Starter GPOs is that you may have a baseline you want to start with for GPOs you create. So instead of having to enter the same information in every GPO you create, you can enter the common information into a starter GPO and then use it as the template for others. And you are not restricted to having a single starter GPO; you can create as many as you need within your environment.
As you can see in Figure 1.27, when you first select the Starter GPOs container, the button labeled Create Starter GPOs Folder appears. You have to create a folder to host the starter GPOs. After you click the button, the Starter GPOs container shows the starter GPOs that you create, as well as the delegations that you configure. Delegations indicate which users have the ability to manipulate the starter GPOs. Figure 1.28 shows the Starter GPO for Delhi.

Starter GPOs
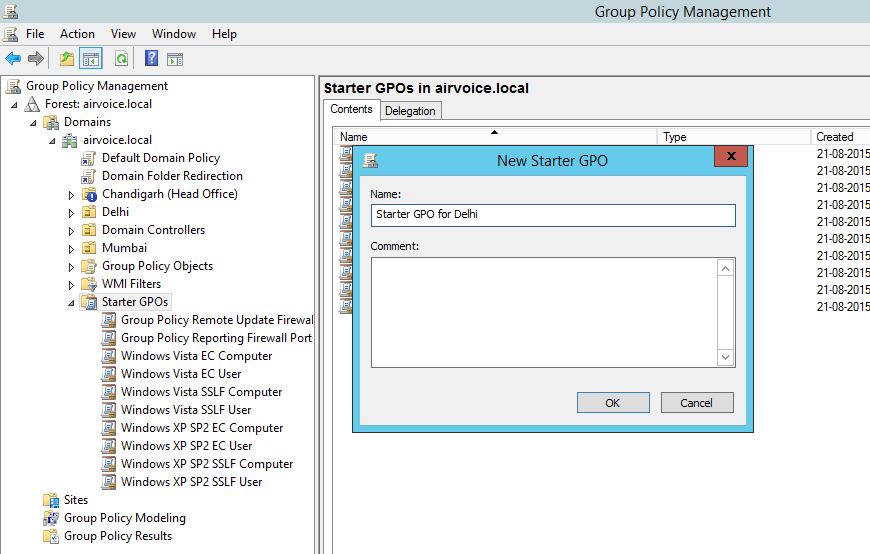
Starter GPO for Delhi
When you right-click a starter GPO and choose the Edit option, you are presented with a Group Policy Management Editor, just as if you were editing a GPO. However, there are not many settings you can manage from starter GPOs. As a matter of fact, you can edit only the Administrative Templates settings, as shown in Figure1.29.
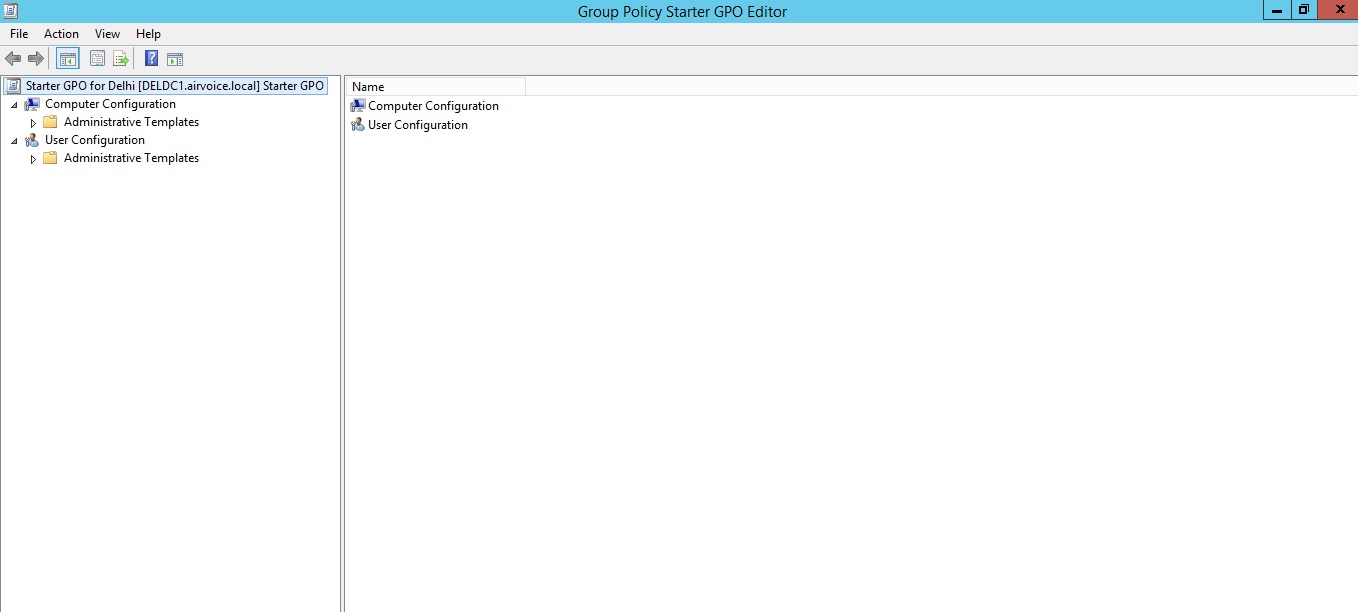
Group Policy Starter GPO Editor
Once you have the starter GPO created, you can use it as the basis for GPOs that you use within your environment. Figure 1.30 shows the dialog that appears when you create a new GPO. Notice that you can specify a starter GPO that you will use for the initial settings included in the new GPO. The newly created GPO from Starter GPO already contains the specific settings. You have not to configure the same basic settings again and again for your environment.

Creating New GPO from Starter GPO
The Starter GPOs container becomes powerful in the export and import area. If you create a set of starter GPOs that you want to use in multiple domains or forests, you can use the Save As Cabinet button to export the starter GPO. Once you have saved the starter GPO, you can import it by using the Load Cabinet button. This way, you don’t have to re-create the starter GPO in each domain and forest in your environment.
Group Policy Modeling
If you have ever wondered whether moving a user or computer to a different OU would cause some unforeseen problems, you find out by testing changes without actually introducing them. The Group Policy Modeling tool can be used to evaluate changes you want to make. The results can then be reviewed so you can determine whether your changes will work or if they need to be modified.
Right-clicking the Group Policy Modeling container and selecting Group Policy Modeling Wizard will present you with a wizard that will step you through defining the change you want to make. After you click Next to go past the splash screen, you will see the first page of the wizard, as shown in Figure 1.31. Here you can specify the domain controller you want to use when you are running the model. By default, the Any Available Domain Controller Running Windows Server 2003 or Later option is specified. If you use this option, a domain controller within the site in which your system is located will be used to evaluate the model. You can choose another domain controller by selecting the This Domain Controller option and then selecting from the list the domain controller you want to use.
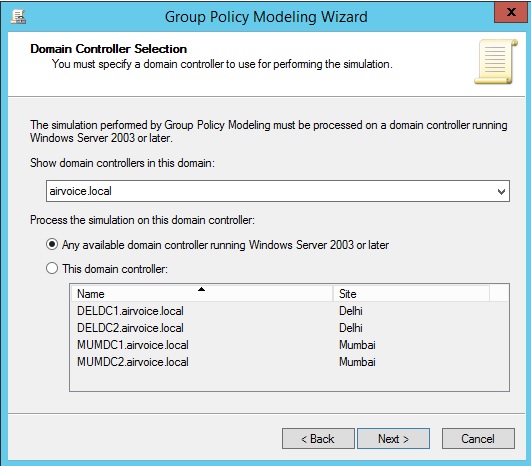
Selecting a Domain Controller
On the next page you’ll select where the user and computer are located within the domain. You can select a container to evaluate what would be applied for any member of the container, or you can select a specific user and/or computer to evaluate. If you leave the option set to Container, you can browse to an OU or container where the account is located by clicking the Browse button and navigating to the correct location, as seen in Figure 1.32.
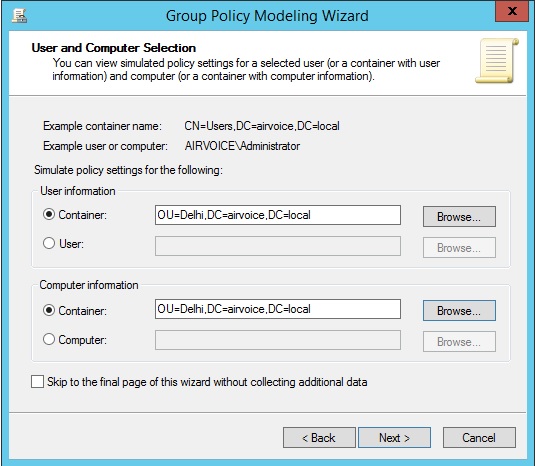
Selecting a Container for User and Computer Information
If you want to specify an account, you can select the User or Computer option and then locate the appropriate account by using the Browse button that appears.
The next page, Advanced Simulation Options, shown in Figure 1.34, allows you to configure special settings that might be configured for a GPO. The first, Slow Network Connection, will show the processing applied when a slow network connection is detected. Within your group policy settings, you can specify the connection speed that is considered slow, as well as the processing options that will be ignored when the slow connection is detected. If you want to see what would be applied and what would be ignored, select this check box.

Advanced Simulation Options
The second setting allows you to evaluate what would happen if loopback processing were turned on. The radio buttons that appear allow you to configure the loopback processing simulation for replace or merge. The final setting allows you to determine what would happen if you placed the computer within a specific site. The drop-down contains all of the sites available within the forest.
The next page, Alternate Active Directory Paths, is the page you will use to simulate moving a user to a new container. If you want to see what would happen if you moved a user from the Users container to an OU, click the Browse button and select the OU into which you want to move the user. If you change your mind, you always have the handy Restore to Defaults button that will reenter the account’s current location.
The next two pages allow you to change the group membership for accounts. The first of the two pages (shown in Figure 1.36), User Security Groups, can be used to add the user’s account to a group as well as remove the user from existing group membership.
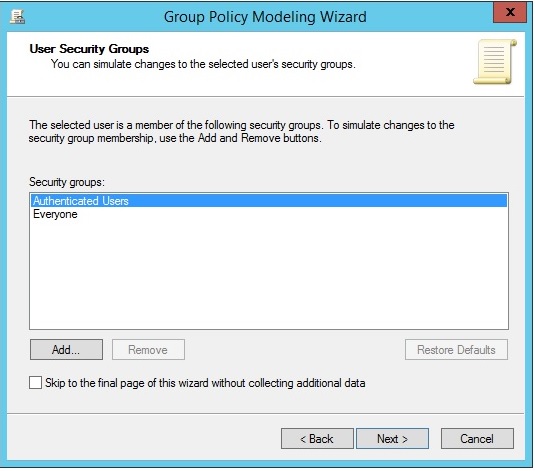
User Security Groups
The next page that follows allows you to do the same for the computer account as shown in Figure 1.37. You can use the Add and Remove buttons to modify the simulated group membership and the Restore Defaults button to return the account membership to the original settings.

Computer Security Groups
The WMI Filters for Users page that appears next, shown in Figure 1.38, allows you to specify WMI filters that are linked to the users in the selected container or to the user you have selected. The next page does the same thing for computer accounts. WMI filters allow you to specify the criteria the account has to match to have the GPO apply. A simple example of this is a WMI filter that determines if the computer has enough free space to install an application. If the account does not meet the criteria specified on the WMI filter, the GPO will not be evaluated or applied to the account.
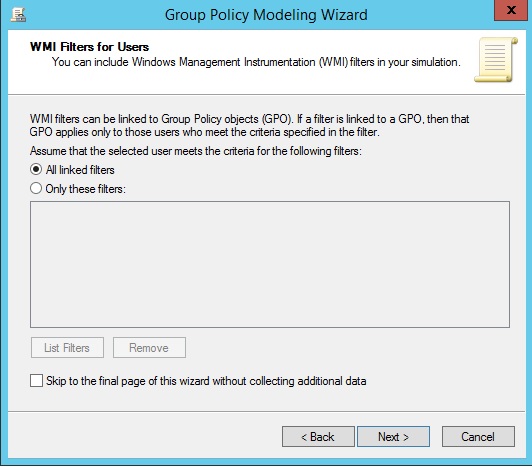
Choosing WMI Filters
The final page of the wizard, seen in Figure 1.39, presents a summary of the settings that you had just configured. You can review this information to determine if you made the correct changes to the settings. If you are done, you can click Next to run the simulation and generate a report. After clicking Finish to end the wizard, the report will give you insight about what would happen when the accounts are moved to different containers or an account is created within a container. The Summary tab displays the settings that were used to generate the modeling report.
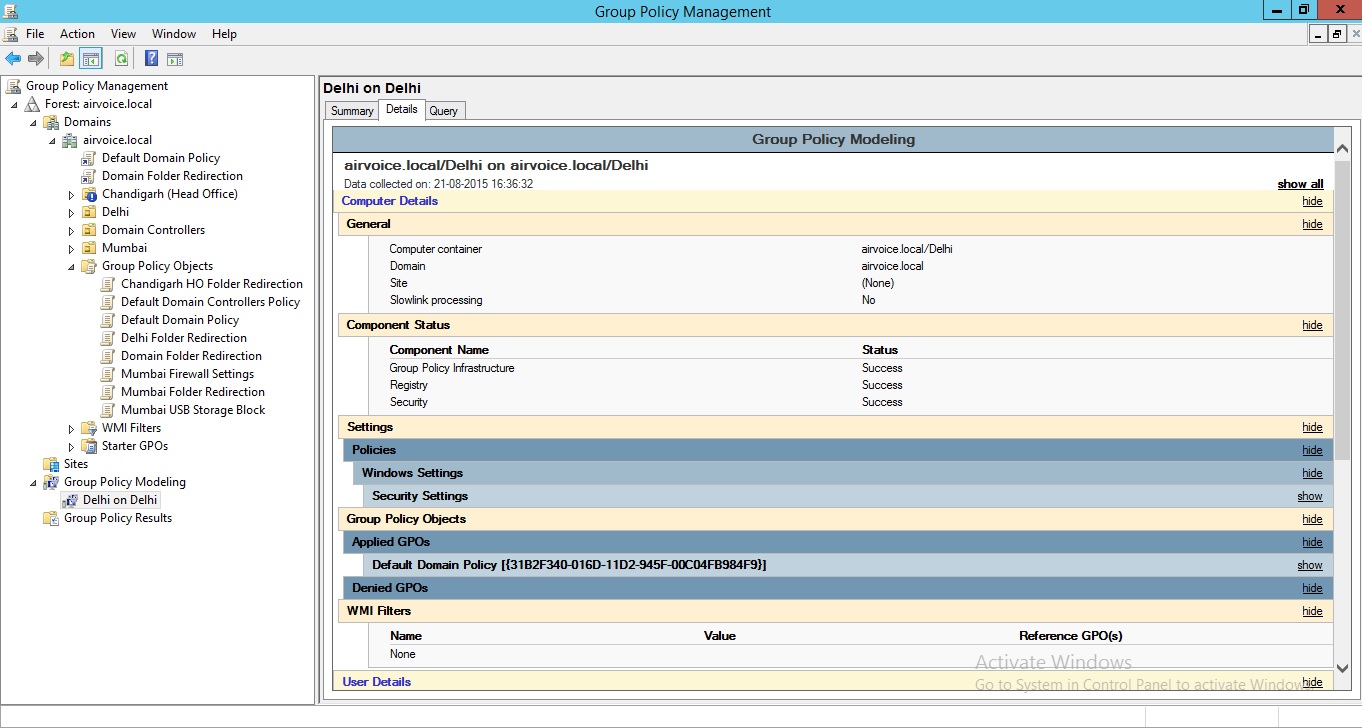
Group Policy Modelling Report
Group Policy Results
If you right-click on the Group Policy Results container and select Group Policy Results Wizard, you will be presented with a wizard that allows you to specify a user and/or computer and then to view the settings that were applied the last time the computer started and the user logged on as shown in Figure 1.40.

Selecting a User to Query
After clicking the Next button on the wizard’s welcome page, you are presented with a page that allows you to specify the computer you are going to evaluate. You can choose the computer you’re currently logged on to, or you can specify another computer within the domain as shown in Figure 1.41.

Selecting a Computer to Query
Notice that you can click the check box for Do Not Display Policy Settings for the Selected Computer in the Results. Selecting this option will bypass evaluating the settings that were applied to the computer. You may want to select this option if you are concerned only with reviewing the settings that were applied to a user.
Once you’ve chosen the accounts, a summary page is displayed. After you click the Next button, the computer is queried and the user’s profile is reviewed. The results are then displayed in a report that you can review as shown in Figure 1.42.
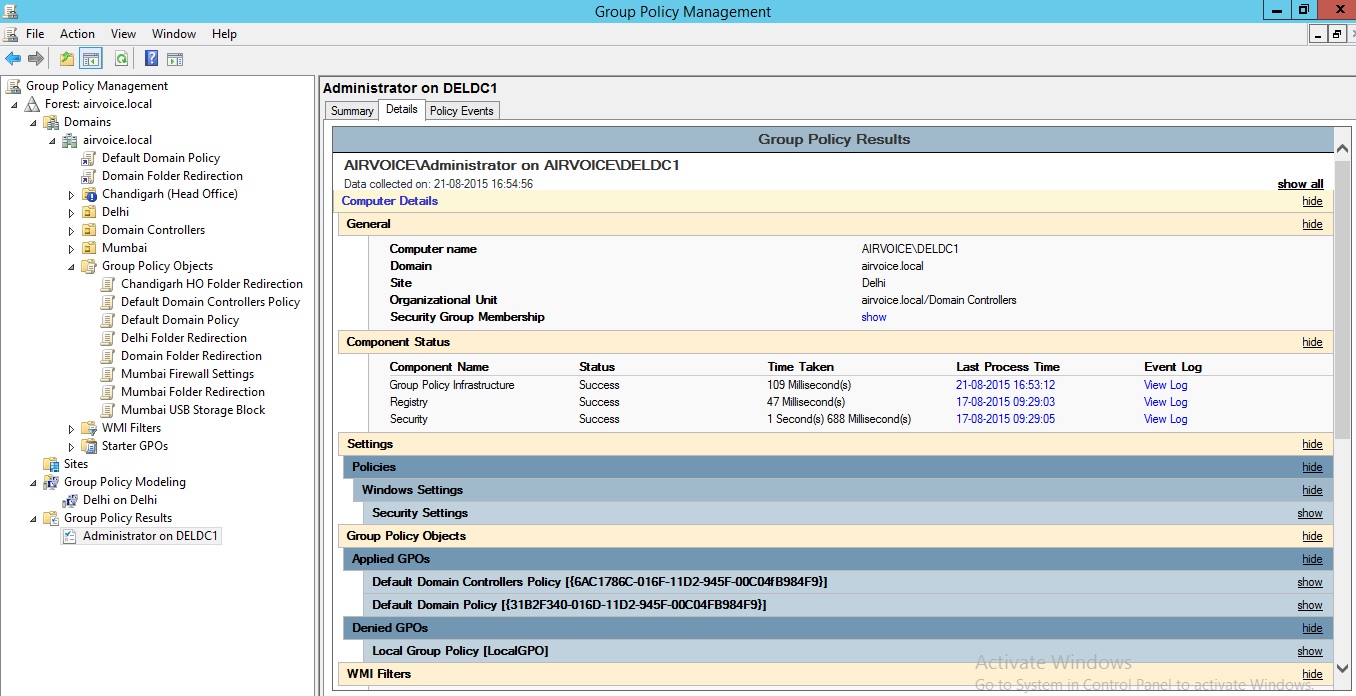
Group Policy Results Details