
- August 17, 2015
- Posted by: Surender Kumar
- Category: Windows Server
Active Directory in Windows Server 2012 R2
Table of Contents
If you are already familiar to the process of promoting a server to domain controller, you would be surprised to know that DCPROMO (legacy domain controller promotion) tool is now deprecated in Windows Server 2012 and above. Now you can do this using Server Manager or via Windows PowerShell. Another important fact I would like to mention is that the PowerShell remoting is enabled by default in Windows Server 2012. So, you can now use PowerShell remoting to start Active Directory Domain Services (AD DS) deployment process right from one server and without logging into other remote servers.
I will show you how to install active directory domain services using Server Manager GUI as well as using PowerShell. Remember that if you come across to a server core installation which do not have GUI installed, you have to complete the whole process using Windows PowerShell.
Active Directory Deployment using Server Manager GUI
To deploy the first Windows Server 2012 or Windows Server 2012 R2 domain controller in a new forest, you can run Windows PowerShell commands directly on the server by either logging on locally to the server or by using Remote Desktop. Another option is to use Windows PowerShell remoting, which enables you to run Windows PowerShell commandlets (cmdlets) on one or more remote computers simultaneously by using the WS-Management protocol. In this section, I am going to show you the process using Server Manager.
Before starting, configure the static IP address and DNS address on each server. Make sure all of your Servers which you are going to promote to domain controllers can communicate (ping) each other. You may need to modify the Windows firewall on your servers.
Best Practices for DNS settings on Domain Controllers
- In single DC/DNS in a domain environment, DC/DNS server must point to its private IP address (not to loopback 127.x.x.) as preferred DNS server in TCP/IP property.
- If multiple DCs/DNS servers are in a domain environment, recommendation to have all DCs point to their own private IP address in preferred DNS server field and other DNS server in alternate DNS server field. Add 127.0.0.1 (loopback) as tertiary DNS server entry (in Advanced settings).
- Each DC must have one IP address and one network adapter is enabled (disable unused NICs).
- IPv6 should not be disabled on DC’s NIC card. Set it to “obtain IPV6 address automatically” and “obtain DNS server address automatically”
- If multiple NICs (enabled and disabled) are present on server, make sure the active NIC should be on top in NIC binding.
- Contact your ISP and get valid DNS IPs from them and add it in to the forwarders, Do not set public DNS server in TCP/IP settings of DC.
Once the above settings are done and all servers can ping each other, you begin the deployment process. Follow the steps shown below to install Active Directory in Windows Server 2012 R2:
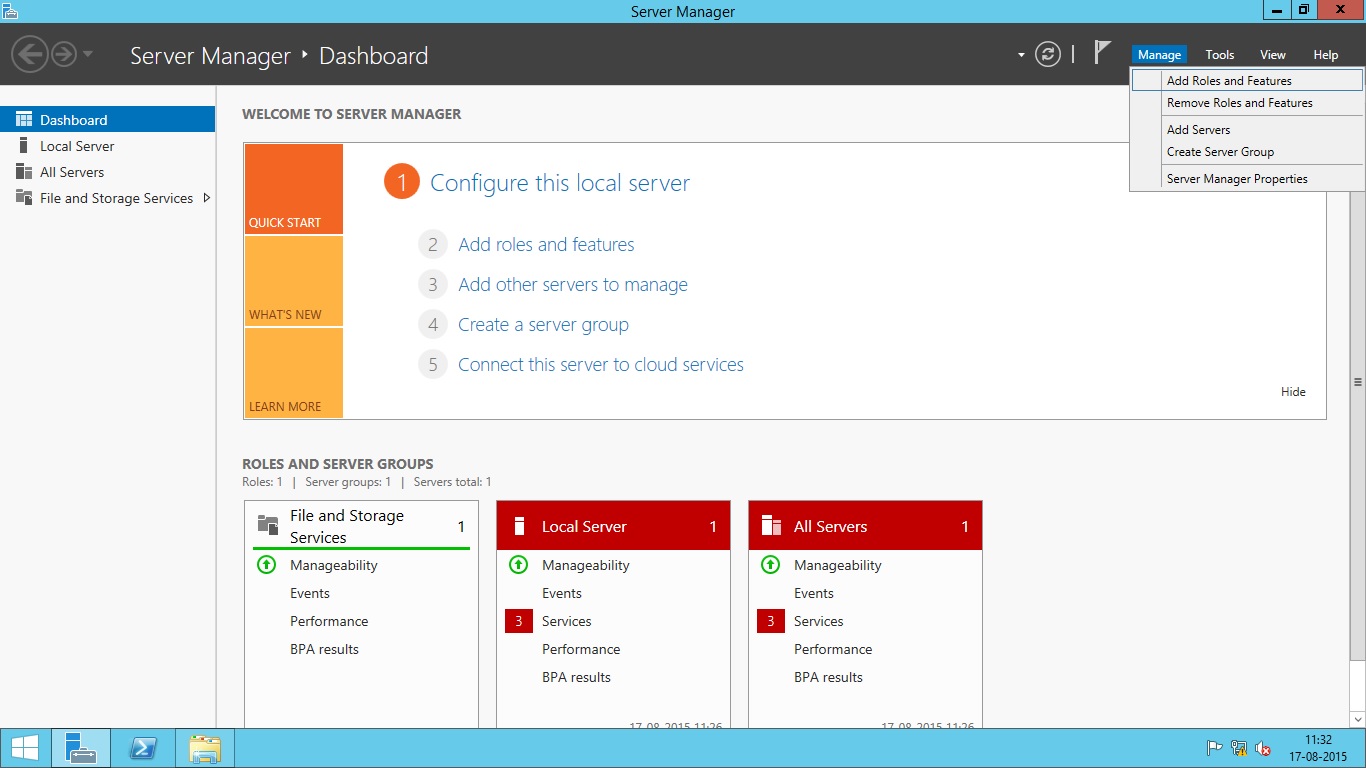
- Open Server Manager.
- Click Manage drop-down and then select Add Roles and Features option as shown below.
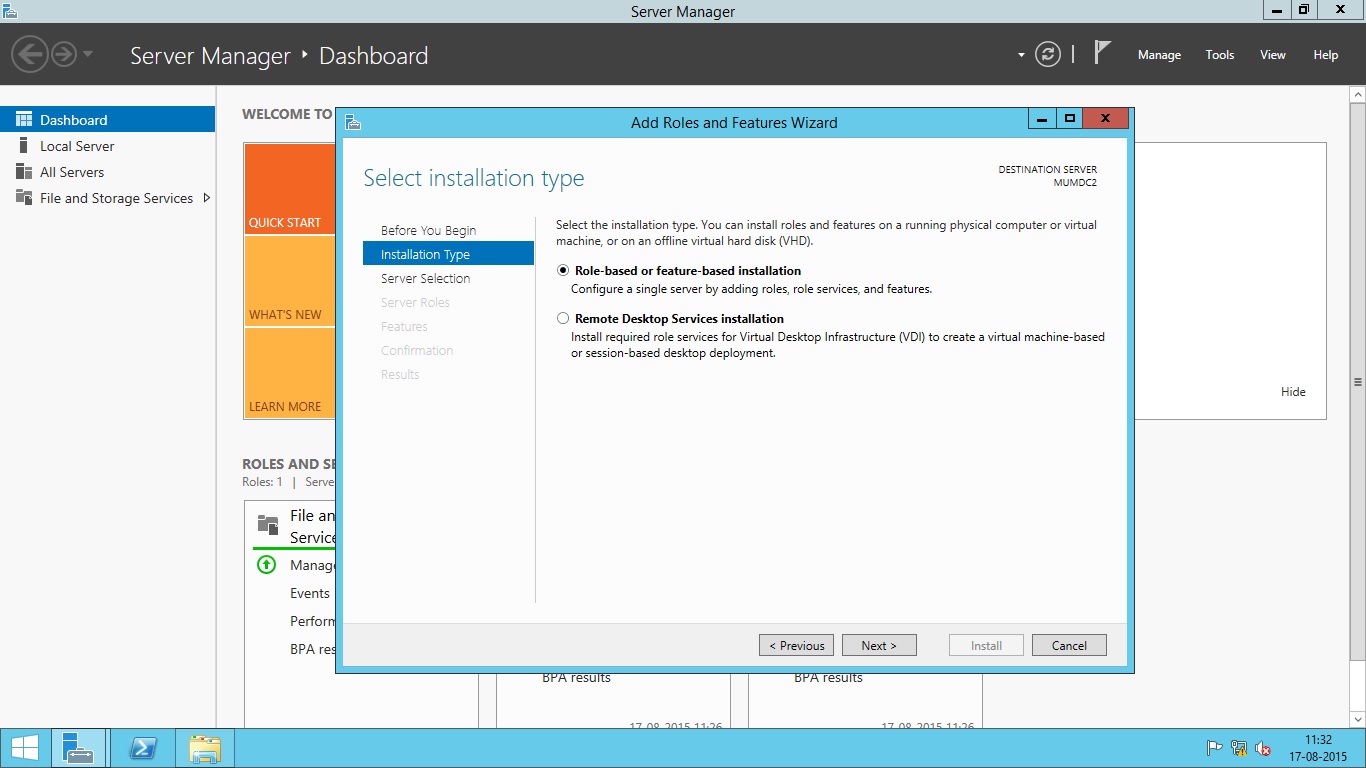
- Press Next on welcome screen and select Role-based or feature-based installation under Installation Type screen and then click Next.
- Select a server from pool. Make sure the server you want to promote is selected then click Next.

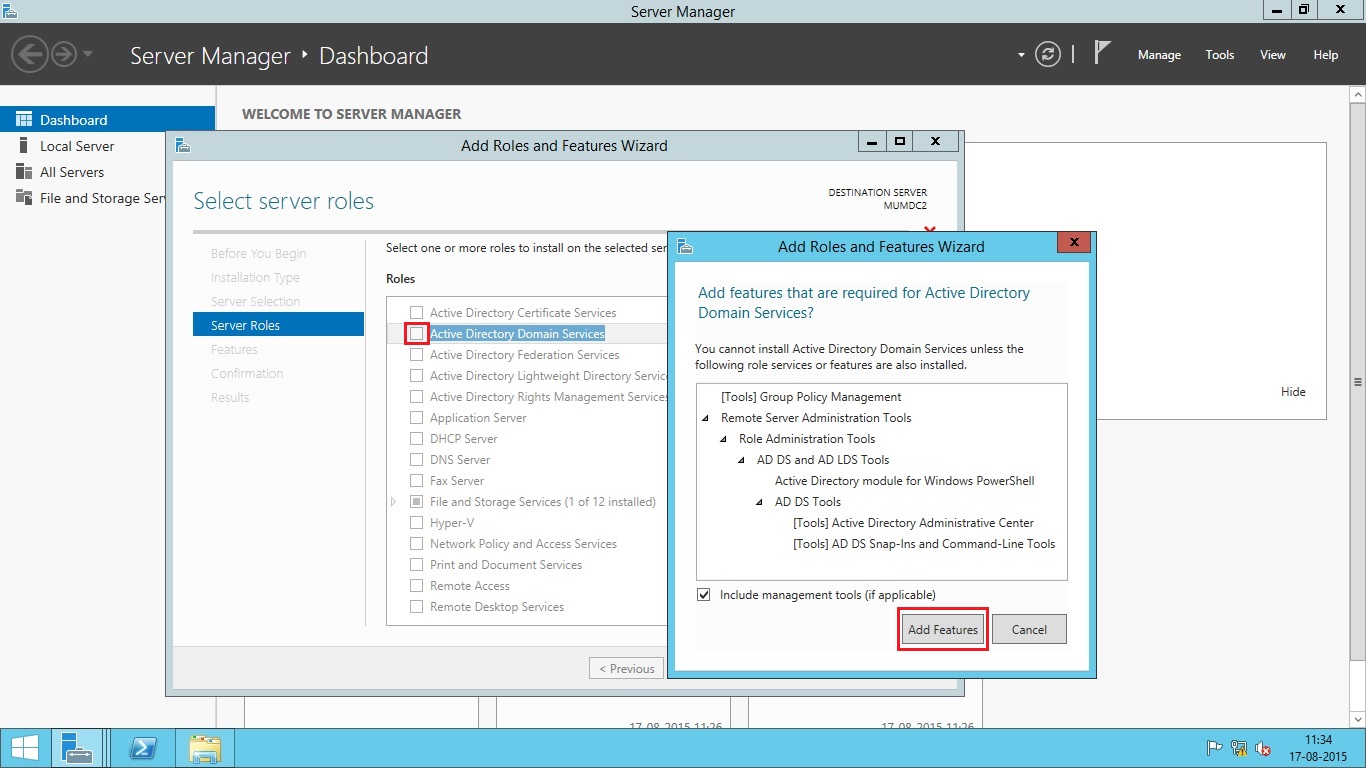
- Select the checkbox in front of Active Directory Domain Services. As soon as you select this option, you will be prompted with Add features that are required by AD DS. Simply click Add Features button as shown below.
- Press Next and then click Install to begin the installation of Active Directory Domain Services binaries. Once the installation is complete, click Close button.
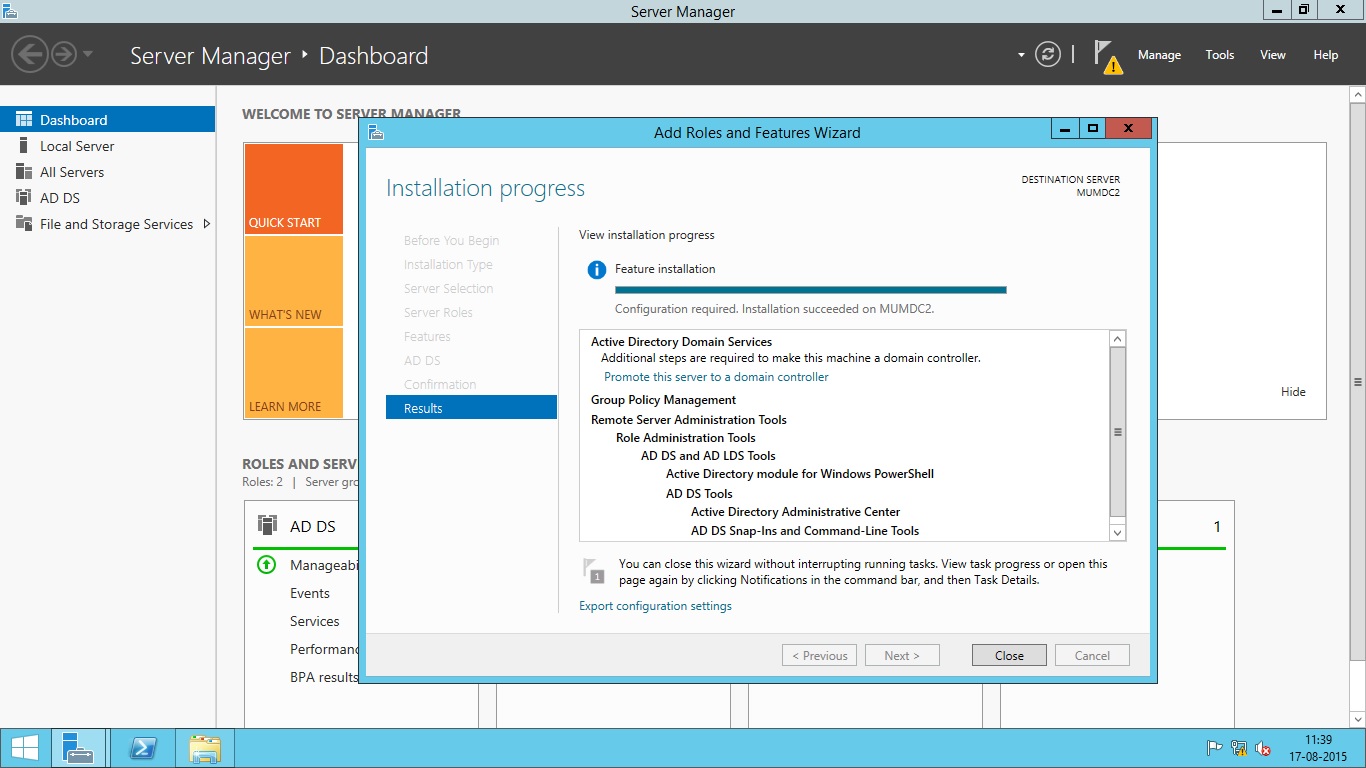

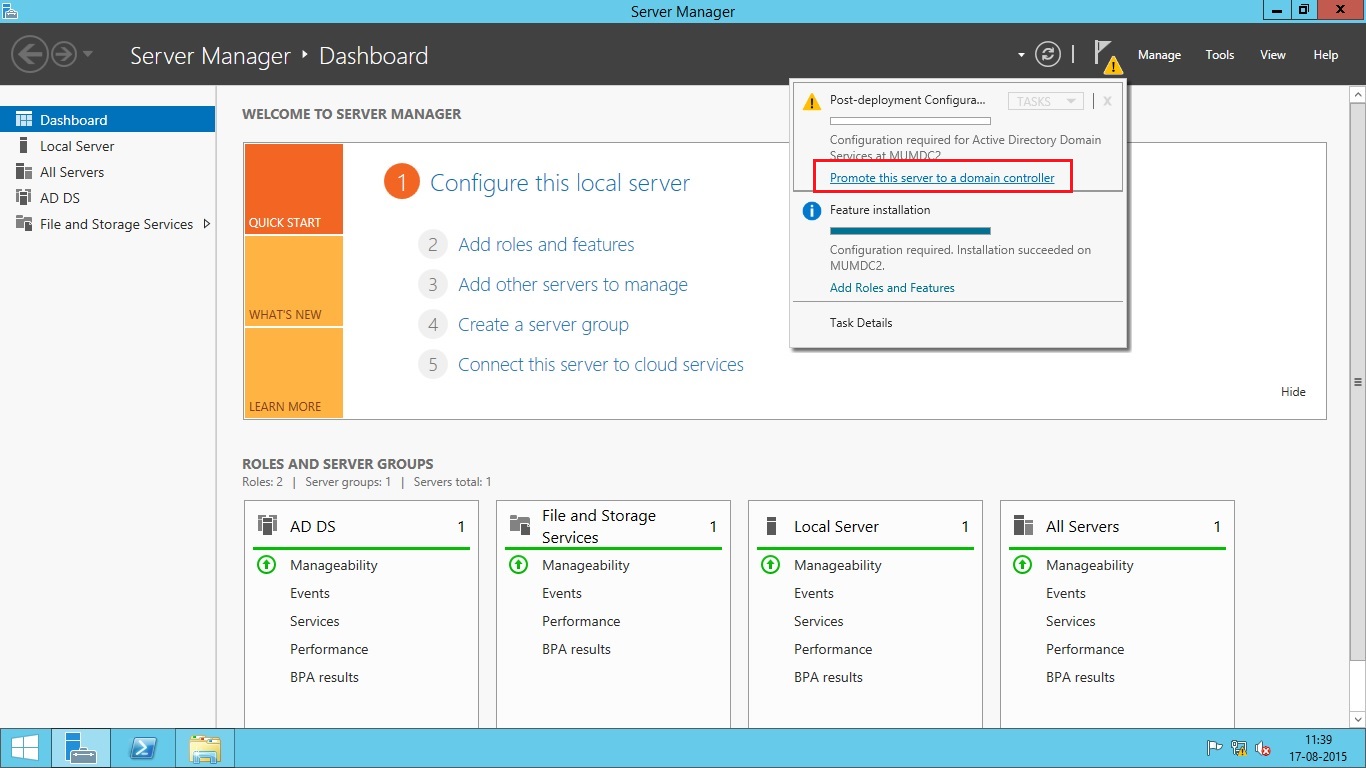
- Once the process is complete, you will be asked for Post deployment configuration by Server Manager. Look at the top right side of Server Manager, you will see yellow triangle near to Flag icon indicating unread notification. Click on the notification and select the option Promote this server to a domain controller.
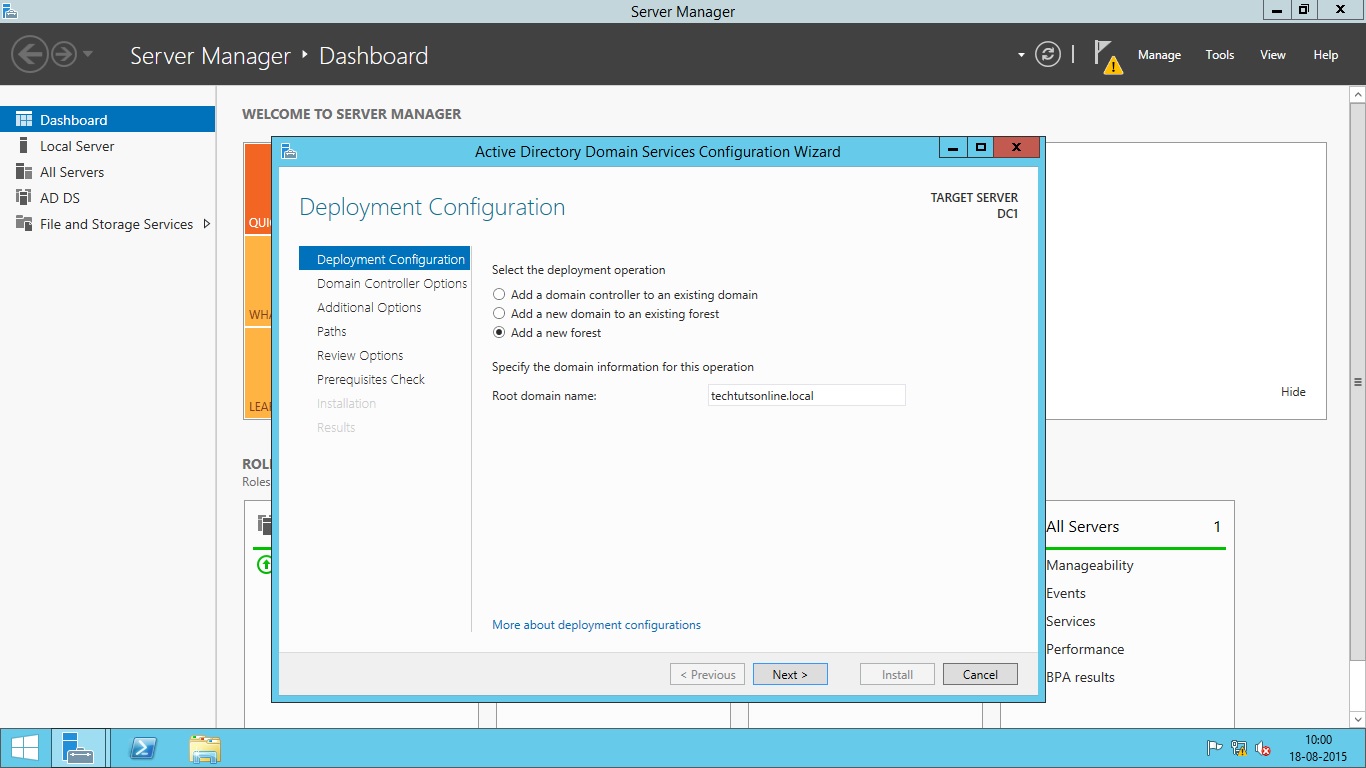
- Once you click at the option ‘Promote this server to a domain controller’, you will see Active Directory Domain Services Configuration Wizard. Now, select one option depending upon your environment. At this stage I assume that you are creating a new AD Forest. So, this server is going to be your first domain controller of first domain in the new forest. Enter the name of your Root domain and click Next. See the diagram below:
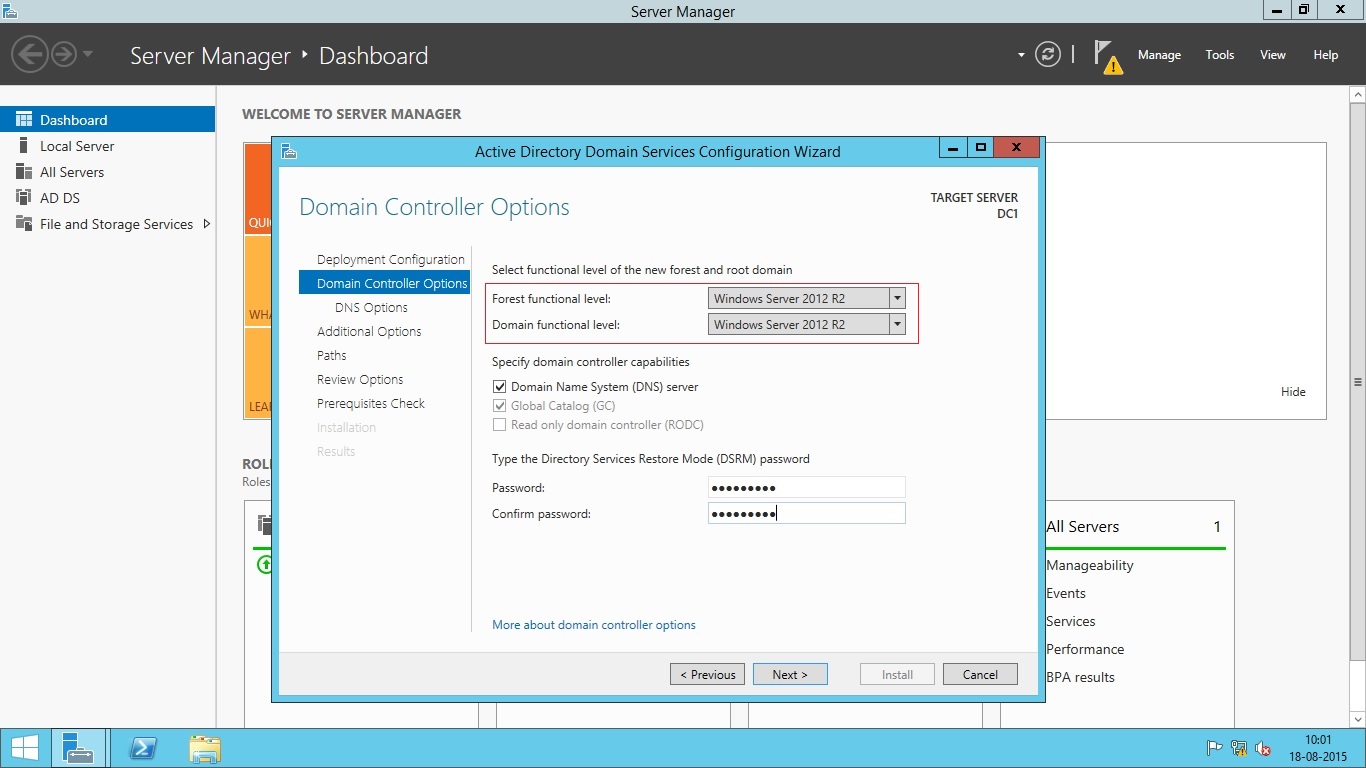
- In this screen you have to select domain controller options like Forest and Domain Functional Level. You also need to specify whether to install DNS service on this server. The Directory Service Restore Mode (DSRM) password is also entered here. This password will be used when you want to start the server in Active Directory Restore Mode for Recovery operations. Notice that the Global Catalog (GC) and Read Only Domain Controller (RODC) options are greyed since this is a first domain controller in this new forest. So, It must be a Global Catalog and it can not be a RODC at first place.
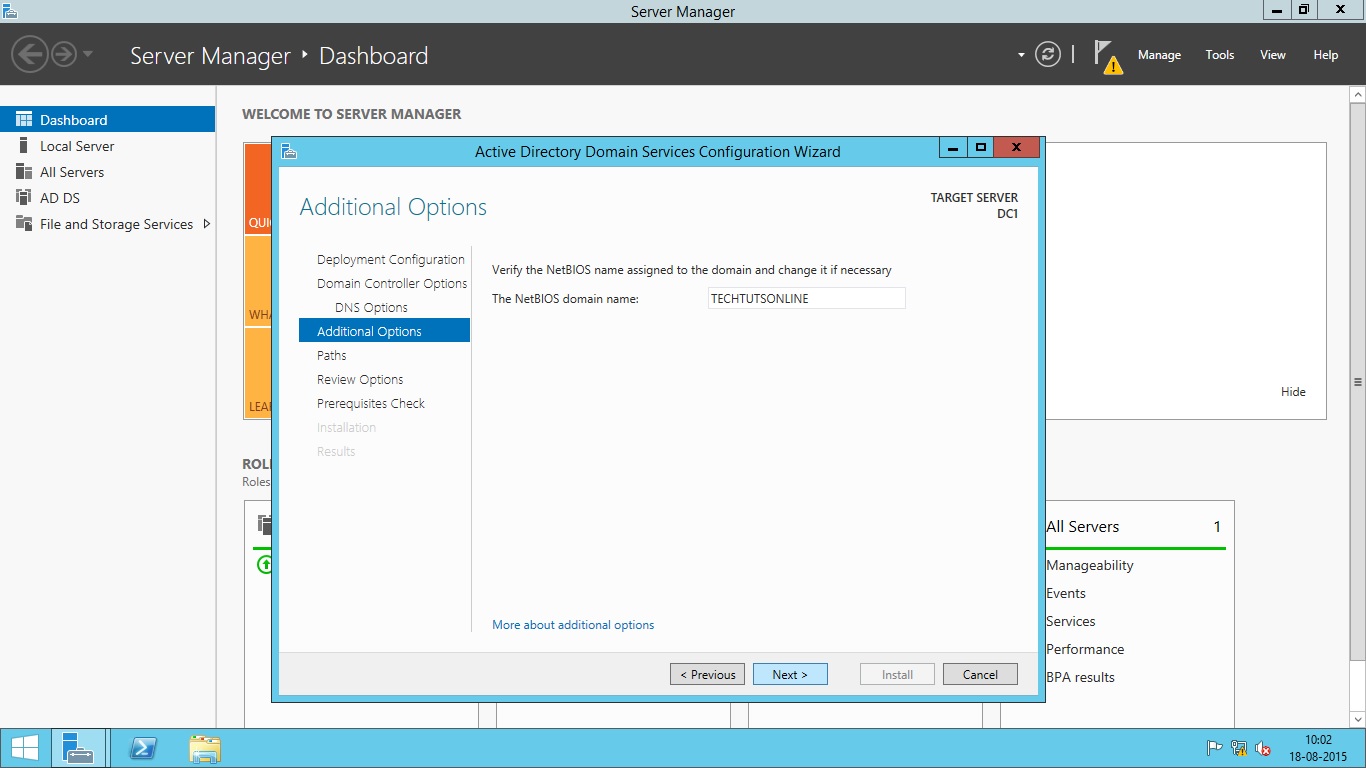
- Press Next and you will be asked to enter the netBIOS name for this server. Leave it default and press Next.
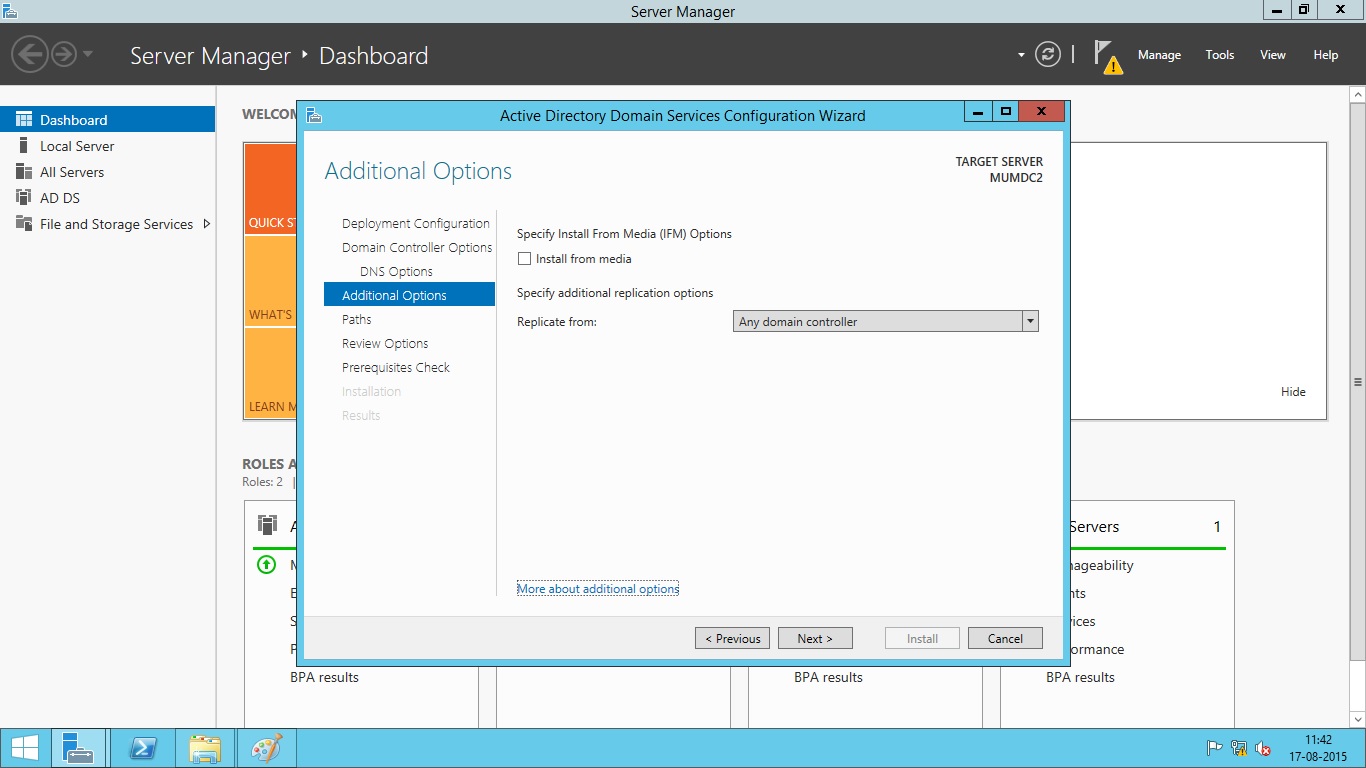
- Note that if you are adding domain controller to existing domain, you will see Install from Media (IFM) or Replicate from existing domain controllers options at next screen. Install from Media is the option which helps you save your network bandwidth if you are adding a new domain controller to existing domain. Because replication traffic can be huge depending upon the Active Directory infrastructure size, and if you are using slow network link between this server and other domain controllers, it will be a good idea to choose Install from Media option. You can use the Ntdsutil.exe tool to create installation media for additional domain controllers that you are creating in a domain. By using the Install from Media (IFM) option, you can minimize the replication of directory data over the network. In this screen, you can also select a particular domain controller to replicate the data from.
If you are creating a new Forest, you will not see the above options.
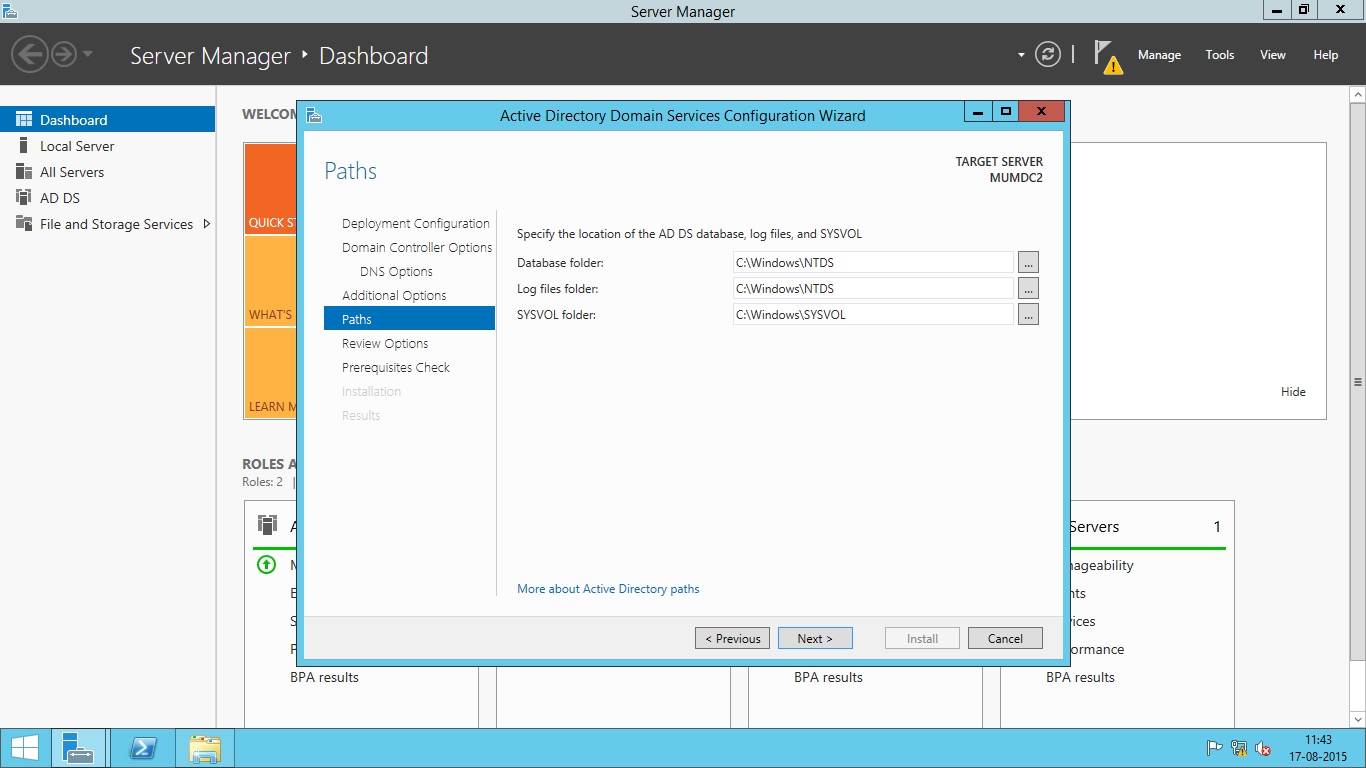
- In the next screen, you will have to choose the location of active directory database, log files and sysvol folders. After selecting the location, press Next.
- Now the server will verify the prerequisites needed for active directory domain services. Once this is completed, press Install button to begin the install operation.
- Restart the server after the installation completes.
Active Directory Deployment using Windows PowerShell
This topic explains how to accomplish common server configuration tasks, such as changing computer name, configuring network properties and promoting the server to a domain controller while the server is in Server Core mode where you do not have any GUI or if you want to do everything using command-line interface.
Change Computer Name
When you install Windows Server 2012 R2 on any system, by default the computer name is set randomly. To change the computer name, you can use the following PowerShell command.
PS C:\>Rename-Computer -NewName DC1 -Restart
You should know that promoting a server to domain controller need a static IP address configured on server. Active Directory will not work when the server is set to obtain IP address automatically from DHCP. So, the first step is to set static IP address.
Set a Static IP address
-
In Windows PowerShell, run Get-NetIPInterface cmdlet.
-
Make a note of the number shown in the IfIndex column of the output for your IP interface or the InterfaceAlias string. If your computer has more than one network adapter, make a note of the number or string corresponding to the interface for which you wish to set a static IP address. See the Figure below:
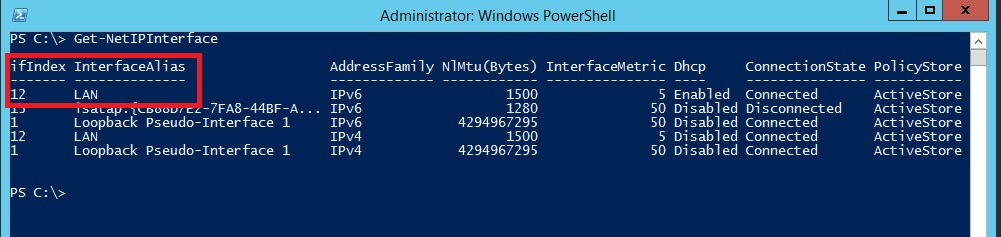
 In this Figure, IfIndex is 12 for which we will set the IP address.
 -
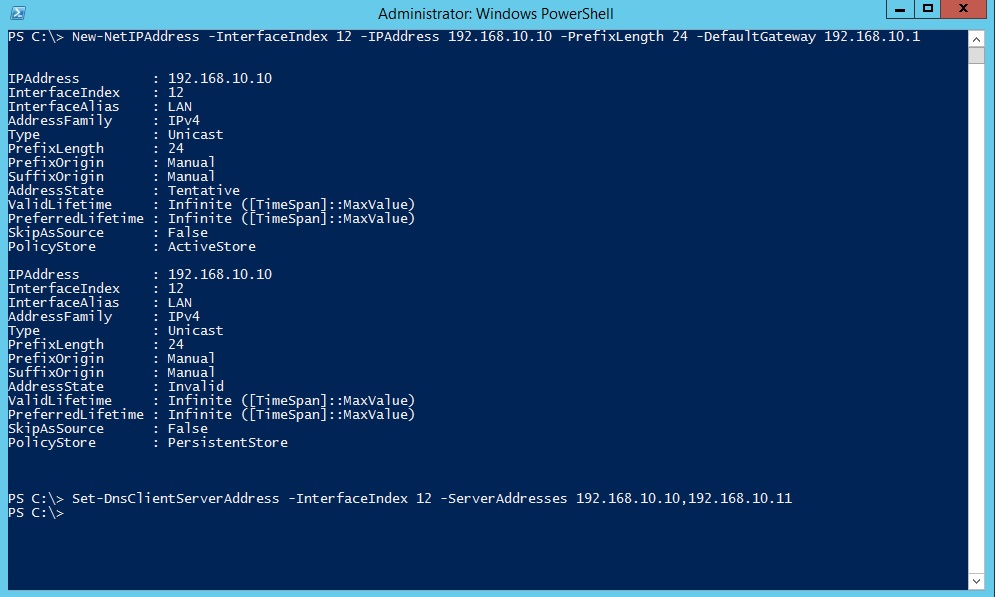
In Windows PowerShell, run the command New-NetIPAddress –InterfaceIndex 12 –IPAddress -192.168.10.10 –PrefixLength 24 –DefaultGateway -192.192.168.10.1
Where:
InterfaceIndex is the value of IfIndex from Step 2 (in this example, 12).
IPAddress is the static IP address you intend to set (in this example, 192.168.10.10).
PrefixLength is the prefix length (another form of subnet mask) for the IP address you intend to set (in this example, 24).
DefaultGateway is the default gateway (in this example, 192.168.10.1).
-
In Windows PowerShell, run the command Set-DNSClientServerAddress –InterfaceIndex 12 -ServerAddresses 192.168.10.10,192.168.10.11
Where:
InterfaceIndex is the value of IfIndex from Step 2 (In this example, 12).
ServerAddresses is the IP address of your DNS server. You can enter multiple addresses separated by comma.

If you need to switch to using DHCP, use the Windows PowerShell command: Set-DnsClientServerAddress –InterfaceIndex 12 –ResetServerAddresses
Setup Windows PowerShell Remoting
As I have already mentioned that you can install active directory domain services on local computer or on remote computer using Windows PowerShell without the need to login into the remote computer. Windows Server 2012 has PowerShell remoting enabled by default.
Windows PowerShell remoting is primarily intended for remotely managing domain-joined computers, and if you are preparing to deploy the first domain controller in a new forest there is no domain to join yet. In other words, the remote server that will be promoted to a domain controller is initially in a workgroup, not a domain. In addition, the local computer from which you will be performing the deployment might also be in a workgroup. If you try to run any command on remote server, you will get the error as shown below:
PS C:\> Get-WindowsFeature -ComputerName DELDC2
Get-WindowsFeature : WinRM cannot process the request. The following error occurred while using Kerberos authentication: Cannot find the computer DELDC2. Verify that the computer exists on the network and that the name provided is spelled correctly.
At line:1 char:1
+ Get-WindowsFeature -ComputerName DELDC2
+ ~~~~~~~~~~~~~~~~~~~~~~~~~~~~~~~~~~~~~~~
  + CategoryInfo     : DeviceError: (Microsoft.Manag...rDetailsHandle):CimException) [Get-WindowsFeature], Exception
  + FullyQualifiedErrorId :  UnSupportedTargetDevice,Microsoft.Windows.ServerManager.Commands.GetWindowsFeatureCommand
Notice that the error message says Error occurred while using Kerberos authentication. This is because by default WS-Man protocol uses Kerberos authentication. Since all the Servers are yet in workgroup environment; the Kerberos is not supported.
In this situation, you need to enable the two stand-alone computers to talk to each other using the WS-Management protocol. If the computer from which you are performing the deployment is also running Windows Server 2012 or Windows Server 2012 R2, you just need to add the name of the remote server to the TrustedHosts list in the local computer’s WinRM configuration. Doing this enables the local computer to connect to the remote server using NTLM as the authentication mechanism instead of Kerberos, which is used in domain-based environments.
I am currently on server DELDC1 and I have other 3 servers named DELDC2, MUMDC1 and MUMDC2. By default, the TrustedHosts list is empty on every server. So, it does not allow commands to any remote computer which is not in domain.
PS C:\> Get-Item WSMan:\\localhost\client\TrustedHosts

   WSManConfig: Microsoft.WSMan.Management\WSMan::localhost\Client

Type            Name                           SourceOfValue   Value
----            ----                           -------------   -----
System.String   TrustedHosts
Now, I will add the 3 servers to TrsutedHosts list using Set-Item cmdlet as shown below:
PS C:\> Set-Item WSMan:\\localhost\client\TrustedHosts -Value DELDC2 -Concatenate -Force
PS C:\> Set-Item WSMan:\\localhost\client\TrustedHosts -Value MUMDC1 -Concatenate -Force
PS C:\> Set-Item WSMan:\\localhost\client\TrustedHosts -Value MUMDC2 -Concatenate -Force
Note that the –Concatenate parameter is mandatory, otherwise every time you run the Set-Item command, it will keep overwriting the old values in TrustedHosts list. The -force parameter is however optional, which is used to suppress the confirmation (Yes/No) prompt. Now, take a look on TrustedHosts list again.
PS C:\> Get-Item WSMan:\\localhost\client\TrustedHosts

   WSManConfig: Microsoft.WSMan.Management\WSMan::localhost\Client

Type            Name                           SourceOfValue   Value
----            ----                           -------------   -----
System.String   TrustedHosts                                   DELDC2,MUMDC1,MUMDC2
DELDC2, MUMDC1 and MUMDC2 servers are now listed under TrsustedHosts. You can now run PowerShell remoting commands on these remote servers from your local server (DELDC1).
PS C:\> Get-WindowsFeature -ComputerName DELDC2 AD-Domain-Services

Display Name                                            Name                       Install State
------------                                            ----                       -------------
[ ] Active Directory Domain Services                    AD-Domain-Services             Available
You did not get any error this time; remote commands are now working. The windows feature ‘Active Directory Domain Services’ in now listed as available on remote server.
Install Active Directory Domain Services
Next step is to Install the AD DS binaries as we did using Server Manager GUI. The interesting thing is that the Server Manager also uses Windows PowerShell cmdlets behind the scenes. Whatever command you give in Server Manager GUI, it is converted to relevant PowerShell cmdlet and run in background.
To install AD DS binaries run the command as shown below:
PS C:\> Install-WindowsFeature AD-Domain-Services

Success Restart Needed Exit Code      Feature Result
------- -------------- ---------      --------------
True    No             Success    {Active Directory Domain Services}
The ADDSDeplyment PowerShell module is installed when you run the above shown command on the server. Notice that the server is not yet promoted to domain controller. We have just installed the required binaries for AD DS.
Now, you need to import the ADDSDeployment module using Import-Module command. See below example:
PS C:\> Import-Module ADDSDeployment
If you did not get any error message as shown above, it means the module is loaded.
The Windows PowerShell cmdlets for adding a new forest, adding new domain, deploying domain controllers and performing other deployment tasks are found in the ADDSDeployment module. To see a list of the available cmdlets in this module, use the Get-Command cmdlet as follows:
PS C:\> Get-Command -Module ADDSDeployment

CommandType     Name                                               ModuleName
-----------     ----                                               ----------
Cmdlet          Add-ADDSReadOnlyDomainControllerAccount            ADDSDeployment
Cmdlet          Install-ADDSDomain                                 ADDSDeployment
Cmdlet          Install-ADDSDomainController                       ADDSDeployment
Cmdlet          Install-ADDSForest                                 ADDSDeployment
Cmdlet          Test-ADDSDomainControllerInstallation              ADDSDeployment
Cmdlet          Test-ADDSDomainControllerUninstallation            ADDSDeployment
Cmdlet          Test-ADDSDomainInstallation                        ADDSDeployment
Cmdlet          Test-ADDSForestInstallation                        ADDSDeployment
Cmdlet          Test-ADDSReadOnlyDomainControllerAccountCreation   ADDSDeployment
Cmdlet          Uninstall-ADDSDomainController                     ADDSDeployment
To add a new forest, we will use the Install-ADDSForest cmdlet listed above.
But before actually installing, we need to make sure if our server is ready for this process. We can test this using Test-ADDSForestInstallation cmdlet. This cmdlet will run a prerequisite check on server and will notify us if installation will be successful or not. The Prerequisites check is a new feature in AD DS 2012 domain configuration. These checks will alert you with suggested options, and inform you of new security changes that will affect older operating systems. This test is also run when you add a domain controller to existing domain.
PS C:\> Test-ADDSForestInstallation

cmdlet Test-ADDSForestInstallation at command pipeline position 1
Supply values for the following parameters:
DomainName: techtutsonline.local
SafeModeAdministratorPassword: *********
Confirm SafeModeAdministratorPassword: *********
WARNING: Windows Server 2012 R2 domain controllers have a default for the security setting named "Allow cryptography
algorithms compatible with Windows NT 4.0" that prevents weaker cryptography algorithms when establishing security
channel sessions.

For more information about this setting, see Knowledge Base article 942564
(http://go.microsoft.com/fwlink/?LinkId=104751).

WARNING: A delegation for this DNS server cannot be created because the authoritative parent zone cannot be found or it
 does not run Windows DNS server. If you are integrating with an existing DNS infrastructure, you should manually
create a delegation to this DNS server in the parent zone to ensure reliable name resolution from outside the domain
"techtutsonline.local". Otherwise, no action is required.

Message                       Context                                      RebootRequired                        Status
-------                       -------                                      --------------                        ------
Operation completed succes... Test.VerifyDcPromoCore.DCP...                         False                       Success
I have run Test-ADDSForestInstallation command in PowerShell and then I am prompted to enter Domain Name. After that I am prompted to enter DSRM password. Finally I got the message that Operation completed successfully. This was only a test; no AD forest and domain is yet created.
To use Install-ADDSForest cmdlet, it is a good idea to take a look at the help page for this cmdlet. This command will show us the syntax and all the parameters this cmdlet can accept as shown below:
PS C:\> Get-Help Install-ADDSForest

NAME
    Install-ADDSForest

SYNTAX
    Install-ADDSForest -DomainName <string> [-SkipPreChecks] [-SafeModeAdministratorPassword <securestring>]
    [-CreateDnsDelegation] [-DatabasePath <string>] [-DnsDelegationCredential <pscredential>] [-NoDnsOnNetwork]
    [-DomainMode <DomainMode> {Win2008 | Win2008R2 | Win2012 | Win2012R2 | Default}] [-DomainNetbiosName <string>]
    [-ForestMode <ForestMode> {Win2008 | Win2008R2 | Win2012 | Win2012R2 | Default}] [-InstallDns] [-LogPath <string>]
    [-NoRebootOnCompletion] [-SkipAutoConfigureDns] [-SysvolPath <string>] [-Force] [-WhatIf] [-Confirm]
    [<CommonParameters>]

[output cut]
Take a look at all the parameters and note down which one you have to use in your command.
Install AD DS Forest
To create a new forest and Add the local server as a first domain controller to this forest, Run the following command:
PS C:\> Install-ADDSForest –domainname techtutsonline.local –DomainMode Win2012R2 –ForestMode Win2012R2 –DatabasePath "D:\NTDS" –SYSVOLPath "D:\SYSVOL" –LogPath "D:\NTDS" -Force

SafeModeAdministratorPassword: *********
Confirm SafeModeAdministratorPassword: *********
The target server will be configured as a domain controller and restarted when this operation is complete.
Do you want to continue with this operation? [Y] Yes [A] Yes to All [N] No [L] No to All [S] Suspend [?] Help (default is "Y"): A
If you want to run this command on remote server (DC2), you can use the above command in the following fashion:
PS C:\> Invoke-Command -ComputerName DC2 -ScriptBlock {Install-ADDSForest –domainname techtutsonline.local –DomainMode Win2012R2 –ForestMode Win2012R2 –DatabasePath "D:\NTDS" –SYSVOLPath "D:\SYSVOL" –LogPath "D:\NTDS" -Force
}
Note that I have changed the path of database, log files and sysvol. Also note that I had not added -SafeModeAdministratorPassword parameter in command. So, the PowerShell prompted me to enter the password when I hit enter. I have not included this parameter here because PowerShell accepts password as a secure string and it will be complicated for you if are new to PowerShell. If you wish to provide the password in the command, then it must be a Secure string using the ConvertTo-SecureString cmdlet. You can add –SafeModeAdministratorPassword (ConvertTo-SecureString ‘Abc@123’ –AsPlainText –Force) at the end of command.
If you typed A at confirmation prompt, then the server will be prompted to domain controller and it will restart automatically after installation. You can add –NoRebootOnCompletion parameter in command if you want to suppress the automatic restart of server.
Add Additional Domain Controller to Existing Domain
You can use the Install-ADDSDomainController cmdlet to install an additional domain controller in an existing domain. For example, the following command installs and promotes a new domain controller and DNS server in the techtutsonline.local domain using domain administrator credentials:
PS C:\>Install-ADDSDomainController -InstallDns -Credential `
(Get-Credential techtutsonline\administrator) -DomainName techtutsonline.local
You will be prompted to provide and confirm the DSRM password and password for techtutsonline\administrator during the installation process.
Add Read-Only Domain Controller
You can use the Add-ADDSReadOnlyDomainControllerAccount cmdlet to create an RODC account that can be used to install an RODC in your forest. After you have created the RODC account, you can use the Install-ADDSDomainController cmdlet with the –ReadOnlyReplica parameter to deploy a new RODC in an existing domain.
To Remove AD DS using PowerShell
To uninstall AD DS and demote the Operation Master Roles from server, you can use Uninstall-ADDSDomainController cmdlet. If the logged on user does not have enough privileges, you can use -credential argument to run the command with Enterprise Admins privilege:
PS C:\> Uninstall-ADDSDomainController –Forceremoval -Demoteoperationmasterrole