
- August 26, 2015
- Posted by: Surender Kumar
- Category: Windows Server
Active Directory Database Maintenance
Table of Contents
Active Directory stores its data in a file named “NTDS.dit”. The choice of filename was taken from the fact that active directory was initially known as NT Directory Service. By default, this file is located in the “%systemroot%\NTDS” folder. In addition to using the database file, Active Directory uses log files that store information prior to committing it to the database. The ntds.dit file is essentially a database based on X.500 standard which is hierarchical in nature. Lightweight Directory Access Protocol (LDAP) is a protocol which is used to access the data contained in database file.
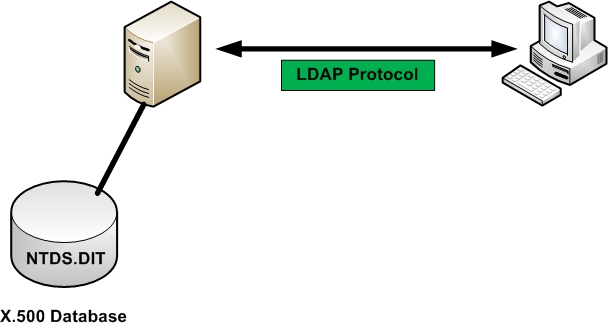 Think of Active Directory as a database and LDAP is a way of accessing the database. LDAP was first released back in 1993 and it provided the simple way of accessing the X.500 databases such as active directory database. LDAP supported IP based networks, So it was adopted by Microsoft to access the active directory database. The admin tools provided with Active Directory uses LDAP behind the scenes to access the database. There a some low level tools in Active Directory such as “ADSI Edit” which require you to understand the syntax that the LDAP uses before you can use them.
The LDAP syntax is pretty simple to understand. Let me ask you that what syntax you will use to access a file on your hard disk?
To access a file on hard disk you will first add the root of file like C:\ or D:\ and then you will enter the folder name like MyData and then finally you will enter the file name. So, The syntax would be something like “D:\MyData\MyFile.txt”.
The LDAP syntax is in reverse order which means the file or object name is written first and name of root is written at last. Let us consider that we want to access a user with the name “John”. To understand the LDAP syntax, follow the steps below:
You will first write Canonical Name or Container Name (CN for short), then you will write the name of folder or organizational unit, and at the end you will write the root location. You are accessing an object in active directory, so you will write the name of domain at the end. To access the user “John” in “techtutsonline.com” domain, the LDAP syntax would be:
CN=John,OU=Users,DC=techtutsonline,DC=com
where:
CN = Container Name
OU = Organizational Unit
DC = Domain Component
Notice that the domain name is split into two parts “techtutsonline” and “com“. Each part is separated by a comma.
The LDAP called this syntax a “Distinguished Name” (or DN) because every object in active directory has a unique distinguishing name. So, the Distinguished Name (DN) uniquely identifies the every object in active directory.
Database File Maintenance
The database file is self-maintained for the most part, but there are a few reasons like low disk space or hardware failure that you may need to maintain the database.
In day-to-day operation, objects will get deleted from Active Directory on a somewhat regular basis. As your Active Directory environment grows, the database grows as needed. The reverse is not true, however. As you delete objects from Active Directory, the database will not automatically shrink itself. This process creates “white space” (or unused space) in your database.
Think of it like this: you have a row of soda cans on a table. If you have a row of 20 cans of soda in a single-file line, and you put another anywhere in the line, the line grows. If you take a few cans out of the middle, the line is still just as long as it was before, but now you have some empty spaces in there. You can add cans back to the empty space (or white space).
The same happens with active directory database. On a regular basis, Active Directory will de-fragment the database to reorganize the data. This is done through the Garbage Collection Agent. The garbage-collection process runs every 12 hours and will online de-fragment the white space to help with performance, but it does not do anything for the unused space that could be returned to the disk partition where the database resides. Performing an online de-fragmentation, enhances your performance, but you do not actually reclaim any drive space. To reclaim the unused white space, you must perform an offline de-fragmentation.
Defragmenting the Active Directory Database
You may experience a great amount of white space if you performed a bulk deletion or if the size of your system-state backup is significantly increased because of the white space. Often, removing the Global Catalog role from a domain controller will result in large amounts of white space.
You can determine how much space is recoverable by changing the logging level of the Garbage Collection Agent. Two levels of logging are available:
- 0 — Only critical events or error events are logged in the directory service log.
- 1 — High-level events are logged. Event ID 700 is recorded when de-fragmentation begins, and event ID 701 is recorded when de-fragmentation ends. Event ID 1646 reports the amount of free space (white space) in the database and the total amount of allocated space.
If you find from this process that you can recover a significant amount of space, you may want to perform an offline de-fragmentation of the Active Directory database file. To do so, follow these steps:
Change the Garbage Collection Logging Value
- Click Start, click Run, type regedit, and then press Enter.
- In Registry Editor, navigate to Garbage Collection in HKEY_LOCAL_MACHINE\SYSTEM\CurrentControlSet\Services\NTDS\Diagnostics.
- Double-click Garbage Collection; for Base, click Decimal.
- In the Value data box, type 1, and then click OK.
Backup the Domain Controller System State
- To open a command prompt with elevated privileges, click Start, search for cmd and right click cmd.exe, and then click Run as administrator .
-
At the prompt, type:
wbadmin start systemstatebackup -backupTarget:<VolumeName> [-quiet]
For example, to create a system state backup with no prompts to the user and save it to D: drive, type:
wbadmin start systemstatebackup -backupTarget:D: -quiet
To view the complete syntax for this command, at a command prompt, type:
wbadmin start systemstatebackup /?

Restart the Domain Controller in Directory Services Restore Mode
- Restart the domain controller. If you are running Windows Server 2012 R2, you need to enter the shutdown –o –r command in elevated command prompt.
- Choose Troubleshoot option
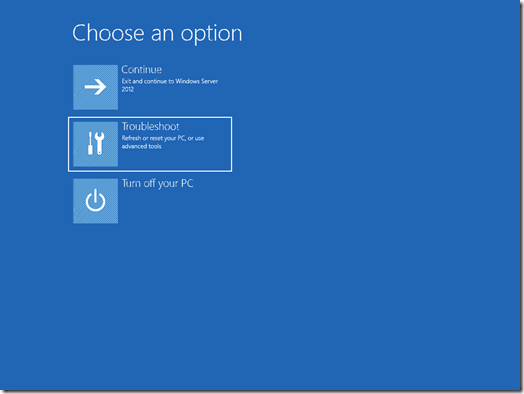

- Select Startup Settings
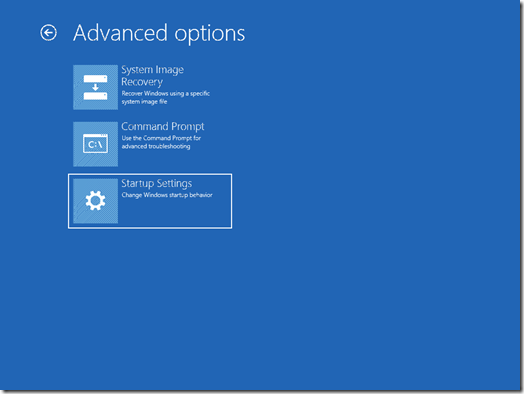
- Click Restart
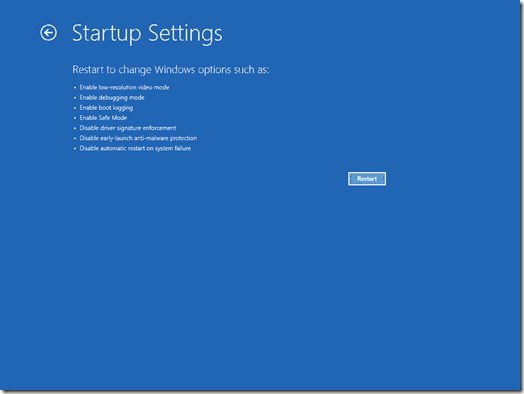
- The Advanced Boot Options screen will be displayed. Select Directory Services Repair Mode and press Enter.

- When prompted, log on as the local administrator.
Performing an Offline Defragmentation
In Directory Services Restore mode, compact the database file to a local directory or remote shared folder, as follows:
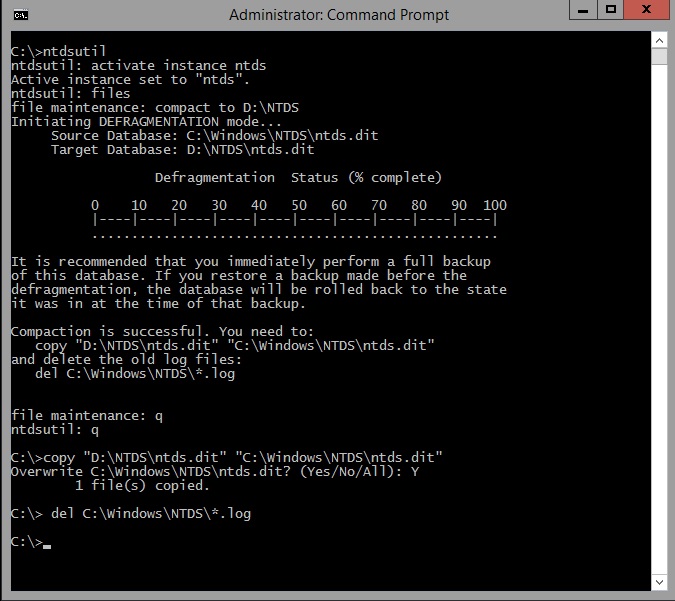
- Copy the complete NTDS folder from C:\Windows\ to some safe location. This is just a backup if anything goes wrong, we can restore it back.
- At the command prompt, type ntdsutil and press Enter.
- At ntdsutil: prompt, type activate instance ntds and press Enter.
- At the ntdsutil: prompt, type files and press Enter.
- At the file maintenance: prompt, type compact to drive:\path, where drive:\path is the path to a location on the local computer or remote computer — for example D:\NTDS. If you want to compact the database to remote folder, you can map the network drive using net use drive: \\server\share /user:domain\username command, where drive: is the drive letter you would like to use for the mapping, server is the remote server name, share is the name of the shared folder, domain is the name of your domain, and username is the name of a user who has rights to that folder.
- Complete steps are given in the following figure:
If errors appear when you restart the domain controller, do the following:
- Restart the domain controller in Directory Services Restore mode.
- Check the errors in Event Viewer.
You may find Event ID 1046 or 1168 in the Event Viewer. If you find these events, you should respond to them accordingly, as follows:
Event ID 1046
“The Active Directory database engine caused an exception with the following parameters.” You cannot recover from this error, and you must restore from backup media.
Event ID 1168
“Internal error: An Active Directory error has occurred.” If you see this error message, Active Directory is missing information in the registry and you must restore from backup media. - Check database integrity and then proceed as follows:
If the integrity check fails, copy the original version of the ntds.dit file from the backup that you preserved to the original database location and repeat the offline defragmentation procedure.
If the integrity check succeeds, perform semantic database analysis with fixup. - If semantic database analysis with fixup succeeds, quit ntdsutil.exe and restart the domain controller normally.
- If semantic database analysis with fixup fails, contact Microsoft Product Support Services.
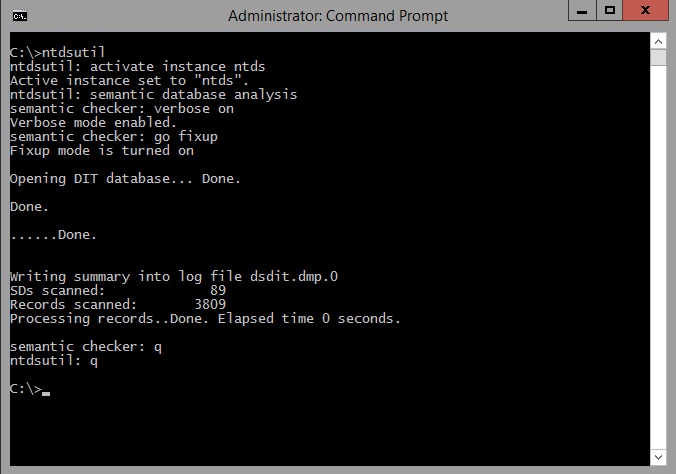
Perform Semantic Database Analysis with fixup
- Open a command prompt.
- Type the command ntdsutil and then press Enter.
- Type activate instance ntds and press Enter.
- At the ntdsutil: prompt, type semantic database analysis and then press Enter.
- At semantic checker: prompt, type verbose on.
- At semantic checker: prompt, type go fixup.
- If errors are reported during the semantic database analysis with fixup, perform a directory database recovery. If semantic database analysis with fixup is successful, close Ntdsutil.exe, and then restart the domain controller normally.
Active Directory Database Troubleshooting and Repair
The tool NTDSUtil.exe is used to manage the consistency of the Active Directory database. Using this tool, you can perform the following actions:
- Check database integrity
- Recover the database
- Compact the database
- Move the database
- Move the log files
- Remove orphaned objects
- Maintain security accounts
Although you rarely have to perform most of these actions, you should understand when and how to use NTDSUtil.exe to perform each one.
The NTDSUtil.exe utility is included on Windows domain controllers. There are very few differences between the versions of NTDSUtil that ship with Windows Server (2000, 2003, and 2008), so most of what is presented within this section applies to any of your domain controllers.
Committing Transactions to the Database
Because of the nature of the Extensible Storage Engine (ESE) database, all the transactions are processed in memory and written to log files before they are committed to the database on the hard drive. If the server were to fail, the transaction logs would still contain all the information necessary to bring the database back to a consistent state.
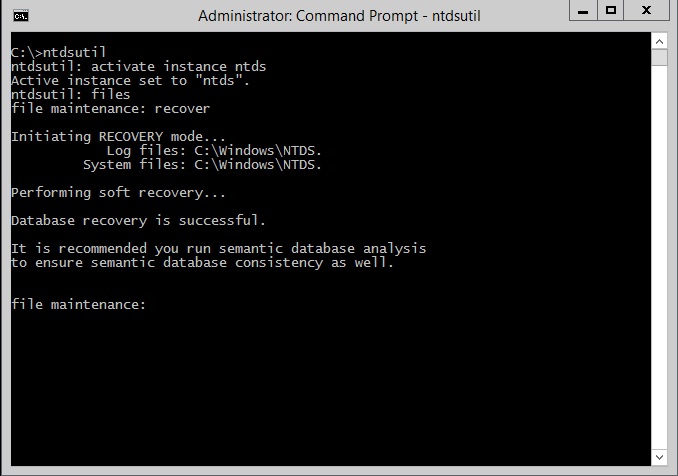
Before performing most of the actions detailed here, commit the transactions to the database; this is also known as performing a recovery procedure. Just follow these steps:
- Start the server in Directory Services Restore Mode.
- Once you log on with the Directory Services Restore Mode Administrator account, open a command prompt.
- At the command prompt, type ntdsutil and press Enter.
- Type activate instance ntds and press Enter.
- From the ntdsutil: prompt, type files and press Enter.
- From the file maintenance: prompt, type recover and press Enter.
As shown in below diagram, you will see information about what is taking place as the recovery is running. After the recovery is complete, the database will be consistent and you will be able to run other utilities as necessary.
If errors comes up while you’re running the recovery on a Windows 2000–based domain controller, and the recovery option does not repair them, you may need to repair the database. Exercise caution before you run this command against your database, because you could lose data in the process.
Make sure you have a good backup of your domain controller. You might want to contact Microsoft Product Support Services to make sure that you have covered all your bases; they may have another option for you to try before you run a repair.
Once you are committed to running the repair process, follow these steps:
- Start the server in Directory Services Restore Mode.
- Once you log on with the Directory Services Restore Mode Administrator account, open a command prompt.
- At the command prompt, type ntdsutil and press Enter.
- Type activate instance ntds and press Enter.
- From the ntdsutil: prompt, type files and press Enter.
- From the file maintenance: prompt, type repair and press Enter.
Checking Active Directory Database Integrity
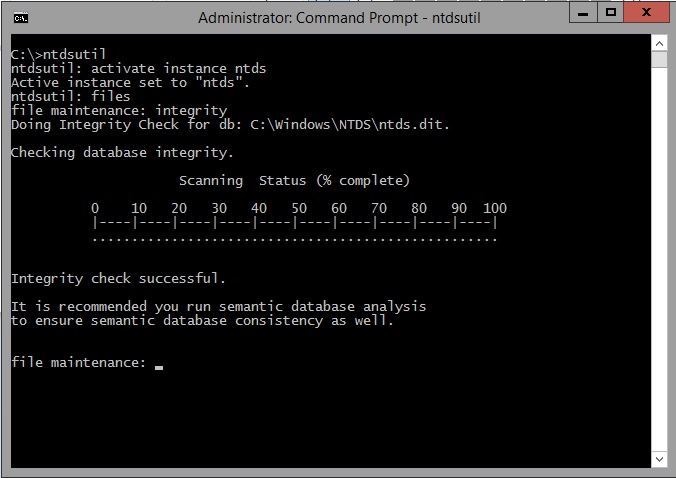
When you are checking the integrity of the database, every single byte of data within the database is analyzed for corruption. This procedure can take a great deal of time if your database is large. This is not something you should do just because you want to see what happens. Before starting an integrity check, make sure you have performed the recovery procedure as detailed previously. The steps to perform an integrity check are as follows:
- Start the server in Directory Services Restore Mode.
- Once you log on with the Directory Services Restore Mode Administrator account, open a command prompt.
- At the command prompt, type ntdsutil and press Enter.
- Type activate instance ntds and press Enter.
- From the ntdsutil: prompt, type files and press Enter.
- From the file maintenance: prompt, type integrity and press Enter.
As you can see in below diagram, the utility will perform the check against the database. If any errors are reported, contact Microsoft Product Support Services to determine how you should proceed.
Moving the Active Directory Database and Log Files
By default, the NTDS.DIT database and other log files are located in the %systemroot%/NTDS folder. As database age, it tend to grow. Even with our best intentions and attempts to create partitions and volumes large enough to hold database, sometimes it grow too large. The same issues hold true for the transaction log files that affect the database. You may not have enough room on a partition or volume to hold the logs; more than likely, however, you either will have a failing drive or you will simply want to separate the transaction log files and the database.
As a matter of fact, I recommend that you move the transaction logs off the physical disk where the database files are. Place them on their own physical disk so that they do not have to compete for disk time with any other service. Once you do so, the system will perform better
To move the database, follow these steps:
- Start the server in Directory Services Restore Mode.
- Once you log on with the Directory Services Restore Mode Administrator account, open a command prompt.
- At the command prompt, type ntdsutil and press Enter.
- Type activate instance ntds and press Enter.
- From the ntdsutil: prompt, type files and press Enter.
- At the file maintenance: prompt, type move DB to <directory> and press Enter. The <directory> can be any location on a partition or volume that has enough space to hold the database and that, preferably, has room for the database to continue growing. If the directory to which you are moving the database does not already exist, the utility will create it for you.
The steps to move the transaction logs are basically the same as those to move the database:
- Start the server in Directory Services Restore Mode.
- Once you log on with the Directory Services Restore Mode Administrator account, open a command prompt.
- At the command prompt, type ntdsutil and press Enter.
- Type activate instance ntds and press Enter.
- From the ntdsutil: prompt, type files and press Enter.
- At the file maintenance: prompt, type move logs to <directory> and press Enter. The <directory> can be any location on a partition or volume that has enough space to hold the database and that, preferably, has room for the database to continue growing. If the directory to which you are moving the database does not already exist, the utility will create it for you.
The following commands will move the database file to D:\NTDS and log files to E:\LOGS folder:
C:\>ntdsutil
ntdsutil: activate instance ntds
Active instance set to "ntds".
ntdsutil: files
file maintenance: move DB to D:\NTDS

Successfully updated the backup exclusion key.
Copying NTFS security from C:\Windows\NTDS to D:\NTDS...
The previous NTDS database location C:\Windows\NTDS\dsadata.bak is unavailable.
The default NTFS security will be applied to NTDS folders.
Default NTFS security on NTDS folders will be set on reboot.
Copying NTFS security from C:\Windows\NTDS to D:\NTDS...

Drive Information:

        C:\ NTFS (Fixed Drive  ) free(39.3 Gb) total(49.7 Gb)
        D:\ NTFS (Fixed Drive  ) free(4.8 Gb) total(4.8 Gb)
        E:\ NTFS (Fixed Drive  ) free(4.8 Gb) total(4.8 Gb)

DS Path Information:

        Database   : D:\NTDS\ntds.dit - 34.1 Mb
        Backup dir : D:\NTDS\DSADATA.BAK
        Working dir: D:\NTDS
        Log dir    : C:\Windows\NTDS - 40.0 Mb total
                        edbtmp.log - 10.0 Mb
                        edbres00002.jrs - 10.0 Mb
                        edbres00001.jrs - 10.0 Mb
                        edb.log - 10.0 Mb

Move database is successful.
Please make a backup immediately else restore will not retain the new file location.
file maintenance: move logs to E:\LOGS
Successfully updated the backup exclusion key.

Copying NTFS security from C:\Windows\NTDS to E:\LOGS...

Drive Information:

        C:\ NTFS (Fixed Drive  ) free(39.4 Gb) total(49.7 Gb)
        D:\ NTFS (Fixed Drive  ) free(4.8 Gb) total(4.8 Gb)
        E:\ NTFS (Fixed Drive  ) free(4.8 Gb) total(4.8 Gb)

DS Path Information:

        Database   : D:\NTDS\ntds.dit - 34.1 Mb
        Backup dir : D:\NTDS\DSADATA.BAK
        Working dir: D:\NTDS
        Log dir    : E:\LOGS - 40.0 Mb total
                        edbtmp.log - 10.0 Mb
                        edbres00002.jrs - 10.0 Mb
                        edbres00001.jrs - 10.0 Mb
                        edb.log - 10.0 Mb

If move log files was successful,
 please make a backup immediately else restore will not retain the new file location.
Removing Orphaned Objects from Active Directory
Typically, when you decommission a domain controller the entries for the domain controller are removed from the database. The same holds true when you remove the last domain controller from a domain. If you select the check box that identifies the domain controller as the last one for the domain, all of the metadata for the domain will be removed from all the other domain controllers within the forest.
But you may encounter instances when the metadata for domain controllers or domains is not removed from the database correctly. This could be because a domain controller was demoted unsuccessfully or because a domain controller failed and you cannot restore it. In such an instance, services might try to connect to domain controllers that they think still exist. This can cause problems with replication as well as with the Knowledge Consistency Checker (KCC).
In the following example, I will remove the failed domain controller metadata to remove the remaining references completely. You can also use the following prcedure to remove the metadata for orphaned domain.
To remove domain controller metadata, follow these steps from the NTDSUtil command-line utility:
- Log on to the domain using an account that is a member of the Enterprise Admins group.
- Verify that all the domain controllers within the forest have replicated successfully.
- Open a command prompt, type ntdsutil, and press Enter.
- At the ntdsutil: prompt, type metadata cleanup and press Enter.
- At the metadata cleanup: prompt, type connections and press Enter.
- Type connect to server servername, where servername is the name of the domain controller holding the Domain Naming Master Operations role. (If you have not logged on using an account that is a member of the Enterprise Admins group, you can set your credentials at this point by typing set creds domainname username password and then pressing Enter).
- Once you have received confirmation that the connection has been made, type q and press Enter.
- Type select operation target and press Enter.
- Type list domains and press Enter.
- From the list of domains that appears, locate the domain of which the domain controller is a member, and note the number associated with the domain.
- Type select domain number and press Enter.
- Type list sites and press Enter.
- From the list of sites that appears, locate the site of which the domain controller is a member and note the number associated with the site.
- Type select site number and press Enter.
- Type list servers in site and press Enter.
- From the list of domain controllers that appears, locate the domain controller and note the number associated with it.
- Type select server number and press Enter.
- Type q and press Enter.
- Type remove selected server and press Enter. You will see the confirmation dialog box as shown below:

- Make sure that the server you are going to remove is already offline. Click YES to remove the selected server.
- Once you receive confirmation that the domain metadata have been removed, type quit two times and exit the command prompt.
The following example removes a domain controller DC2 from techtutsonline.com domain.
C:\>ntdsutil
ntdsutil: metadata cleanup
metadata cleanup: connections
server connections: connect to server DC1
Binding to DC1 ...
Connected to DC1 using credentials of locally logged on user.
server connections: q
metadata cleanup: select operation target
select operation target: list domains
Found 1 domain(s)
0 - DC=techtutsonline,DC=com
select operation target: select domain 0
No current site
Domain - DC=techtutsonline,DC=com
No current server
No current Naming Context
select operation target: list sites
Found 1 site(s)
0 - CN=Default-First-Site-Name,CN=Sites,CN=Configuration,DC=techtutsonline,DC=com
select operation target: select site 0
Site - CN=Default-First-Site-Name,CN=Sites,CN=Configuration,DC=techtutsonline,DC=com
Domain - DC=techtutsonline,DC=com
No current server
No current Naming Context
select operation target: list servers in site
Found 2 server(s)
0 - CN=DC1,CN=Servers,CN=Default-First-Site-Name,CN=Sites,CN=Configuration,DC=te
chtutsonline,DC=com
1 - CN=DC2,CN=Servers,CN=Default-First-Site-Name,CN=Sites,CN=Configuration,DC=techtutsonline,DC=com
select operation target: select server 1
Site - CN=Default-First-Site-Name,CN=Sites,CN=Configuration,DC=techtutsonline,DC=com
Domain - DC=techtutsonline,DC=com
Server - CN=DC2,CN=Servers,CN=Default-First-Site-Name,CN=Sites,CN=Configuration,DC=techtutsonline,DC=com
        DSA object - CN=NTDS Settings,CN=DC2,CN=Servers,CN=Default-First-Site-Na
me,CN=Sites,CN=Configuration,DC=techtutsonline,DC=com
        DNS host name - DC2.techtutsonline.com
        Computer object - CN=DC2,OU=Domain Controllers,DC=techtutsonline,DC=com
No current Naming Context
select operation target: q
metadata cleanup: remove selected server
Transferring / Seizing FSMO roles off the selected server.
Removing FRS metadata for the selected server.
Searching for FRS members under "CN=DC2,OU=Domain Controllers,DC=techtutsonline,DC=com".
Deleting subtree under "CN=DC2,OU=Domain Controllers,DC=techtutsonline,DC=com".
The attempt to remove the FRS settings on CN=DC2,CN=Servers,CN=Default-First-Site-Name,CN=Sites,CN=Configuration,DC=techtutsonline,DC=com failed because "Element not found.";metadata cleanup is continuing.
"CN=DC2,CN=Servers,CN=Default-First-Site-Name,CN=Sites,CN=Configuration,DC=techtutsonline,DC=com" removed from server "DC1"
metadata cleanup: q
ntdsutil: q

C:\>
After completing the above step, you can manually remove the Computer account for DC2 from Domain Controllers OU if it it does not remove automatically.
8 Comments
Comments are closed.
Thanks really useful.
Glad to know. Please like & subscribe me on social media if you find the content helpful.
YouTube: https://www.youtube.com/techtutsonline
Facebook: https://www.facebook.com/techtutsonline
Google+: https://plus.google.com/+Techtutsonline
Twitter: https://twitter.com/techtutsonline
Good information provided. Your screenshots are really helpful for understanding the procedure.
Thank you
Hello Amit,
Really appreciate your words. Thanks
Thank you for your excellent explanation and screen shots. If i may ask a quick question regarding the same utility.
My Domain controller (DC1) server 2016 that is the one that failed and the backup domain controller DC2 is the one running now that is servicing the users. All of the FSMO rules are pointing to DC1 when I try to transfer FSMO rule to the backup server I get an error could not contact the failed DC1 to transfer the role and it is more than 120 day since last replication. if i try your instruction in “Removing Orphaned Objects from Active Directory” will that transfer the FSMO role to the DC2 automatically? and would that solve my issue?
Thank you,
Khalil Alami
No, removing orphaned objects won’t help you transfer the roles. Since your original role holder DC is already offline, you have to Seize the FSMO Roles onto DC2. Seizing the roles help you gain control of FSMO roles that are held on a failed DC.
Read this article carefully: https://www.techtutsonline.com/flexible-single-master-operations-roles/ (Specially Seize the FSMO Roles via Ntdsutil.exe part of article).
After Seizing the roles on your DC2, you can do the metadata cleanup and re-introduce the failed DC1 to your domain.
Thank you, That worked like a charm I seized the roles and after I was done, I went back and did the metadata cleanup. Now I can install a new server and install the active directory and replicate correctly to it.
Glad to know I could help you.
Please like & subscribe me on social media.
YouTube: https://www.youtube.com/techtutsonline
Facebook: https://www.facebook.com/techtutsonline
Twitter: https://twitter.com/techtutsonline