
- September 2, 2015
- Posted by: Surender Kumar
- Category: Linux
Manage Processes in Linux
Table of Contents
Linux in general is a fairly stable operating system. Occasionally, things do go wrong however and sometimes we also wish to tweak the running of the system to better suit our needs. In this section, I will take a look at how you can manage programs, or processes on a Linux system.
What is a Process?
A program is a series of instructions which tell the computer what to do. When we run a program, those instructions are copied into memory and space is allocated for variables and other stuff required to manage its execution.
An instance of running program or command is called process and the number printed by shell is called process identifier (PID), this PID can be use to refer specific running process.
What is Currently Running
Like most modern operating systems, Linux is a multitasking operating system. This means that many processes can be running at the same time. Operating system will generally run some system processes to manage everything. Aside to system processes, there might be multiple users connected to a Linux system and running multiple processes at the same time. If you want to get a list of what is currently running on the system, you can use a program called top. The output of top command is something as shown in image below:

Let’s break down the output for clear understanding:
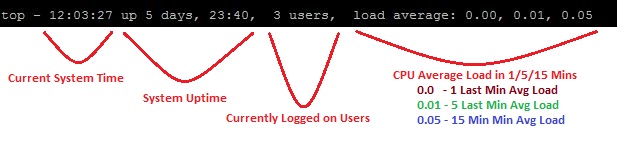
The first line gives the information about system uptime, currently logged on users and average CPU load in 1/5/15 minutes. For clarification take a look at the below picture.
The second line gives the information about total processes, running processes, sleeping processes and zombie process. The zombie process or defunct process is a process that has completed execution via the exit system call but still has an entry in the process table. It is a process in the “Terminated state”. This entry is still needed to allow the parent process to read its child’s exit status. See the picture below for description.

The third line gives the information about CPU usage percentage.
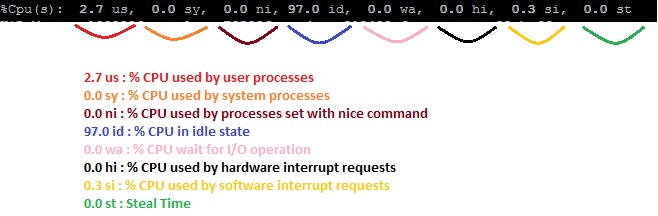
As shown in above diagram, Steal time is the time that a virtual CPU waits for a real CPU while the hypervisor is servicing another virtual processor.
The fourth line gives the information about memory usage. See the picture below for explanation.

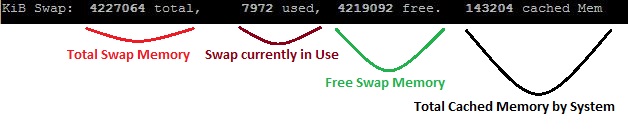
The fifth line shows the swap memory utilization on system, you can find here how much swap is being used.
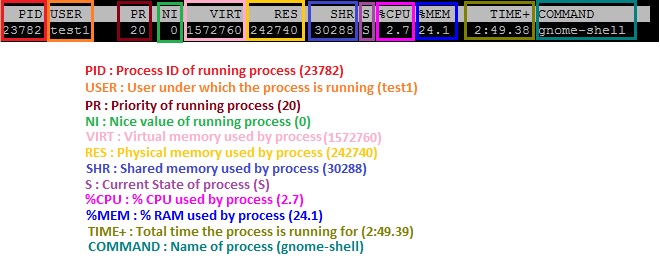
The sixth line act as header for the information displayed after 6th line. The output shown by command contains different columns and the information about each process is listed. Take a look at the picture for more detailed understanding.
You can use following keyboard shortcut keys if you want to sort output on basis of any fields:
Press "SHIFT + F" and Select your choice below and press ENTER.

  A     ( PID = Process Id )
  b     (  PPID   = Parent Process Pid )
  d     (  UID= User Id )
  e     (  USER   = User Name )
  f     (  GROUP  = Group Name )
  g     (  TTY= Controlling Tty )
  h     (  PR = Priority )
  i     (  NI = Nice value )
  j     (  P  = Last used cpu (SMP) )
  k     (  %CPU  = CPU usage )
  l     (  TIME  = CPU Time )
  n     (  %MEM  = Memory usage (RES) )
  o     (  VIRT  = Virtual Image (kb) )
  p     (  SWAP  = Swapped size (kb) )
  q     (  RES= Resident size (kb) )
  r     (  CODE  = Code size  (kb) )
  s     (  DATA  = Data+Stack size (kb) )
  t     (  SHR= Shared Mem size (kb) )
  w     (  S  = Process Status )
  x     (  COMMAND= Command name/line )
The top command will give you a realtime view of the system and only show the number of processes which will fit on the screen. Another command you can use to look at processes is called ps which stands for processes. If you run ps command without any option, it will show you just the processes running in your current terminal. To list a complete system view, you can use ps aux command.
[root@centos ~]# ps aux
USER       PID %CPU %MEM    VSZ   RSS TTY      STAT START   TIME COMMAND
root         1  0.0  0.7  53960  7060 ?        Ss   Aug27   0:06 /usr/lib/systemd/
root         2  0.0  0.0      0     0 ?        S    Aug27   0:00 [kthreadd]
root        10  0.0  0.0      0     0 ?        S    Aug27   0:00 [rcuob/1]
root        11  0.0  0.0      0     0 ?        S    Aug27   0:00 [rcuob/2]
root        12  0.0  0.0      0     0 ?        S    Aug27   0:00 [rcuob/3
root     23791  0.0  0.3 179984  3836 ?        Ss   Sep01   0:00 /usr/sbin/cupsd -
test1    23798  0.0  0.5 506448  5744 ?        Sl   Sep01   0:00 /usr/libexec/gsd-
test1    23806  0.0  0.4 180500  4512 ?        Sl   Sep01   0:00 /usr/libexec/dcon
test1    23814  0.0  0.7 461252  7420 ?        Sl   Sep01   0:00 /usr/bin/ibus-dae

[output cut]
The output of ps aux command is quite detailed but you might not always be looking for complete details. So, you can pipe the output to grep command to filter out just the output.
[root@centos ~]# ps aux | grep libreoffice
test1    45954  0.0  0.3 234080  3228 ?        Sl   14:42   0:00 /usr/lib64/libreoffice/program/oosplash --writer
test1    46023  0.3  7.7 1096348 77988 ?       Sl   14:43   0:00 /usr/lib64/libreoffice/program/soffice.bin --writer
root     46061  0.0  0.0 112640   984 pts/0    R+   14:45   0:00 grep --color=auto libreoffice
Notice the process ID (marked purple) which appears next to username is the PID for LibreOffice. The process ID 46061 (marked red) is the PID for grep command you you have just run.
Killing any Crashed Process
When a program crashes, it can be quite annoying. Let’s say that a user test1 is running LibreOffice on a system and it locks up due to any reason. You try and close the window using GUI but nothing happens, it has become completely unresponsive. No worries, you can easily kill the libreoffice process and then reopen it.
To kill the process which is not responding or crashed. To do so you can use a program called kill. The syntax is kill [signal] <PID>.
The signal can be expressed in either numbers or words. Some well known signals are:
- -1 or -HUP – This argument makes kill send the “Hang Up” signal to processes. Processes have to be programmed to actually listen to this process and do something with it. Most daemons are programmed to re-read their configuration when they receive such a signal. This is very likely the safest kill signal there is, it should not obstruct anything.
- -9 or -KILL – The kernel will let go of the process without informing the process of it. An unclean kill like this could result in data loss. This is the “hardest”, “roughest” and most unsafe kill signal available, and should only be used to stop something that seems unstoppable.
- -15 or -TERM – Tell the process to stop whatever it’s doing, and end itself. When you don’t specify any signal, this signal is used. It should be fairly safe to perform, but better start with a “-1” or “-HUP”.
There are many kill signals that each serve a particular purpose. Typing kill -l command will list the kill signals. Notice that all kill signals begin with “SIG”; this means SIGnal.
[root@centos ~]# kill -l
 1) SIGHUP       2) SIGINT       3) SIGQUIT      4) SIGILL       5) SIGTRAP
 6) SIGABRT      7) SIGBUS       8) SIGFPE       9) SIGKILL     10) SIGUSR1
11) SIGSEGV     12) SIGUSR2     13) SIGPIPE     14) SIGALRM     15) SIGTERM
16) SIGSTKFLT   17) SIGCHLD     18) SIGCONT     19) SIGSTOP     20) SIGTSTP
21) SIGTTIN     22) SIGTTOU     23) SIGURG      24) SIGXCPU     25) SIGXFSZ
26) SIGVTALRM   27) SIGPROF     28) SIGWINCH    29) SIGIO       30) SIGPWR
31) SIGSYS      34) SIGRTMIN    35) SIGRTMIN+1  36) SIGRTMIN+2  37) SIGRTMIN+3
38) SIGRTMIN+4  39) SIGRTMIN+5  40) SIGRTMIN+6  41) SIGRTMIN+7  42) SIGRTMIN+8
43) SIGRTMIN+9  44) SIGRTMIN+10 45) SIGRTMIN+11 46) SIGRTMIN+12 47) SIGRTMIN+13
48) SIGRTMIN+14 49) SIGRTMIN+15 50) SIGRTMAX-14 51) SIGRTMAX-13 52) SIGRTMAX-12
53) SIGRTMAX-11 54) SIGRTMAX-10 55) SIGRTMAX-9  56) SIGRTMAX-8  57) SIGRTMAX-7
58) SIGRTMAX-6  59) SIGRTMAX-5  60) SIGRTMAX-4  61) SIGRTMAX-3  62) SIGRTMAX-2
63) SIGRTMAX-1  64) SIGRTMAX
Certain numbers are missing because those signals are not supported on my operating system, or they are discontinued. If you run the same command, you may have different numbers.
The signals 1, 9, and 15 are the most common signals. It is important to learn those very well when administering Linux systems.
To start killing the process, you need to identify the process id of the process to be killed. You can use the ps aux | grep libreoffice command as shown below:
[root@centos ~]# ps aux | grep libreoffice
test1    46739  0.1  0.3 234080  3268 ?        Sl   15:31   0:00 /usr/lib64/libreoffice/program/oosplash --calc
test1    46754  1.1  5.7 903092 58164 ?        Sl   15:31   0:00 /usr/lib64/libreoffice/program/soffice.bin --calc --splash-pipe=5
root     46773  0.0  0.0 112640   984 pts/0    S+   15:32   0:00 grep --color=auto libreoffice
The number next to username is the process-ID (46739 and 46754 in our example).
[root@centos ~]# kill -9 46739
[root@centos ~]# kill -9 46754
[root@centos ~]#
[root@centos ~]#
[root@centos ~]# ps aux | grep libreoffice
root     46784  0.0  0.0 112640   984 pts/0    R+   15:33   0:00 grep --color=auto libreoffice
Notice that after using kill -9 46739 and kill -9 46754 command, there is no libreoffice process running under test1 user account. Regular users may only kill the processes which they are running The root user on the system may kill any process.
Locked up Desktop GUI
On rare occassions, when a process crashes and locks up, it can lock up the entire desktop GUI. If this happens, you will not be able to do anything using GUI. But still there is another option in Linux.
Linux actually runs several virtual consoles. By default the regular users can only see console 7 which is the GUI. If the GUI has locked up, and we are in luck, we can get to another console and kill the offending process from there. To switch between consoles you use the keyboard sequence Ctrl+Alt+F1 or Ctrl+Alt+F2. You can use any function key from F1 to F6 to open different virtual consoles. So, Ctrl+Alt+F1 will get you to a console if all goes well. Enter your username and password and here you can run the commands to identify process ids and kill them. Then Ctrl+Alt+F7 will get you back to the GUI to see if it has been fixed. The general approach is to keep killing processes until the lock up is fixed. Normally you can look for the processes with high CPU usage or high memory usage and start with those processes first. Sometimes this approach works, sometimes doesn’t. If nothing works, you may need to restart the computer. Just depends how lucky you are.
Foreground and Background Processes
When we run a program normally (like we have been doing so far), they are run in the foreground. Most of them run to completion in a fraction of a second as well. But sometimes you may want to run some command like compiling a program which will take a lot of time to complete. In this case you have to wait for the command to complete before you can run the next command. If you don’t like waiting and want to run the command in the background, you can use ampersand (&) symbol at the end of command. Use of & symbol allows the shell to run the command as a background job.
For demonstration purpose, I am going to use sleep 50 command which does nothing but waits for 50 seconds before the user is taken back to shell to run next command. You can use jobs command to check the status of background processes. To bring any background job to foreground, you can use fg command. The complete steps are demonstrated below:
[root@centos ~]# sleep 60 &
[1] 47068
[root@centos ~]# sleep 70 &
[2] 47069
[root@centos ~]#
[root@centos ~]# jobs
[1]-  Running                 sleep 60 &
[2]+  Running                 sleep 70 &
[root@centos ~]#
[root@centos ~]# fg 2
sleep 70
^Z
[2]+  Stopped                 sleep 70
[root@centos ~]#
[root@centos ~]# jobs
[1]-  Running                 sleep 60 &
[2]+  Stopped                 sleep 70
[root@centos ~]#
Notice that initially, I started two jobs in background (using & symbol). Then I used jobs command to list the status of jobs. It listed job ID in beginning and status of job. To bring the job with ID 2 to foreground, I used fg 2 command. When I hit Ctrl+z key, the status of job changed to Stopped.
Process Priority Management
Linux does a great job of prioritizing tasks automatically. However, what Linux thinks is best isn’t always best for you. Basically, Linux always wants to make a process finish as soon as possible, which means that you get a nice bit of lag when you try to do your work as a CPU or disk hungry process churns away. Fortunately, there are tools that will let you tell the Linux operating system what you want.
User’s ability to attach a priority value to its own process upon execution determines whether you are being nice to your fellow users on the same system. Are you being nice or you simply abuse system resources for no apparent reason? If you give a process a higher priority, then Kernel will allocate more cpu time to that process. By default when a program is launched in Linux, it gets launched with the priority of ‘0’.
If you are going to run a command that will eat up large amounts of CPU cycles and you want to make sure that this process doesn’t keep you from doing your work, you can run the command with nice to give the command a lower-than-default priority.
[root@centos ~]#
[root@centos ~]# nice updatedb &
[1] 47551
[root@centos ~]#
Running the command with nice lowers the process’s CPU priority and will result in smoother CPU performance for your other applications. By default nice will set a nice level to 10. To start process with other nice value than 10 we can use -n where n is any integer.
[root@centos ~]# nice -5 sleep 120&
[1] 47922
[root@centos ~]# ps -l
F S   UID   PID  PPID  C PRI  NI ADDR SZ WCHAN  TTY          TIME CMD
4 S     0 47333 47289  0  80   0 - 29036 wait   pts/1    00:00:00 bash
0 S     0 47922 47333  0  90   5 - 26973 hrtime pts/1    00:00:00 sleep
0 R     0 47923 47333  0  80   0 - 30315 -      pts/1    00:00:00 ps
[root@centos ~]#
To set nice value below 0 root permissions are required. Nice will still start the program, however, the nice value will be set to 0 if the command is run without root privilege.
But what if you already run a command which is now horribly exhausting the CPU ? That is where the renice command comes into play. With renice you can change the CPU priority for an currently running processes.
[root@centos ~]# sleep 60&
[1] 47629
[root@centos ~]# renice -n 10 -p 47629
47629 (process ID) old priority 0, new priority 10
[root@centos ~]#
As shown above, you have to use priority as the first argument and the process ID as the second argument with renice command. The priority argument has a range from -20 to 19 where -20 is the highest priority and 19 is the lowest priority. In other words, a higher numeric value priority results in lower CPU priority.
The renice command also gives a root user the ability to change a nice value for all processes of a specific user. This is done by -u switch. The following command will change a priority of all processes for test1 user to -19.
[root@centos ~]# renice -n 19 -u test1
1000 (user ID) old priority 19, new priority 19
[root@centos ~]#
Since the processing power of CPU is still growing exponentially fast over the years the importance of nice command is diminishing at the same pace. Therefore, as a result it is very rare today that you will need to change process priority manually. But you should know that basic concept that how the Linux handles processes.
2 Comments
Comments are closed.
Good info. Lucky me I came across your site by chance (stumbleupon). I’ve saved it for later!
I am truly thankful to the holder of this site who has shared this great piece of writing at here.|