
- January 27, 2016
- Posted by: Surender Kumar
- Category: Windows Server
SharePoint 2013 SP1 Deployment Guide On Three-tier Farm
Table of Contents
A three-tier farm configuration consists of two front-end web servers, an application server, and a database server. The deployment sequence and configurations that are described in this article are based on recommended best practices. While the farm configuration is not complex, it provides a fundamental infrastructure to implement a SharePoint 2013 solution on similar or more complex farms.
Topology Overview
This topology is typically used for the medium and large farms described in Overview of SharePoint 2013 installation and configuration. In terms of performance, capacity, and scalability, a three-tier topology is recommended over a two-tier topology. A three-tier topology provides the most efficient physical and logical layout to support scaling out or scaling up, and it provides better distribution of services across the member servers of the farm. The following illustration shows the three-tier deployment that is described in this article.
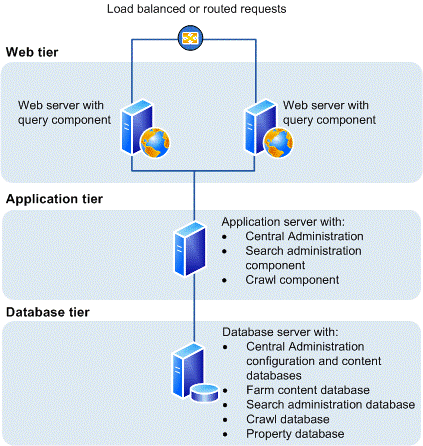
In the above illustration, note the following:
- You can add web servers to the web tier. These servers can be configured as conventional web servers to handle user requests, or they can be configured to host dedicated query components or other service components.
- You can add farm servers to the application tier and configure them as dedicated servers that will host the SharePoint Central Administration website or other services on the farm that require dedicated resources or isolation from the web tier — for example, crawl components, query components, and profile pages.
- You can add database servers to the database tier to implement a stand-alone instance, database mirroring, or a failover cluster. To configure the farm for high availability, database mirroring or a failover cluster is required on the database tier.
Hardware Requirements
Web & Application Server
- Processor: 64 Bit, 4 Cores
- Memory: Single Server install requires 24GB, OR App server in three-tier farm requires 12GB
- Hard Drive: 80GB Free Space, 2x free space as RAM to capture memory dump in case of failure
Database Server
- Processor: 64 Bit, 4 Cores for small deployments and 64 Bit, 8 Cores for medium deployments
- Memory: 8GB for small deployments and 16GB for medium deployments
- Hard Drive: 80GB Free Space, and depends upon amount of data need to be stored.
Software Requirements
Web & Application Server
- 64-bit Windows Server 2012 Standard or Datacenter.
- Web Server (IIS) role
- Application Server role
- Microsoft .Net Framework 4.5
- Microsoft Information Protection & Control Client (MSIPC)
- Windows Identity Foundation 1.0 and WIF Extensions
- SQL Native Client 2008R2 SP1
- Sync Framework 1.0 SP1
- Windows Server AppFabric + CUI (KB2671763)
- WCF Data Services 5.0
- Windows PowerShell 3.0
All of above roles and features are installed by the preparation tool
Database Server
- 64-bit edition of SQL Server 2008 R2 SP1 OR SQL Server 2012 (For Business Intelligence scenario, SQL 2012 SP1 is needed)
- 64-bit edition of Windows Server 2008 R2 SP1 Standard, Enterprise, or Datacenter OR Windows Server 2012 Standard or Datacenter.
Preparing the Servers
Before you install SharePoint 2013, you must check for and install all the prerequisites on the application server and the web servers by using the Microsoft SharePoint Products Preparation Tool.
Use the following procedure to install prerequisites on each server in the farm.
- Verify that the user account that is performing this procedure is the Setup user account.
- In the folder where you downloaded the SharePoint 2013 software, locate and then run prerequisiteinstaller.exe.
- On the Welcome to the Microsoft SharePoint Products Preparation Tool page, click Next.
|
Note: The preparation tool may have to restart the local server to complete the installation of some prerequisites. The installer will continue to run after the server is restarted without manual intervention. However, you will have to log on to the server again. |
- On the License Terms for software products page, review the terms, select the I accept the terms of the License Agreement(s) check box, and then click Next.
- On the Installation Complete page, click Finish.
After you complete the Microsoft SharePoint Products Preparation Tool, you must also install the following patches before running the SharePoint 2013 setup:
- KB2554876 – The SharePoint parsing process crashes (For Server 2008 R2 SP1)
- KB2708075 – Fix: IIS 7.5 configurations are not updated when you use the ServerManager class to commit configuration changes (For Server 2008 R2 SP1)
- KB2472264 – You cannot customize some TCP configurations by using netsh command (For Server 2008 R2 SP1)
- KB2759112 – Hotfix: ASP.NET race condition in .NET 4.5 RTM (For Server 2008 R2 SP1)
- KB2765317 – Hotfix: ASP.NET race condition in .NET 4.5 RTM (For Server 2012)
Administrative and Service Accounts in SharePoint 2013
The following administrative and service accounts are required for SharePoint 2013 deployment. Additional accounts and permissions may be required to fully implement all aspects of a production farm.
- SQL Server Service Account: This account is required to run the SQL Server database services ‘MSSQLSERVER’ and ‘SQLSERVERAGENT’. Name it something like sqlSvcAcc.
- Setup Administrator: This account is required to run the SharePoint setup, SharePoint Products Configuration Wizard, and install/manage SQL Server. Name it something like spAdmin.
- SharePoint Farm Account: This account is required for configuration and management of SharePoint. This account also acts as the default application pool identity for the SharePoint Central Administration website and run the Microsoft SharePoint Foundation Workflow Timer Service. Name it like spFarmAcc.
- Application Pool Account: This account is required to configure web applications in SharePoint. Name it like spAppPoolAcc.
Procedure to Setup Service Accounts
- Create a new Organizational Unit in Active Directory and create the above 4 service accounts.
- Set their passwords to never expire and user cannot change the password.
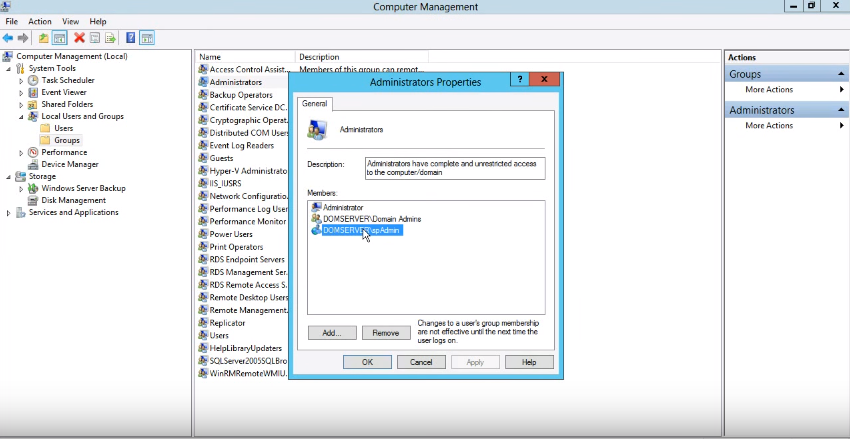
- Add the SharePoint Setup Administrator account (spAdmin) to administrators group on all servers in SharePoint farm.

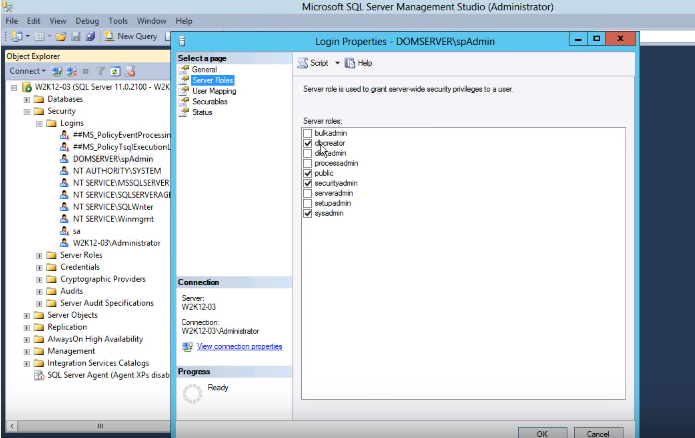
- Assign the ‘dbcreator’, ‘sysadmin’ and ‘securityadmin’ role to spAdmin account in SQL server as shown below:
- Open SQL Server Management Studio
- Go to Security and then Logins.
- Double click domain\spAdmin Login properties windows will open up.
- Select ‘Server Roles’ option and select the checkboxes against ‘dbcreator’, ‘sysadmin’ and ‘securityadmin’.

Installing SQL Server
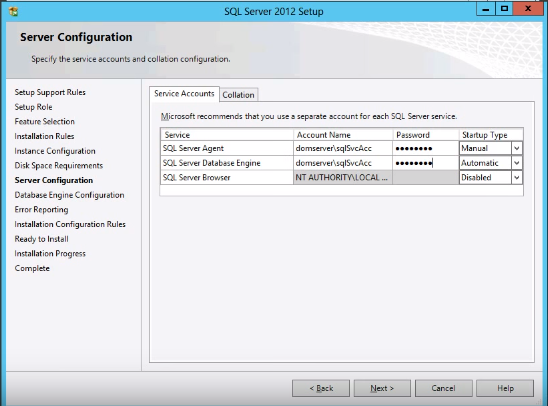
- Run the SQL Server setup.
- Under Server Configuration screen type the service account ‘sqlSvcAcc’ name and password for SQL Server Agent and SQL Server Database Engine services.

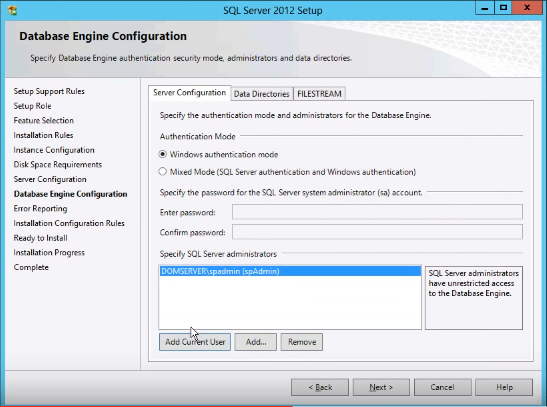
- Under Database Engine Configuration, specify the ‘spAdmin’ service account as SQL Server administrator.

- Complete the setup.
Installing SharePoint 2013
After the prerequisites are installed, follow these steps to install SharePoint 2013 on each server in the farm.
The following procedure installs binaries, configures security permissions, and edits registry settings for SharePoint 2013.
- Verify that the user account that is performing this procedure is the Setup user account.
- Run the setup.
- On the SharePoint 2013 Start page, click Install SharePoint Server
- On the Enter Your Product Key page, enter your product key, and then click Continue
- On the Read the Microsoft Software License Terms page, review the terms, select I accept the terms of this agreement check box, and then click Continue
- On the Choose the installation you want page, click Server Farm
- On the Server Type tab, click Complete
- (Optional) To install SharePoint 2013 at a custom location, or to store search index files at a custom location, click the File Location tab, and then either type the custom location or click Browse to find the custom location
- Click Install Now
- When the Setup program is finished, a dialog box prompts you to complete the configuration of your server. Clear the Run the SharePoint Products and Technologies Configuration Wizard now check box. For consistency of approach, it is recommend that you do not run the configuration wizard until you have installed SharePoint 2013 on all application and front-end web servers that will participate in the server farm.
- Click Close to finish Setup
- Follow above steps (1 to 11) on all SharePoint Web Front End and Application servers
Create and Configure the Farm
To create and configure the farm, you need to run the SharePoint Products Configuration Wizard. This wizard automates several configuration tasks, such as creating the configuration database, installing services, and creating the Central Administration website. It is recommended that you run the SharePoint Products Configuration Wizard on the server that will host the SharePoint Central Administration website before you run the wizard on the other servers in the farm.
- Verify that the user account that is performing this procedure is the Setup user account.
- On the server that will host Central Administration (the application server), click Start, point to All Programs, and then click SharePoint 2013 Products, and then click SharePoint 2013 Products Configuration Wizard. If the User Account Control dialog box appears, click Continue.
- On the Welcome to SharePoint Products page, click Next.
- In the dialog box that notifies you that some services might have to be restarted during configuration, click Yes.
- On the Connect to a server farm page, click Create a new server farm, and then click Next.
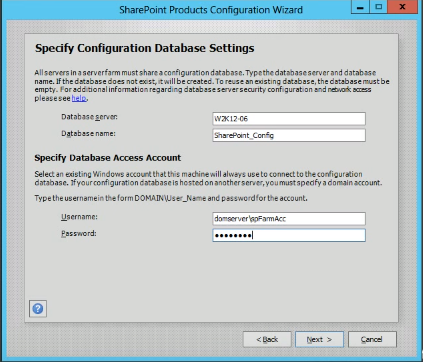
- On the Specify Configuration Database Settings page, specify Configuration database settings and database access account as shown below:

- On the Specify Farm Security Settings page, type a passphrase, and then click Next.
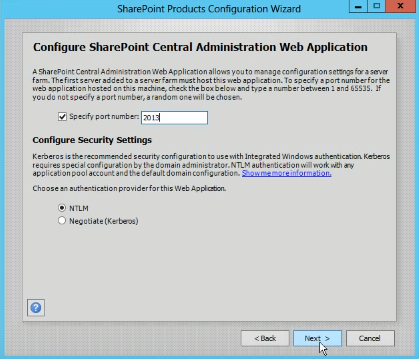
- On the Configure SharePoint Central Administration Web Application page, configure SharePoint Central Administration Web Application. A SharePoint Central Administration Web Application allows you to manage configuration settings for a server farm. The first server added in server farm hosts this web application. You can specify a particular port number, else a random port will be chosen.

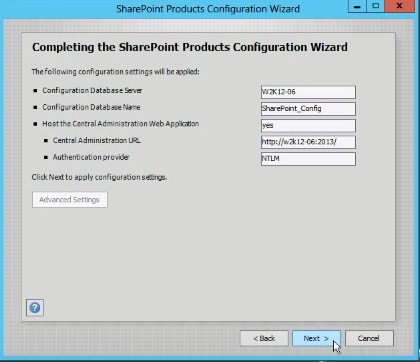
- On the Completing the SharePoint Products Configuration Wizard page, click Next.

- On the Configuration Successful page, click Finish.
- The Central Administration website will open in a new browser window. Here you can create and manage your SharePoint 2013 web application (website).
Troubleshooting Tip: If the SharePoint Products Configuration Wizard fails, check the log files on the drive on which SharePoint 2013 is installed, which are located in the %COMMONPROGRAMFILES%\Microsoft Shared\Web Server Extensions\15\LOGS folder.
Add Web Servers to the Farm
After you create the farm on the application server, you can add the servers for the web tier by following the same process described earlier in this topic for installing SharePoint 2013 on the server that hosts Central Administration. The only difference is that during setup, you are prompted to join an existing farm. Follow the wizard steps to join the farm.
Post-Installation Steps
After you install and configure SharePoint 2013, your browser window opens to the Central Administration web site of your new SharePoint site. Although you can start adding content to the site or customizing the site, it is recommended that you first perform the following administrative tasks:
- Configure usage and health data collection: You can configure usage and health data collection in your server farm. The system writes usage and health data to the logging folder and to the logging database.
- Configure diagnostic logging: You can configure diagnostic logging that might be required after initial installation or upgrade. The default settings are sufficient for most situations. Depending upon the business needs and life-cycle of the farm, you might want to change these settings.
- Configure incoming e-mail: You can configure incoming e-mail so that SharePoint sites accept and archive incoming e-mail. You can also configure incoming e-mail so that SharePoint sites can archive e-mail discussions as they occur, save e-mailed documents, and show e-mailed meetings on site calendars. In addition, you can configure the SharePoint Directory Management Service to provide support for e-mail distribution list creation and administration.
- Configure outgoing email: You can configure outgoing email so that your Simple Mail Transfer Protocol (SMTP) server sends email alerts to site users and notifications to site administrators. You can configure both the “From” email address and the “Reply” email address that appear in outgoing alerts.
- Configure Search settings: You can configure Search settings to crawl the content in SharePoint 2013.
Troubleshooting SharePoint Setup Issues
Sometimes, the preparation tool gives error as shown below:
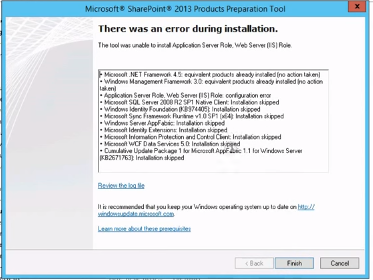
The workaround is to manually add the Application Server and Web Server (IIS) role(s) on Server 2012. Follow the steps below:
- Open Server Manager
- Under Installation Type, choose Role-based or feature-based installation
- Select the Server for installing the role
- Under Server Roles screen, select the Application Server and Web Server (IIS).
- If prompted, click Add Features and press Next
- Skip the Features screen
- Under Application Server Role Services, select the Web Server Support, TCP Port Sharing, HTTP Activation, Named Pipes Activation, TCP Activation as shown below. Do not de-select any other option selected by default. If prompted, click Add Features. Click Next.
- Under Web Server (IIS) Role Services, select Logging Tools, Tracing, .Net Extensibility 3.5, ASP.NET 3.5, IIS 6 Management Compatibility, IIS 6 Scripting Tools. Do not de-select any other option selected by default. Click Next and click Close once installation completes.