
- July 5, 2017
- Posted by: Surender Kumar
- Category: PowerShell
PowerShell alternative of Telnet command
Table of Contents
If you are a Windows system administrator, you will surely know the importance of the Telnet command in your day-to-day life. As you know, all Windows versions starting with Vista come with the telnet client feature disabled by default. If you want to test the connectivity or reachability to a remote computer, you must enable the Telnet-Client optional Windows feature, or you will look for some alternative command to Telnet.
In this article, you will learn how to use Test-NetConnection cmdlet as an alternative of telnet in PowerShell.
Test a remote TCP port
Launch the PowerShell console and type the following command:
Test-NetConnection -ComputerName techtutsonline.com -Port 443
Where the -ComputerName parameter is used to specify the name (or IP address) of remote computer and -Port parameter is used to specify the TCP port that you want to test the connectivity for. See the following screenshot for reference:
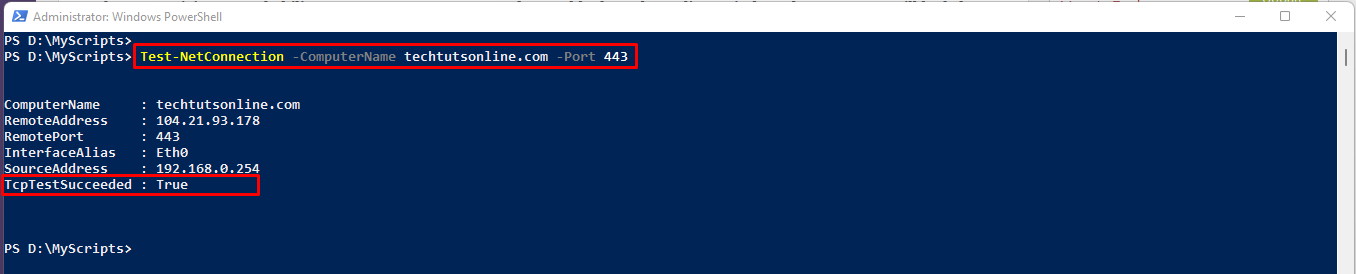
The above command tests the connectivity of your local computer with techtutsonline.com domain name on TCP port 443. By default, it gives you the information about remote server (by doing the name resolution), the name of source interface and it’s IP address.
The TcpTestSucceeded : True in output means the remote server is listening on that port and your system can reach it on that TCP port. If you see TcpTestSucceeded : False, it means something is wrong. Maybe server isn’t listening on that port or your connection attempt is blocked.
If you’re interested in adjusting the information level this command produces, you could add -InformationLevel parameter with either “Quiet” or “Detailed” values.
For instance, to see the test result only, you could use the same command as:
Test-NetConnection -ComputerName techtutsonline.com -Port 443 -InformationLevel Quiet
This command will return only True or False in output. You just saw how to use the Test-NetConnection cmdlet as an alternative of Telnet command. You could even use it as an alternative of Ping command or as an alternative of the Tracert command. Let’s see how.
Test regular Ping connectivity
If you want to test the regular ping connectivity to a remote computer, just omit the -Port parameter and use the command as shown below:
Test-NetConnection -ComputerName techtutsonline.com

This command will return the PingSucceeded and Round Trip Time (RTT) in output. If you are wondering on how to run a continuous ping in PowerShell, checkout this article.
Tracing the Route
One more useful feature offered by Test-NetConnection cmdlet is its built-in ability to trace the route to a remote computer. Remember the tracert command we used for this purpose? Well not anymore, you can use the Test-NetConnection cmdlet for that too. To trace the route just use the following command:
Test-NetConnection techtutsonline.com -TraceRoute
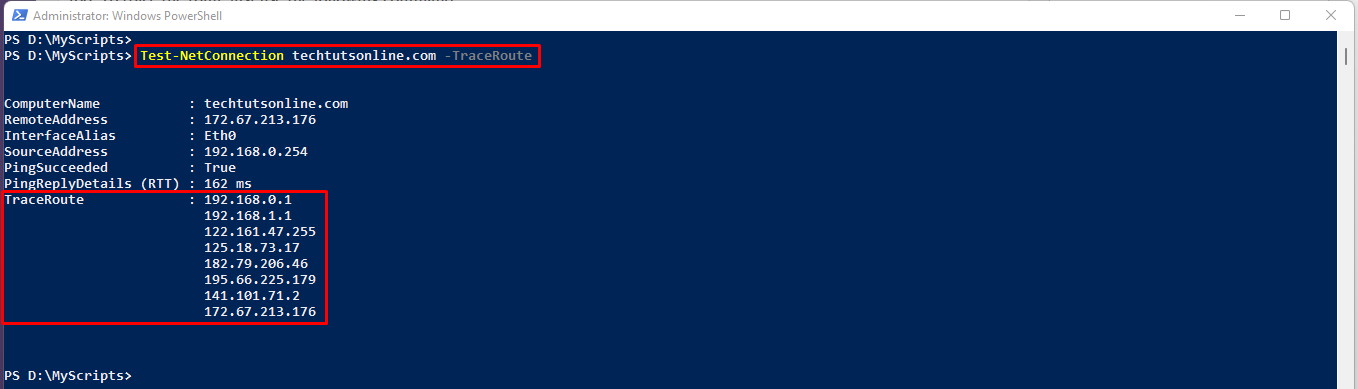
The output isn’t like the one you see in tracert but you get the information about various hops in between and that’s all you need most of the time.
Tip: If you want to be able to use Telnet command in PowerShell exactly as you do in cmd.exe (command prompt), keep on reading the remaining article.
Creating Telnet PowerShell Module
Now that Telnet feature is disabled in every version of Windows but the good news is that every version of Windows comes with PowerShell installed out of the box. So we can create a PowerShell module that will work exactly like traditional Telnet command.
To create the Telnet PowerShell module, follow these steps:
- Launch Windows PowerShell console and run the following command:
-
ise $(New-Item $HOME\Documents\WindowsPowerShell\Modules\Telnet\Telnet.psm1 -Force)
The above command will create a PS module file at predefined location and automatically open that file in PowerShell ISE.
- Now copy the following code, paste it in the PowerShell ISE and press “Ctrl+S” to save the module file.
<#
.Synopsis
Tests the connectivity between two computers on a TCP Port

.Description
The Telnet command tests the connectivity between two computers on a TCP Port. By running this command, you can determine if specific service is running on Server.

.Parameter <ComputerName>
This is a required parameter where you need to specify a computer name which can be localhost or a remote computer

.Parameter <Port>
This is a required parameter where you need to specify a TCP port you want to test connection on.

.Parameter <Timeout>
This is an optional parameter where you can specify the timeout in milli-seconds. Default timeout is 10000ms (10 seconds)

.Example
Telnet -ComputerName DC1 -Port 3389
This command reports if DC1 can be connected on port 3389 which is default port for Remote Desktop Protocol (RDP). By simply running this command, you can check if Remote Desktop is enabled on computer DC1.

.Example
Telnet WebServer 80
This command tells you if WebServer is reachable on Port 80 which is default port for HTTP.

.Example
Get-Content C:\Computers.txt | Telnet -Port 80
This command will take all the computernames from a text file and pipe each computername to Telnet Cmdlet to report if all the computers are accessible on Port 80.
#>
Function Telnet{

    [CmdletBinding()]
    param(
        [Parameter(Mandatory=$true,
                   ValueFromPipeline=$true,
                   ValueFromPipelineByPropertyName=$true)]
        [Alias ('HostName','cn','Host','Computer')]
        [String]$ComputerName='localhost',
        [Parameter(Mandatory=$true,
            ValueFromPipeline=$true,
            ValueFromPipelineByPropertyName=$true)]
        [int32]$Port,
         [int32] $Timeout = 10000
    )

    Begin {}

    Process {
    foreach($Computer in $ComputerName) {
    Try {
          $tcp = New-Object System.Net.Sockets.TcpClient
          $connection = $tcp.BeginConnect($Computer, $Port, $null, $null)
          $connection.AsyncWaitHandle.WaitOne($timeout,$false)  | Out-Null
          if($tcp.Connected -eq $true) {
          Write-Host  "Successfully connected to Host: `"$Computer`" on Port: `"$Port`"" -ForegroundColor Green
      }
      else {
        Write-Host "Could not connect to Host: `"$Computer `" on Port: `"$Port`"" -ForegroundColor Red
      }
    }

    Catch {
            Write-Host "Unknown Error" -ForegroundColor Red
          }

       }

    }
    End {}
}
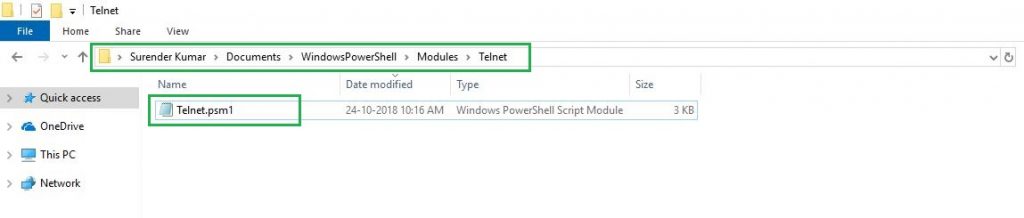
- At the end of all the steps, your PowerShell module should be available at the location as shown in image below:
That’s it! Your Telnet PowerShell module is ready. Use can start using it like a traditional telnet command.
- Close the current PowerShell console and open a new one. Type the following command:
Get-Help Telnet -Full
Below is the snapshot of Get-Help Telnet -Full command:
NAME
    Telnet

SYNOPSIS
    Tests the connectivity between two computers on a TCP Port


SYNTAX
    Telnet [-ComputerName] <String> [-Port] <Int32> [[-Timeout] <Int32>] [<CommonParameters>]


DESCRIPTION
    The Telnet command tests the connectivity between two computers on a TCP Port. By running this command, you can determine if specific service is running on
    Server.


PARAMETERS
    -ComputerName <String>

        Required?                    true
        Position?                    1
        Default value                localhost
        Accept pipeline input?       true (ByValue, ByPropertyName)
        Accept wildcard characters?  false

    -Port <Int32>

        Required?                    true
        Position?                    2
        Default value                0
        Accept pipeline input?       true (ByValue, ByPropertyName)
        Accept wildcard characters?  false

    -Timeout <Int32>

        Required?                    false
        Position?                    3
        Default value                10000
        Accept pipeline input?       false
        Accept wildcard characters?  false

    <CommonParameters>
        This cmdlet supports the common parameters: Verbose, Debug,
        ErrorAction, ErrorVariable, WarningAction, WarningVariable,
        OutBuffer, PipelineVariable, and OutVariable. For more information, see
        about_CommonParameters (https:/go.microsoft.com/fwlink/?LinkID=113216).

INPUTS

OUTPUTS

    -------------------------- EXAMPLE 1 --------------------------

    PS C:\>Telnet -ComputerName DC1 -Port 3389

    This command reports if DC1 can be connected on port 3389 which is default port for Remote Desktop Protocol (RDP). By simply running this command, you can check
    if Remote Desktop is enabled on computer DC1.


    -------------------------- EXAMPLE 2 --------------------------

    PS C:\>Telnet WebServer 80

    This command tells you if WebServer is reachable on Port 80 which is default port for HTTP.


    -------------------------- EXAMPLE 3 --------------------------

    PS C:\>Get-Content C:\Computers.txt | Telnet -Port 80

    This command will take all the computernames from a text file and pipe each computername to Telnet Cmdlet to report if all the computers are accessible on Port
    80.

RELATED LINKS
Look! You just created a Windows PowerShell module that will feel and behave exactly like regular cmdlets. You can use parameters like -ComputerName, -Port, -Credential, -Verbose, -ErrorAction etc. which is awesome.
Using Telnet Cmdlet
Now, its time to use our newly created Telnet Module. As shown in examples of cmdlet, you can use the Telnet module in 3 different ways.
First Way:
Telnet -ComputerName techtutsonline.com -Port 80
Successfully connected to techtutsonline.com on Port: 80
Second Way:
Telnet techtutsonline.com 80
Successfully connected to techtutsonline.com on Port: 80
Third Way:
Get-Content D:\Servers.txt | Telnet -Port 80
Successfully connected to WebServer on Port: 80
Could not connect to DC1 on Port: 80
Successfully connected to Linux-Box on Port: 80
Congratulations! Your Telnet module is working as expected. The good thing about this module is that you can use same command that used to work with cmd.exe.
This cmdlet is an ideal way to work on client’s servers where you do not have authority (or you do not want) to enable Telnet-Client Windows feature for any reason.
4 Comments
Comments are closed.
Your script is marvelous, my requirement is port in bulk instead of servername, so how I modify this script
Hi Amol,
You could use the following modified script:
<#
.Synopsis
Tests the connectivity between two computers on a TCP Port

.Description
The Telnet command tests the connectivity between two computers on a TCP Port. By running this command, you can determine if specific service is running on Server.

.Parameter

This is a required parameter where you need to specify a computer name which can be localhost or a remote computer
.Parameter
This is a required parameter where you need to specify a TCP port you want to test connection on.
.Parameter
This is an optional parameter where you can specify the timeout in milli-seconds. Default timeout is 10000ms (10 seconds)
.Example
Telnet -ComputerName DC1 -Port 3389
This command reports if DC1 can be connected on port 3389 which is default port for Remote Desktop Protocol (RDP). By simply running this command, you can check if Remote Desktop is enabled on computer DC1.
.Example
Telnet WebServer 80
This command tells you if WebServer is reachable on Port 80 which is default port for HTTP.
.Example
Get-Content C:\Computers.txt | Telnet -Port 80
This command will take all the computernames from a text file and pipe each computername to Telnet Cmdlet to report if all the computers are accessible on Port 80.
#>
Function Telnet{
[CmdletBinding()]
param(
[Parameter(Mandatory=$true,
ValueFromPipeline=$true,
ValueFromPipelineByPropertyName=$true)]
[Alias ('HostName','cn','Host','Computer')]
[String]$ComputerName='localhost',
[Parameter(Mandatory=$true,
ValueFromPipeline=$true,
ValueFromPipelineByPropertyName=$true)]
[int32[]]$Port,
[int32] $Timeout = 10000
)
Begin {}
Process {
foreach($p in $port) {
Try {
$tcp = New-Object System.Net.Sockets.TcpClient
$connection = $tcp.BeginConnect($ComputerName, $p, $null, $null)
$connection.AsyncWaitHandle.WaitOne($timeout,$false) | Out-Null
if($tcp.Connected -eq $true) {
Write-Host "Successfully connected to Host: `"$ComputerName`" on Port: `"$p`"" -ForegroundColor Green
}
else {
Write-Host "Could not connect to Host: `"$ComputerName `" on Port: `"$p`"" -ForegroundColor Red
}
}
Catch {
Write-Host "Unknown Error" -ForegroundColor Red
}
}
}
End {}
}
See this image to know how to use it:


I went through all your steps but I have an issue. After I run “Telnet techtutsonline.com 80”, the PowerShell window goes blank and I never see “Successfully connected to techtutsonline.com on Port: 80”.
What went wrong?
Hi Greg, It appears to me that you have Telnet-Client windows feature already enabled. This article assumes you have not (or you cannot for any reason) enable the telnet client windows feature.
Telnet client being not enabled, gives you the opportunity to totally rely on Windows PowerShell to check the reachability to remote computer.