- September 12, 2017
- Posted by: Surender Kumar
- Categories: Windows Server, WSUS Server
Windows Server Update Services (WSUS) in Server 2012 R2
Table of Contents
Windows Server Update Services (WSUS) enables the administrators to deploy the latest Microsoft product updates. You can use WSUS to fully manage the distribution of product updates onto your organization computers. A WSUS server can also be the update source for other WSUS servers within the organization. The WSUS server that acts as an update source is called an Upstream Server and the server that connects to the upstream server in called Downstream Server. In a WSUS implementation, at least one WSUS server on your network must be able to connect to Microsoft Update to get available update information.
Install the WSUS Server Role
-
- Log on to the server on which you plan to install the WSUS server role by using an account that is a member of the Local Administrators group.
- In Server Manager, click Manage, and then click add Roles and Features.
- On the Before you begin page, click Next.
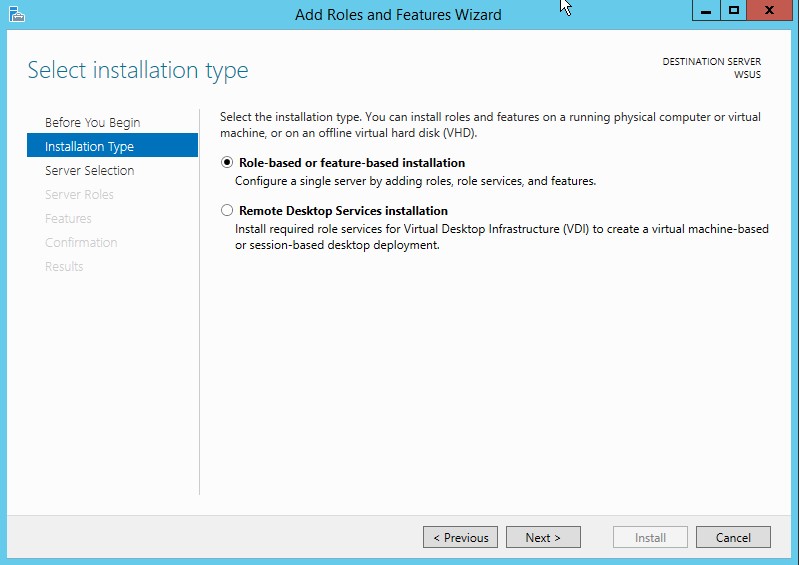
- In the select installation type page, confirm that Role-based or feature-based installation option is selected and click Next.
5. On the select destination server page, choose where the server is located (from a server pool or from a virtual hard disk). After you select the location, choose the server on which you want to install the WSUS server role, and then click Next.
6. On the select server roles page, select Windows Server Update Services. To Add features that are required for Windows Server Update Services, click Add Features, and then click Next.
7. On the Select features page, keep the default selections, and then click Next.
8. On the Windows Server Update Services page, click Next.
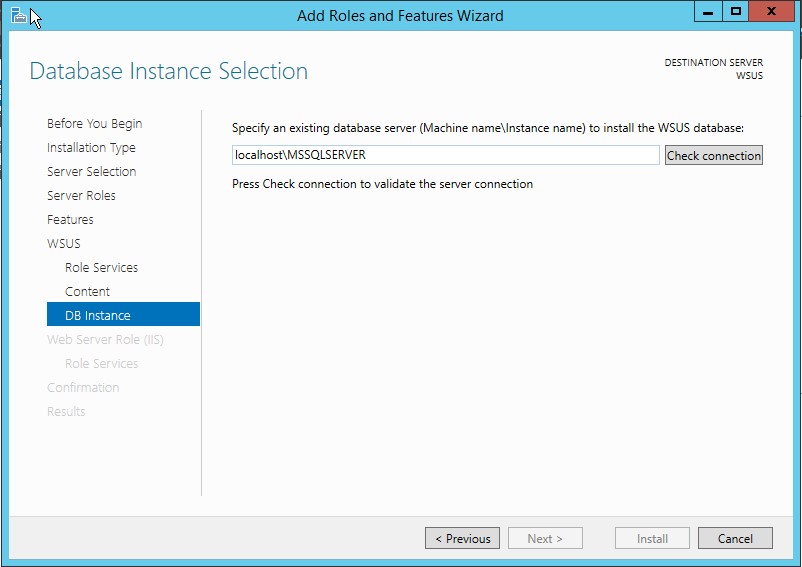
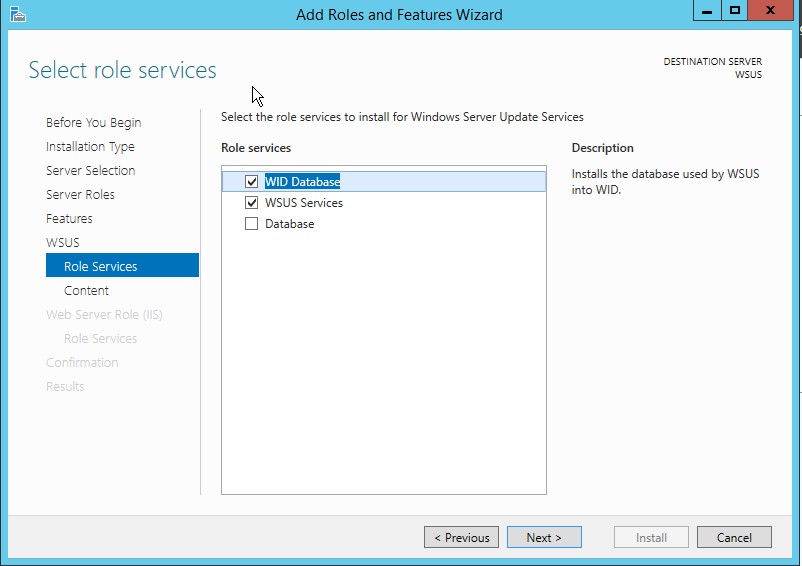
9. On the Select Role Services page, choose your preferred database type and then click Next. If you are already have a SQL server on same server (or on different server), you can go ahead and uncheck the WID Database option, then check the Database option. If you choose SQL database, you will have to provide SQL connection details as shown in following diagram:
If you want to use Windows Internal Database (WID), just select WID Database and WSUS services option and click Next as shown in following diagram:
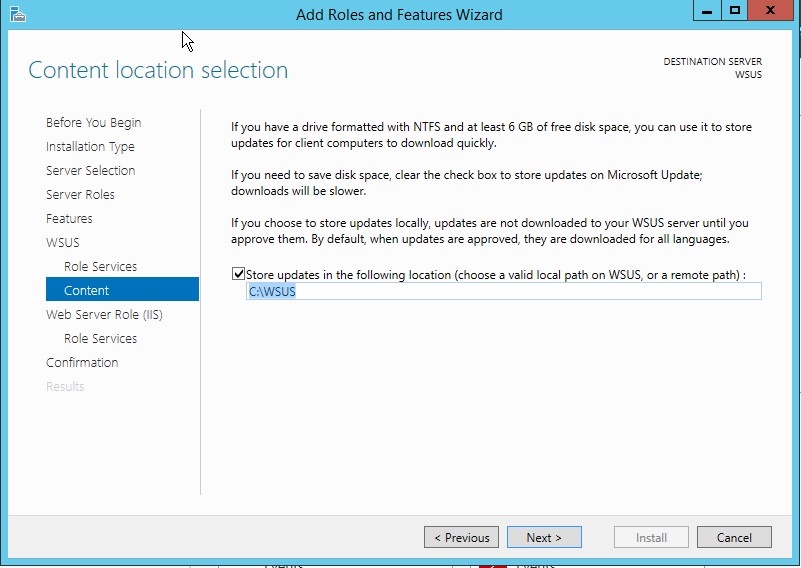
10. On the Content location selection page, type a valid location to store the updates. For example, you can create a folder named WSUS at the root of drive C: specifically for this purpose, and type C:\WSUS as the valid location.
11. Click Next. The Web Server Role (IIS) page opens. Review the information, and then click Next. In select the role services to install for Web Server (IIS), keep the defaults, and then click Next.
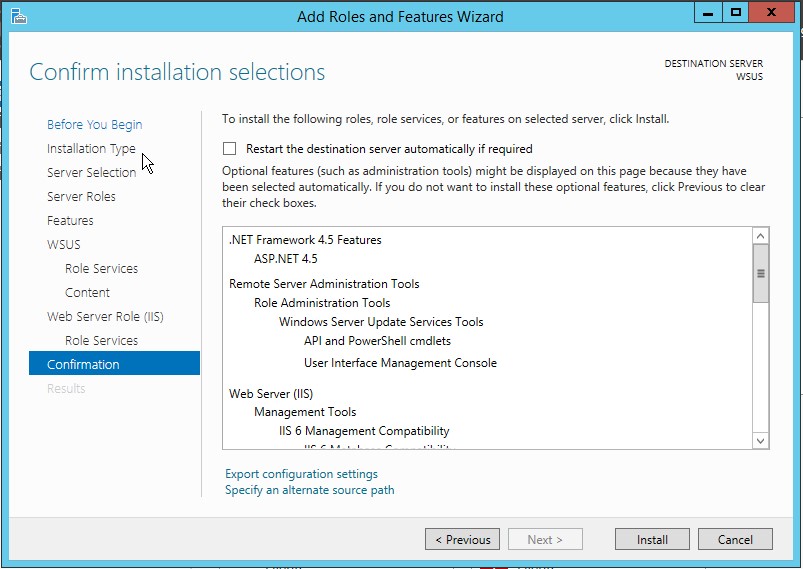
12. On the Confirm installation selections page, review the selected options, and then click Install.
The WSUS installation wizard runs. This might take several minutes to complete.
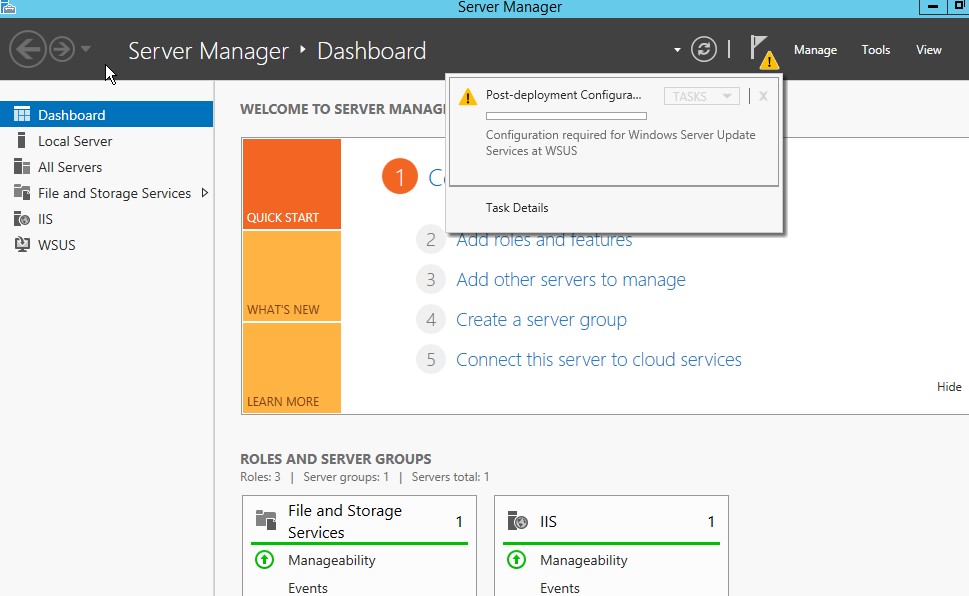
13. Once WSUS installation is complete, in the summary window on the Installation progress page, click Launch Post-Installation tasks. The text changes, requesting: Please wait while your server is configured.
When the task has finished, the text changes to: Configuration successfully completed. Click Close.
14. In Server Manager, verify if a notification appears to inform you that a restart is required. This can vary according to the installed server role. If it requires a restart make sure to restart the server to complete the installation.
WSUS Configuration
- Launch WSUS console.
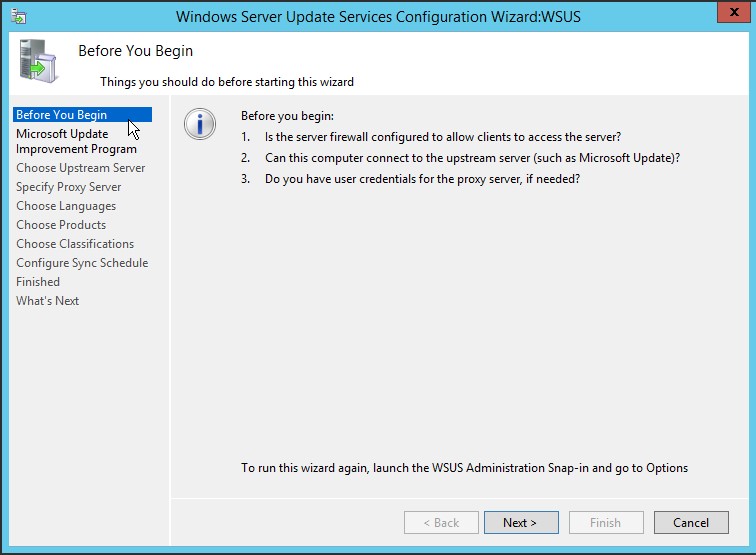
2. When WSUS Configuration wizard opens up, click Next
3. Now you are asked to participate into Microsoft Update Improvement plan. If you are fine with Microsoft collecting some information about your organization (like how many computers your organization have, how many computers successfully installed each update etc.), select the checkbox Yes, I would like to join Microsoft Update Improvement Program and click Next.
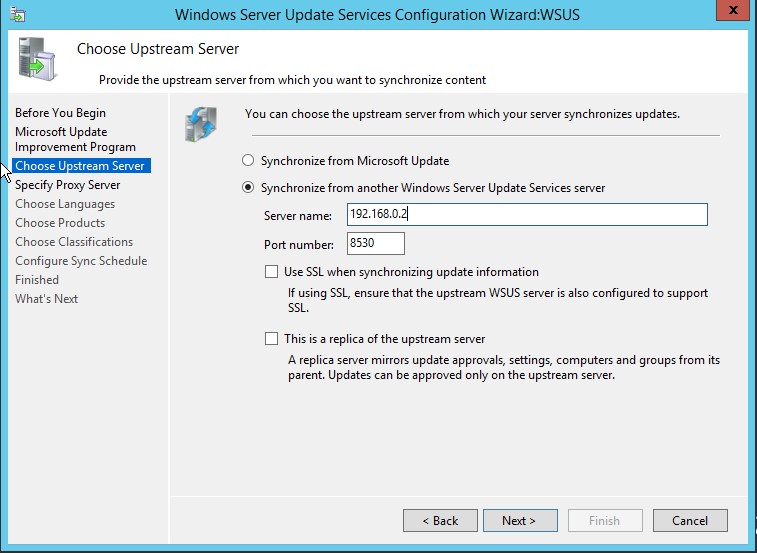
4. Next screen is to configure your upstream server which defines Where does this WSUS server will download the updates. You can either select Synchronize from Microsoft Update (which is default) or select Synchronize from another Windows Server Update Services server. If this is the first WSUS server in your organization, you should select first option so that the server can download the updates directly from Windows Update. Make sure to adjust your firewall settings for both cases. If you choose to connect to Windows Update, make sure your server has access to internet or if you choose to connect to an upstream server, be sure to allow Port 8530 or 8531 (SSL) on both servers.
In my case, I already have a WSUS server on 192.168.0.2 server, I will choose to download updates from this server. You can also make this server as a replica server. Replica server picks all the configuration from upstream server and you can not directly approve any update on Replica server, it can only deploy the updates to computers.
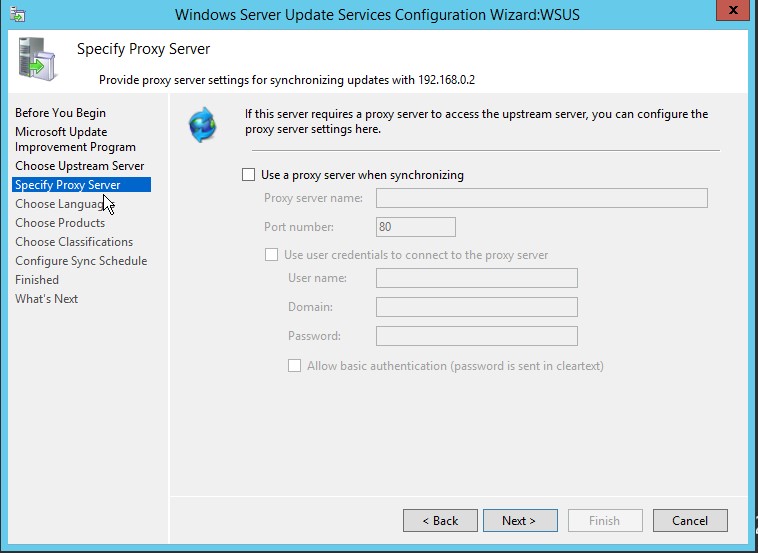
5. Next step is to choose Proxy settings, If you use proxy to connect to internet, you can enter the details here. If not, leave everything at its default setting.
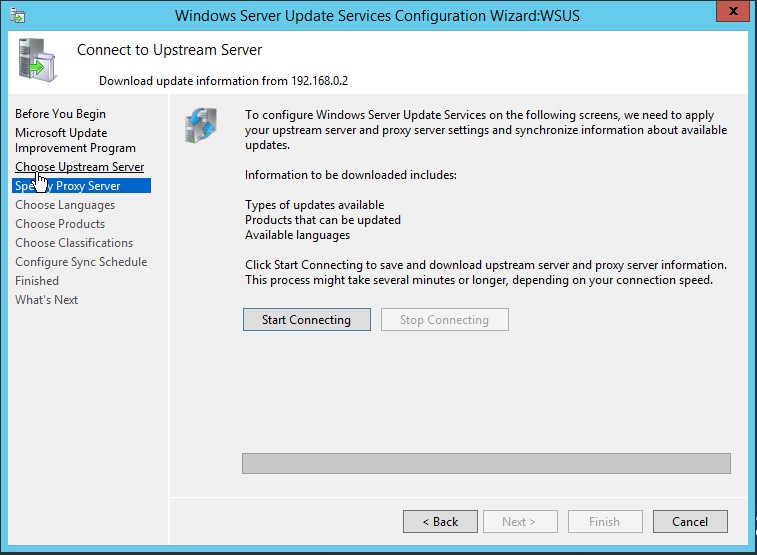
6. Now, click Start Connecting. It will take some time to complete the operation.
When progress bar turns all green, click Next.
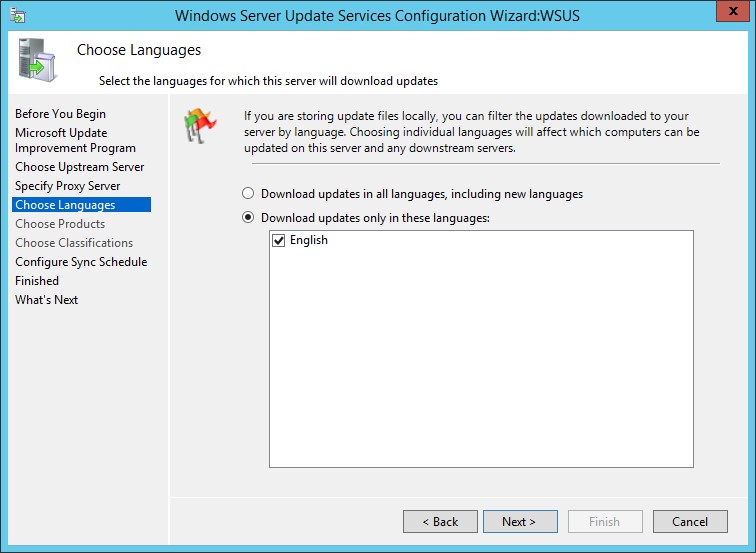
7. On Language selection screen, select the language for your products and click Next.
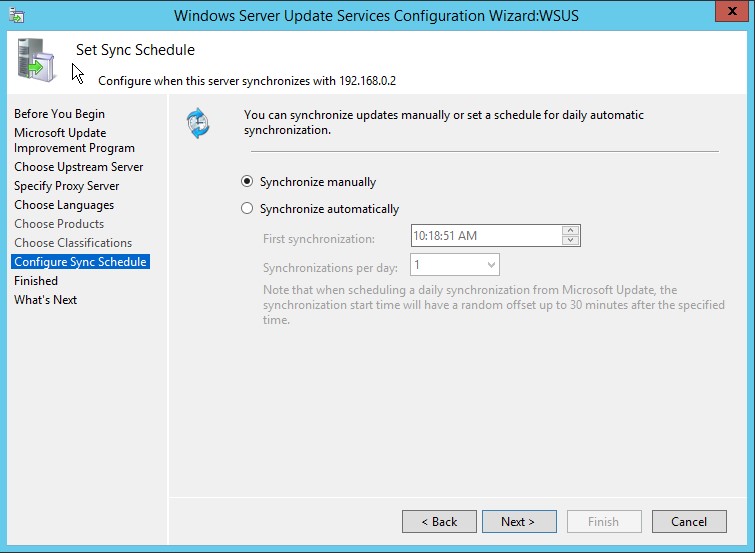
8. Next step is to configure the Sync schedule. If you choose to Synchronize manually, server will not check for new updates and will not download any update until you run the synchronization
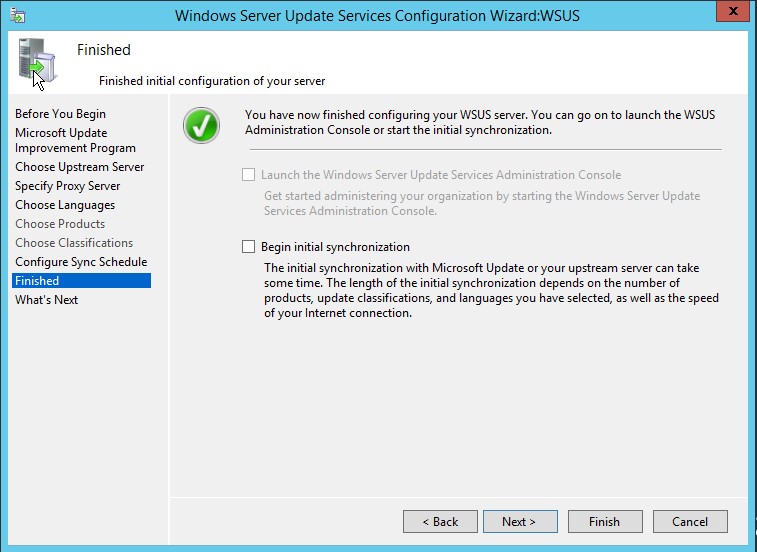
9. In the next step, uncheck the option Begin initial synchronization and click Finish Since initial synchronization takes a lot of time, we will do it after completing all the configuration steps.
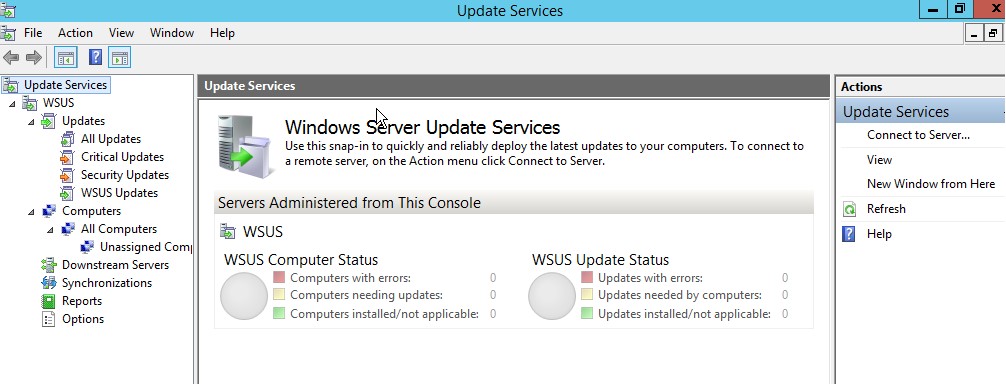
10. Windows Server Update Services wizard will launch automatically.
Close the WSUS console for now. We have to install some required updates.
Install some Required Updates on WSUS server
On Windows Server 2012 R2 and Windows Server 2012 R2, you need to install the KB3095113 and KB3159706.
1. KB3095113 enables the WSUS support for Windows 10 feature upgrades. The update can be downloaded from following link:
2. KB3159706 enables the ESD decryption provision in WSUS in Windows Server 2012 and Windows Server 2012 R2. The update can be downloaded from following link:
https://support.microsoft.com/en-us/kb/3159706
KB3159706 requires some manual steps to complete the installation. If you do not perform these steps, the WSUS server will keep crashing.
Manual Steps
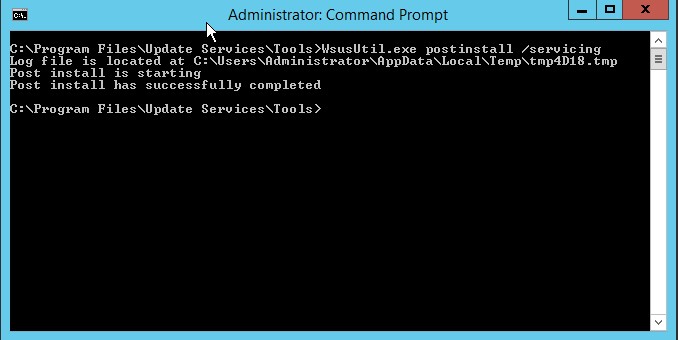
a. Open an elevated Command Prompt, and run the following command (assuming “C” as OS drive):
"C:\Program Files\Update Services\Tools\wsusutil.exe" postinstall /servicing
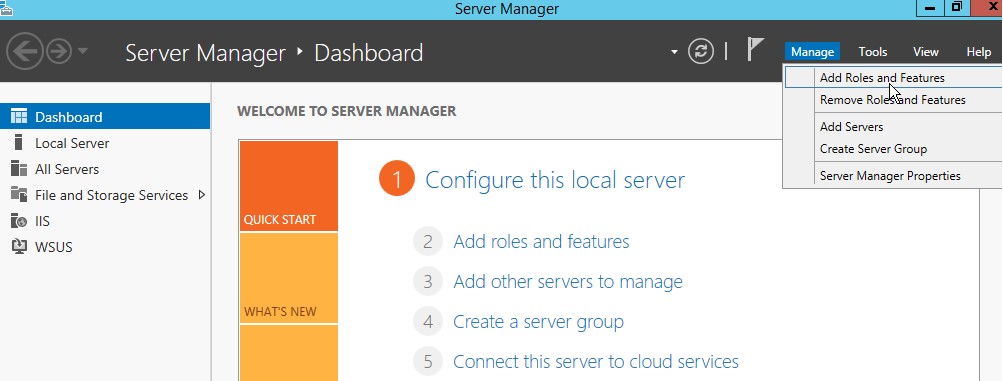
b. Open Server Manager, click Manage and then select Add Roles and Features
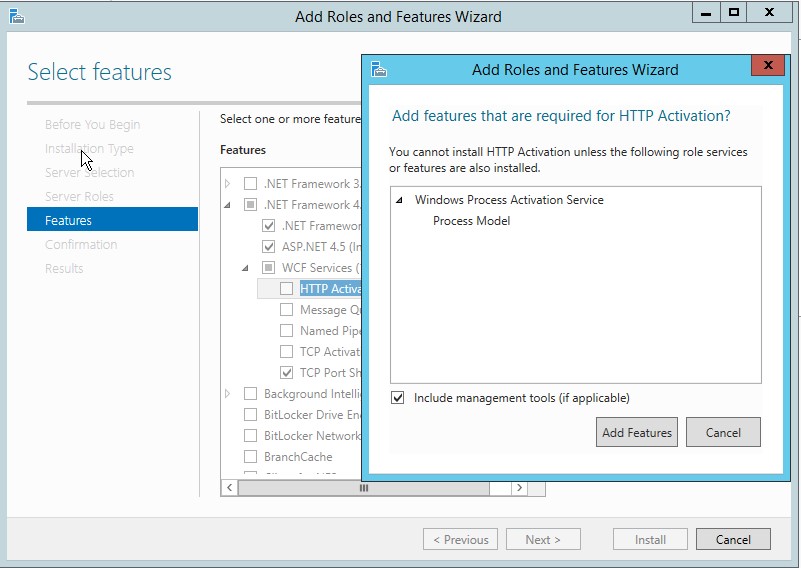
c. On Add and Remove Roles wizard, press Next a couple times until you see Features screen. Expand .NET Framework 4.5 features, and then expand WCF Services and select HTTP Activation feature. When prompted to add required role services, click Add Features button and click Next.
d. Now click Install button and wait for installation to complete.
e. After completing the install either restart the server or restart the WSUS services.
f. To run reports on WSUS server, you need to install Microsoft Report Viewer 2008 SP1 which is available for download on the following link:
https://www.microsoft.com/en-in/download/details.aspx?id=3841
Advanced Configuration of WSUS server
Launch the WSUS console and follow the steps to do additional configurations:
Create Computer Groups
Computer groups enable you to target updates to specific computers. There are two default computer groups: All Computers and Unassigned Computers. When each client computer initially contacts the WSUS server, the server adds that client computer to each of these groups.
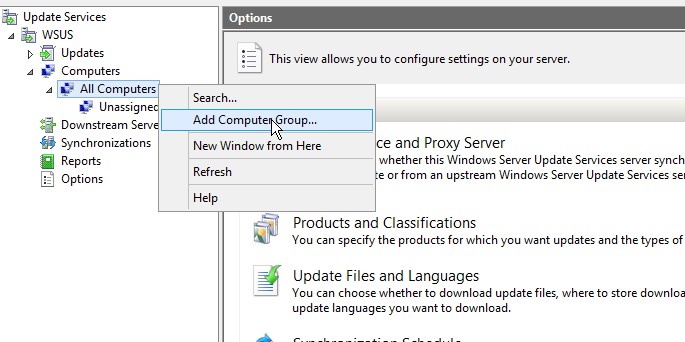
Let us add three more computer groups with names IT, Testing, and User PCs. To do this:
- Right click on All Computers default group and select Add Computer Group
- Enter the name for the group and click Add.
It is a good practice to create a Testing group and then add some test lab PCs to this group so that you can test the updates on these computers before rolling out the updates to whole organization computers. If anything goes wrong, you can identify the offending update and Decline that update so that it does not get installed on your production PCs.
Select Product and Classifications
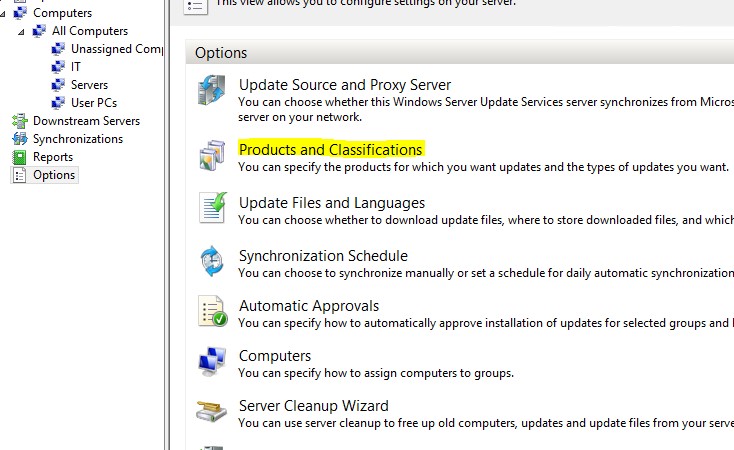
It is always a good idea to select only the products and classifications you require in your organization. By doing so, you will only download what you need. It will save a lot of hard drive space as well as internet bandwidth. To select Products and Classifications:
- Click Options in WSUS console.
- Click Products and Classifications.
- Under Products tab, only select products that are installed in your organization. By default, a whole lot of products will be selected. For example, in my case, I have only Office 2016 and Windows 10 installed. Therefore, I will only select Office 2016 and Windows 10 and uncheck everything else.
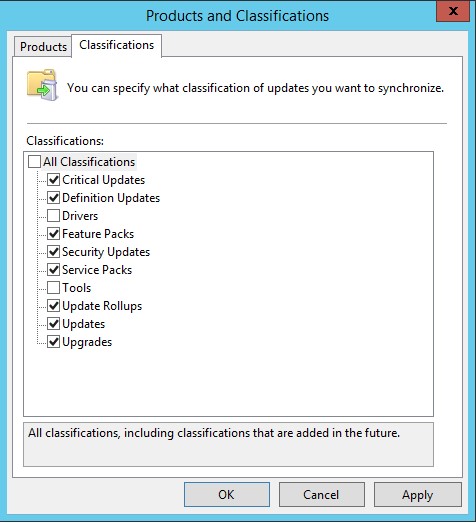
- Under Classifications tab, select the product classification you need. In most of the cases you only need to select Critical Updates, Security Updates, Updates and Upgrades but you can choose anything as per your policy or requirement.
Below are some short descriptions of every classification (source Microsoft documentation):
- Critical Updates: Specifies a broadly released update for a specific problem that addresses a critical, non-security-related bug.
- Definition Updates: Specifies an update to virus or other definition files.
- Feature Packs: Specifies new product features that are distributed outside of a product release and that are typically included in the next full product release.
- Security Updates: Specifies a broadly released update for a product-specific, security-related issue.
- Service Packs: Specifies a cumulative set of hotfixes that are applied to an application. These hotfixes can include: security updates, critical updates, software updates, and so on.
- Tools: Specifies a utility or feature that helps to complete one or more tasks.
- Update Rollups: Specifies a cumulative set of hotfixes that are packaged together for easy deployment. These hotfixes can include security updates, critical updates, updates, and so on. An update rollup generally addresses a specific area, such as security or a product component.
- Updates: Specifies an update to an application or file that is currently installed.
- Upgrade: Specifies an upgrade for Windows 10 features and functionality. Your software update points and sites must run a minimum of WSUS 4.0 with the hotfix 3095113to get the Upgrade
Update Files and Languages
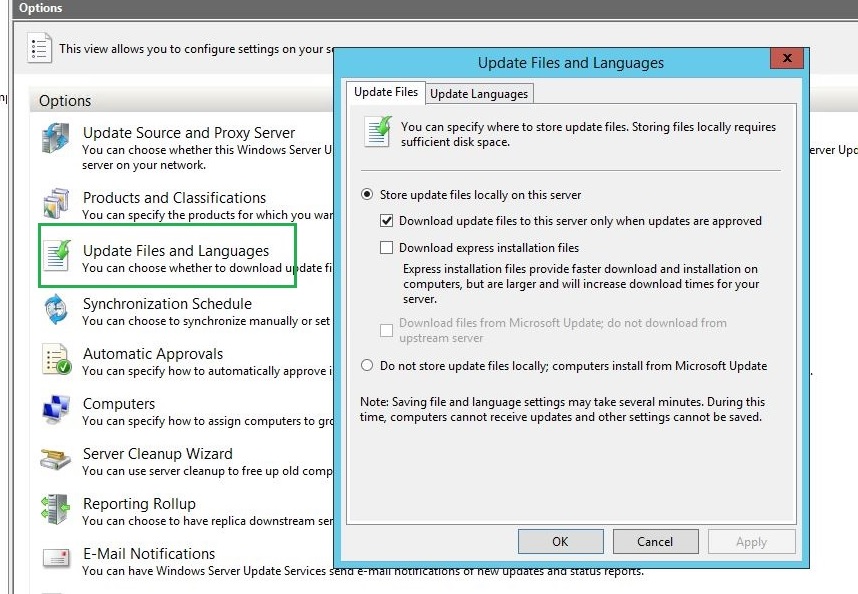
You can specify whether to store update files on your local WSUS server or on Microsoft Update. If you choose to store the updates locally, you can limit the updates downloaded to your server by language. If you choose to store the update files on Microsoft Update, then your WSUS server obtains only update information (metadata) for the criteria you have specified on the Synchronization Options page. In this scenario, the update files come directly from Microsoft Update and are downloaded at the time of installation on the client computers receiving updates. You will need to make sure your client computers have direct access to Microsoft Update in this scenario. This option does not make any sense of deploying the WSUS server in organization if every client computer is supposed to download updates from internet.
To select Update Files and Languages:
- Click Options in WSUS console.
- Click Update Files and Languages option.
On Update Files tab, make sure that the Store update files locally on this server radio button is selected. If you want the updates to start downloading only when you approve the updates, select the checkbox against Download update files to this server only when updates are approved. This option gives you explicit privilege to download only the updates you want. You should consider using this option if your ISP gives you limited monthly data.
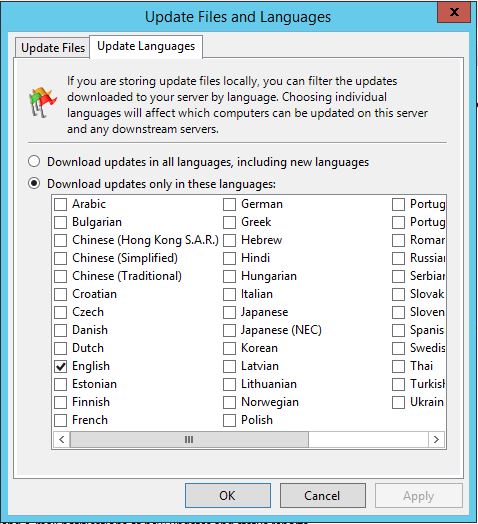
- Under Update Languages tab, only select the languages that are applicable to your products. In my case, I only selected English since I know that every software (including Windows) in my organization is running on US English. Never ever select the radio button Download updates in all languages. This option will unnecessarily cost you huge disk space and internet bandwidth.
Automatic Approvals
After updates have been synchronized to your WSUS server, you must approve them to initiate a deployment action. When you approve an update, you are essentially telling WSUS what to do with it (for example, your choices are Install, Detect only, Remove, or Decline update). When approving an update, you specify a default approval setting for the All Computers group, and any necessary settings for each computer group in the Approve Updates dialog box. If you do not approve an update, its approval status remains Not approved and your WSUS server performs no action for the update. The exceptions to this are in the Critical Updates and Security Updates classifications, which by default are automatically approved for detection after they are synchronized.
If you do not wish to approve each and every update manually, WSUS console gives you an option to set automatic approval rules.
To open Automatic Approvals:
- Click Options in WSUS console.
- Click Automatic Approvals option.
I would personally recommend creating an automatic approval rule for Testing group we created earlier. In most of the case, WSUS server is set to Sync after business hours. If you do not create any automatic approval rule, what would happen is this:
- Remember previously we selected an option to Download updates only when they are approved.
- If we do not create any automatic approval rule, WSUS server will not download any update after synchronization finishes. It will wait for you to approve the updates. As soon as you approve the updates, the download will start.
- Guess what happens if there are hundreds of updates to be downloaded. The internet connection will get congested which will affect your business applications and production.
- If you want the updates to be downloaded after business hours, you must set the Sync schedule after your business hours and create an automatic approval rule. When WSUS finishes synchronization and it finds new updates to download, the updates will be auto approved and downloaded at the same time thus not impacting production hours. Of course all the updates matching your Products and Classifications criteria will be downloaded. So, be sure to select your Products and Classifications wisely.
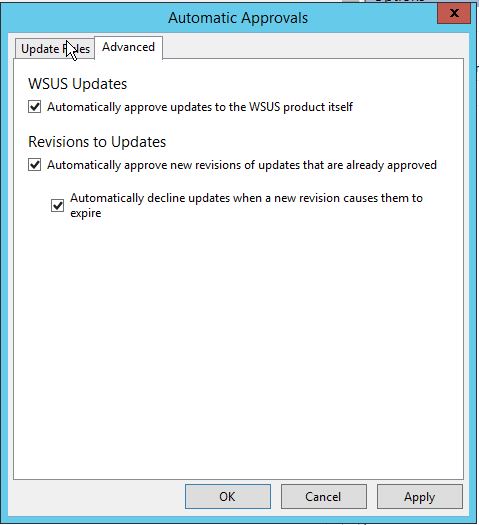
If you want to download and approve the Updates for WSUS software itself, go to Advanced tab and select the checkbox against Automatically approve updates to the WSUS product itself option under WSUS Updates.
Assign Computers to Different Groups
To open the settings:
- Click Options in WSUS console.
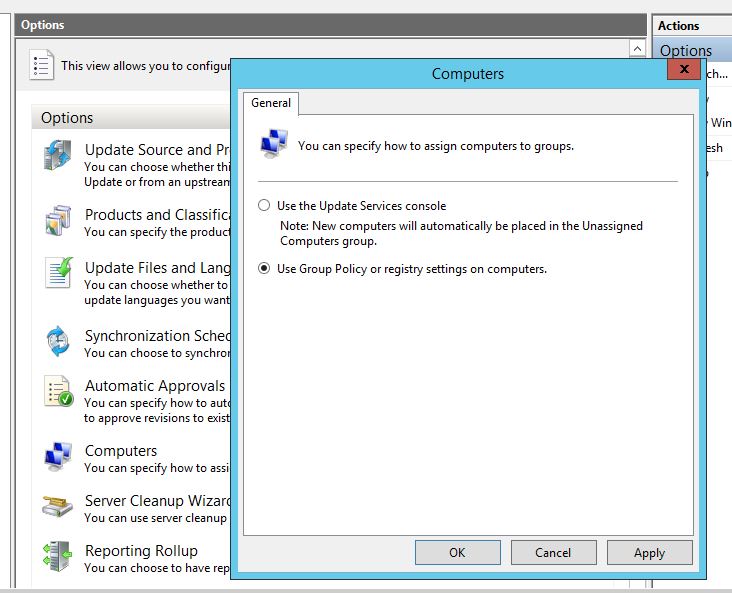
- Click Computers option.
There are only two options:
- Use the Update Services console: This option allows you to manually assign the computers to groups.
- Use Group Policy or registry settings on computers: This is the most preferred way of assigning computers. If you are running an Active Directory Domain, you can use Group policy to provide WSUS settings for all the computers. If you are using Workgroup environment, you can use registry settings.
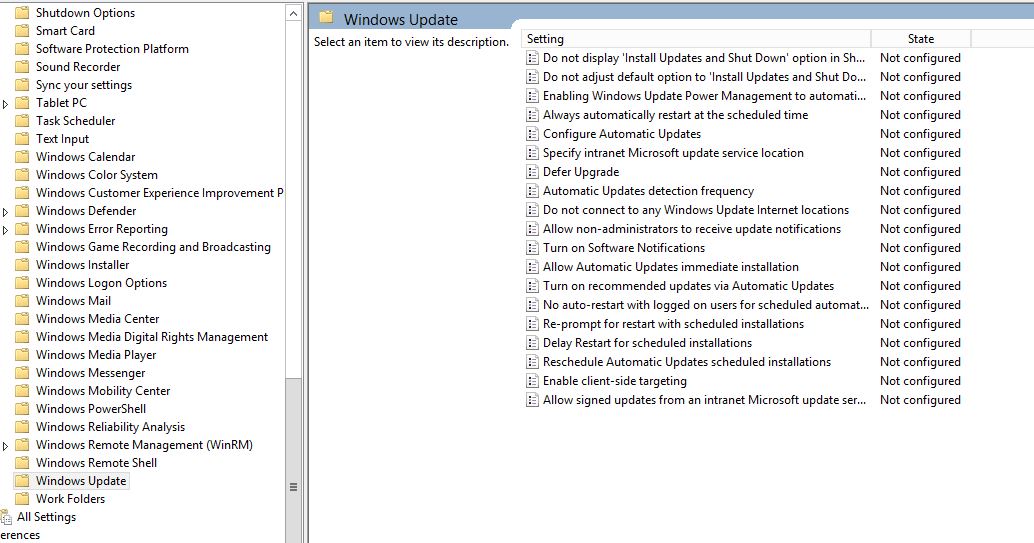
Group Policy settings are located at Computer Configuration –> Policies –> Administrative Templates –> Windows Components –> Windows Update.
To do so via Registry editing, copy the following code into notepad, save the file with .reg extension and then run this file on target client computer. The client computer will be auto configured to download updates from WSUS server instead of Windows update.
Windows Registry Editor Version 5.00

[HKEY_LOCAL_MACHINE\SOFTWARE\Policies\Microsoft\Windows\WindowsUpdate]
"AcceptTrustedPublisherCerts"=dword:00000001
"ElevateNonAdmins"=dword:00000001
"TargetGroup"="User PCs"
"TargetGroupEnabled"=dword:00000001
"WUServer"="http://192.168.0.2:8530"
"WUStatusServer"="http://192.168.0.2:8530"

[HKEY_LOCAL_MACHINE\SOFTWARE\Policies\Microsoft\Windows\WindowsUpdate\AU]
"AUOptions"=dword:00000004
"AUPowerManagement"=dword:00000001
"AutoInstallMinorUpdates"=dword:00000001
"DetectionFrequency"=dword:0000000a
"DetectionFrequencyEnabled"=dword:00000001
"IncludeRecommendedUpdates"=dword:00000001
"NoAUAsDefaultShutdownOption"=dword:00000001
"NoAUShutdownOption"=dword:00000001
"NoAutoRebootWithLoggedOnUsers"=dword:00000001
"NoAutoUpdate"=dword:00000000
"RebootRelaunchTimeout"=dword:0000000a
"RebootRelaunchTimeoutEnabled"=dword:00000001
"RescheduleWaitTime"=dword:0000000a
"RescheduleWaitTimeEnabled"=dword:00000001
"ScheduledInstallDay"=dword:00000007
"ScheduledInstallTime"=dword:00000002
"UseWUServer"=dword:00000001
Of course replace the IP and Port (192.168.0.2:8530) with your WSUS server’s IP (Name) and port.
See the following table for more information about registry code:
| Entry name | Data type | Values |
| AcceptTrustedPublisherCerts | Reg_DWORD | Range = 1|0
– 1 = Enabled. The WSUS server distributes available signed non-Microsoft updates. |
| DisableWindowsUpdateAccess | Reg_DWORD | Range = 1|0
– 1 = Disables access to Windows Update. |
| ElevateNonAdmins | Reg_DWORD | Range = 1|0
– 1 = All members of the Users security group can approve or disapprove updates. |
| TargetGroup | Reg_SZ | Name of the computer group to which the computer belongs. This policy is paired with TargetGroupEnabled. |
| TargetGroupEnabled | Reg_DWORD | Range = 1|0
– 1 = Use client-side targeting. |
| WUServer | Reg_SZ | HTTP(S) URL of the WSUS server that is used by Automatic Updates and API callers (by default). This policy is paired with WUStatusServer, and both keys must be set to the same value to be valid. |
| WUStatusServer | Reg_SZ | The HTTP(S) URL of the server to which reporting information is sent for client computers that use the WSUS server that is configured by the WUServer key. This policy is paired with WUServer, and both keys must be set to the same value to be valid. |
| Entry name | Data type | Values |
| AUOptions | Reg_DWORD | Range = 2|3|4|5
– 2 = Notify before download. |
| AutoInstallMinorUpdates | Reg_DWORD | Range = 0|1
– 0 = Treat minor updates like other updates. |
| DetectionFrequency | Reg_DWORD | Range = n, where n = time in hours (1–22).
– Time between detection cycles. |
| DetectionFrequencyEnabled | Reg_DWORD | Range = 0|1
– 1 = Enable detection frequency. |
| NoAutoRebootWithLoggedOnUsers | Reg_DWORD | Range = 0|1
– 1 = Logged-on user can decide whether to restart the client computer. |
| NoAutoUpdate | Reg_DWORD | Range = 0|1
– 0 = Enable Automatic Updates. |
| RebootRelaunchTimeout | Reg_DWORD | Range = n, where n = time in minutes (1–1,440).
– Time between prompts for a scheduled restart. |
| RebootRelaunchTimeoutEnabled | Reg_DWORD | Range = 0|1
– 1 = Enable RebootRelaunchTimeout. |
| RebootWarningTimeout | Reg_DWORD | Range = n, where n = time in minutes (1–30).
– Length, in minutes, of the restart warning countdown after updates have been installed that have a deadline or scheduled updates. |
| RebootWarningTimeoutEnabled | Reg_DWORD | Range = 0|1
– 1 = Enable RebootWarningTimeout. |
| RescheduleWaitTime | Reg_DWORD | Range = n, where n = time in minutes (1–60).
– Time in minutes that Automatic Updates waits at startup before it applies updates from a missed scheduled installation time. |
| RescheduleWaitTimeEnabled | Reg_DWORD | Range = 0|1
– 1 = Enable RescheduleWaitTime . |
| ScheduledInstallDay | Reg_DWORD | Range = 0|1|2|3|4|5|6|7
– 0 = Every day. |
| ScheduledInstallTime | Reg_DWORD | Range = n, where n = the time of day in 24-hour format (0–23). |
| UseWUServer | Reg_DWORD | Range = 0|1
– 1 = The computer gets its updates from a WSUS server. |
Finally, I would like to say that WSUS is a great tool which every organization should consider to save their monthly internet data and bandwidth. This prevents repeated download of same updates over and over again when each computer of your organization is updated.
As your WSUS keeps downloading new and new updates, it will need more and more disk space. Whatever it downloads over a period of time is not always necessary for you to keep. So, I would suggest to run Server Cleanup Tool (available in Options page of WSUS console) once within 1-2 months so that unnecessary updates (like expired, superseded, not-required) could be removed to reclaim disk space.


