
- June 9, 2018
- Posted by: Surender Kumar
- Category: PowerShell
Use PowerShell to transfer large files via BITS
Table of Contents
Background Intelligent Transfer Service (BITS) has been around for a long time. It is a component of Microsoft Windows operating systems, which facilitates asynchronous, prioritized, and throttled transfer of files between machines using idle network bandwidth. It is most commonly used by recent versions of Windows Update to deliver software updates.
The Copy-Item PowerShell cmdlet is sufficient when copying file(s) or folder(s) between computers. The problem arises when the network you are transferring the files across is unreliable. Unreliable means that the machine you are copying upon does not maintain the connection or if you’re transferring a large file across the link that affects the overall network performance. Copy-Item cmdlet does not provide any way to optimize the network bandwidth in such scenario. In this situation, transferring files using BITS would be your best bet. BITS is the smart way of transferring large files without affecting overall network performance.
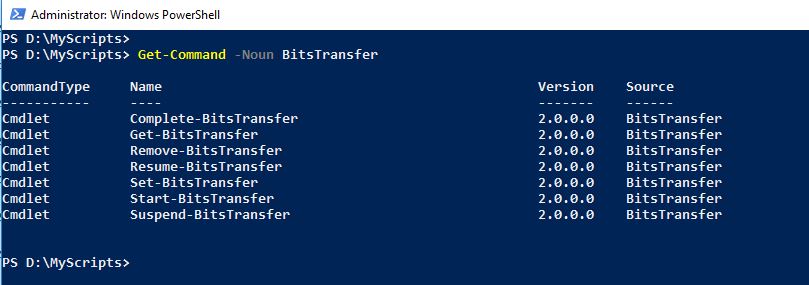
To check various cmdlets that are provided by BitsTransfer, use the Get-Command cmdlet as shown below:
PS D:\MyScripts> Get-Command -Noun BitsTransfer
First of all, lets take a look at Start-BitsTransfer cmdlet help.
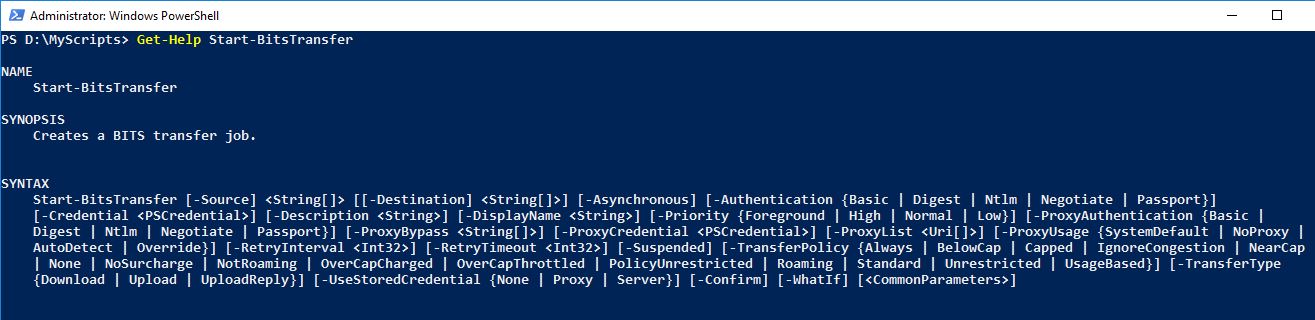
Notice that the -Source parameter is not enclosed inside square brackets which indicates it is a mandatory parameter. All other parameters are optional.
Lets discuss some commonly used parameters and their usage.
-Source
This parameter specifies the source location and the name of the file(s) that you want to transfer. Notice the <String[]> keyword next to Source which indicates it can accept an array (multiple values). The source file names are paired with the corresponding destination file names. For example, the first file name specified in the Source parameter corresponds to the first file name in the Destination parameter and so on. The Source and Destination parameters must have the same number of elements; otherwise, the command will not work.
-Destination
This specifies the destination location and the names of the files that you want to transfer. It should have same number of elements as that of Source parameter.
-Asynchronous
This parameter allows the BITS transfer job to be created and pushed in the background. The command prompt reappears immediately after the BITS transfer job is created. The command will return a BitsJob object, which can be used to monitor the status and progress. If you run the command without Asynchronous parameter, you will continue to see the Transfer progress. This parameter comes handy in Scripting as it passes the control to next line immediately without having to wait for one transfer job to complete.
-Credential
This parameter specifies the credentials to be used to authenticate the user to the server that is specified in the value of the Source parameter. The default is the current user. This comes handy while you are transferring files between multiple computers and currently logged-on user does not have enough access to copy the files. You can also use Get-Credential cmdlet to create and store the credentials in secure PSCredential object.
-TransferType
This parameter specifies the BITS transfer job type. Possible values are:
- Download (default): Specifies that the transfer job will download the file(s) to the client computer.
- Upload: Specifies that the transfer job will upload the file(s) to the server.
- UploadReply: Specifies that the transfer job will upload the file(s) to the server and receives a reply file from the server.
Download Using BITS
For example, if I want to download a large file from internet, I will use the Start-BitsTransfer cmdlet as shown below:
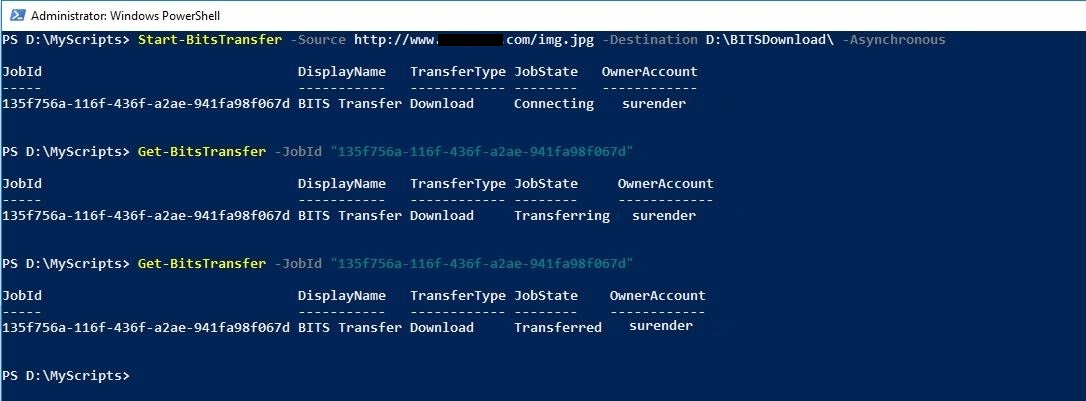
Take a look at the JobState property of transfer job. It transitioned from Connecting to Transferring and then changed to Transferred when the file downloaded.
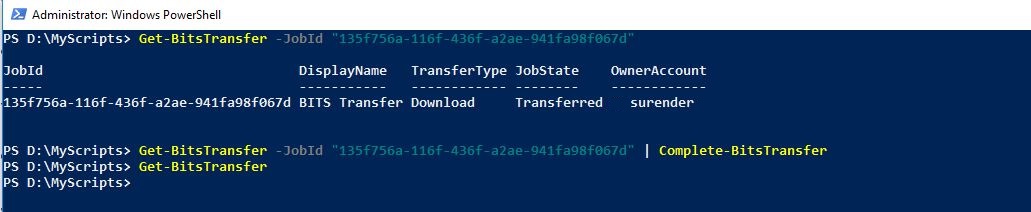
Now that the file is downloaded, PowerShell will keep showing it to you every time you will run Get-BitsTransfer command. To mark it as complete and remove from list, you can pipe the output of Get-BitsTransfer command to Complete-BitsTransfer cmdlet as shown below:
Upload Using BITS
Similarly, you can use Start-BitsTransfer cmdlet to upload the file(s) by using -TransferType parameter with the value of ‘Upload’ while rest of the options remains same.
In the following screenshot, I uploaded an iso file from D:\ISO\ to File Server. The best thing about BITS transfer is that if your file server’s network link is pretty busy while you run the command as some other user is copying really important stuff. Your BitsTransfer job will not cause any problem with his/her copying operation since BITS make use of idle bandwidth. It will wait until link becomes available.

By using this concept, you can leverage the power of BITS and create a script to transfer the file(s) between computers.