
- June 16, 2015
- Posted by: Surender Kumar
- Category: Cisco Routers
IP Routing Configuration
Table of Contents
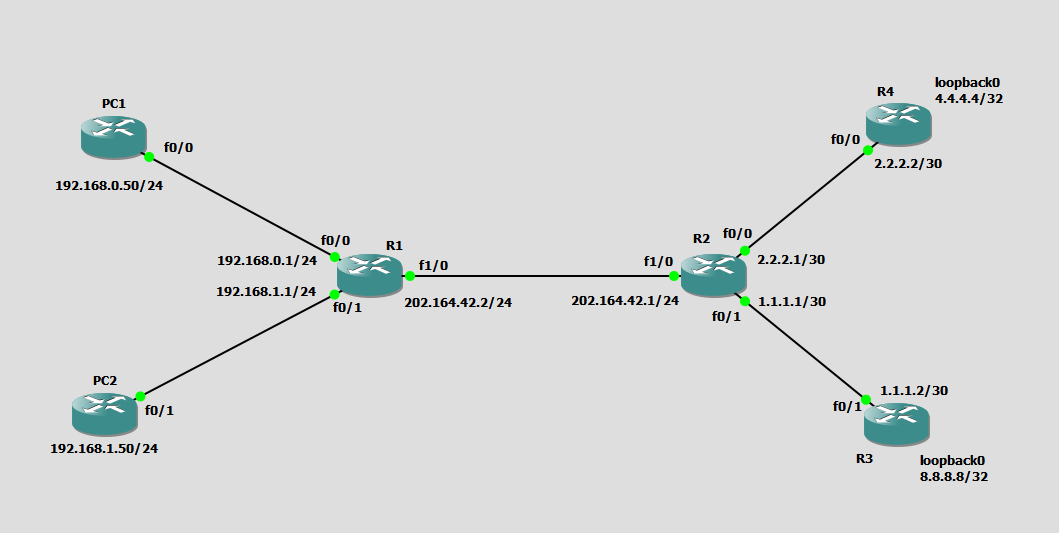
To configure IP Routing, I will use the diagram below. In the diagram, I have two routers PC1 and PC2 which will work like end devices. I have disabled IP routing and configured both of them to use default gateway.
Always remember that, by default, routers only know about networks that are directly connected to them. In order to learn about remote networks, the routers need to be configured with either of the routing method i.e. static routes, dynamic routes or dynamic routes.
Before jumping to IP Routing configuration, we need to setup some basic parameters of every routers and assign IP address to interfaces according to our network diagram.
Configure PC1
Router#config term
Enter configuration commands, one per line.  End with CNTL/Z.
Router(config)#hostname PC1
PC1(config)#no ip domain lookup
PC1(config)#no ip routing
PC1(config)#interface FastEthernet0/0
PC1(config-if)# ip address 192.168.0.50 255.255.255.0
PC1(config-if)# no shut
PC1(config-if)# exit
PC1(config)#ip default-gateway 192.168.0.1
PC1(config)#end
PC1#write
Building configuration...

*Jun 16 16:04:01.743: %SYS-5-CONFIG_I: Configured from console by console[OK]
PC1#
The above configuration commands will configure router’s hostname as PC1 and setup IP address 192.168.0.50 on interface FastEthernet0/0. The no ip routing command will turn off routing on router so that this router will behave just like an end device (PC). The ip default-gateway command will tell the router that every packet should be forwarded to IP address 192.168.0.1.
Configure PC2
Router#conf term
Enter configuration commands, one per line. End with CNTL/Z.
Router(config)#hostname PC2
PC2(config)#no ip domain lookup
PC2(config)#no ip routing
PC2(config)#interface FastEthernet0/0
PC2(config-if)# ip address 192.168.1.50 255.255.255.0
PC2(config-if)# no shut
PC2(config-if)#exit
PC2(config)#ip default-gateway 192.168.1.1
PC2(config)#end
PC2#write
Building configuration...

*Jun 16 16:04:44.623: %SYS-5-CONFIG_I: Configured from console by console[OK]
PC2#
The above configuration commands will configure router’s hostname as PC2 and setup IP address 192.168.1.50 on interface FastEthernet0/0. The no ip routing command will turn off routing on router so that this router will behave just like an end device (PC). The ip default-gateway command will tell the router that every packet should be forwarded to IP address 192.168.1.1.
Configure R1
Router#
Router#config term
Enter configuration commands, one per line.  End with CNTL/Z.
Router(config)#hostname R1
R1(config)#no ip domain lookup
R1(config)#interface FastEthernet0/0
R1(config-if)# ip address 192.168.0.1 255.255.255.0
R1(config-if)# no shut
R1(config-if)#interface FastEthernet0/1
R1(config-if)# ip address 192.168.1.1 255.255.255.0
R1(config-if)# no shut
R1(config-if)#interface FastEthernet1/0
R1(config-if)# ip address 202.164.42.2 255.255.255.0
R1(config-if)# no shut
R1(config-if)# end
R1#write
Building configuration...

*Jun 16 16:09:28.079: %SYS-5-CONFIG_I: Configured from console by console[OK]
R1#
Note that during the R1 configuration, I did not run no ip routing command because we are not going to disable routing on this device. In our test network, R1, R2, R3 and R4 should actually work as a router.
Configure R2
Router#
Router#config term
Enter configuration commands, one per line.  End with CNTL/Z.
Router(config)#hostname R2
R2(config)#no ip domain lookup
R2(config)#interface FastEthernet0/0
R2(config-if)# ip address 2.2.2.1 255.255.255.252
R2(config-if)# no shut
R2(config-if)#interface FastEthernet0/1
R2(config-if)# ip address 1.1.1.1 255.255.255.252
R2(config-if)# no shut
R2(config-if)#interface FastEthernet1/0
R2(config-if)# ip address 202.164.42.1 255.255.255.0
R2(config-if)# no shut
R2(config-if)# end
R2#write
Building configuration...

*Jun 16 16:10:08.283: %SYS-5-CONFIG_I: Configured from console by console
R2#
Configure R3
R3#
R3#config term
Enter configuration commands, one per line.  End with CNTL/Z.
R3(config)#hostname R3
R3(config)#no ip domain lookup
R3(config)#interface FastEthernet0/1
R3(config-if)# ip address 1.1.1.2 255.255.255.252
R3(config-if)# no shut
R3(config-if)#interface loopback0
R3(config-if)# ip address 8.8.8.8 255.255.255.255
R3(config-if)# no shut
R3(config-if)# end
R3#write
Building configuration...

*Jun 16 16:12:33.883: %SYS-5-CONFIG_I: Configured from console by console[OK]
R3#
Configure R4
Router#
Router#config term
Enter configuration commands, one per line.  End with CNTL/Z.
Router(config)#hostname R4
R4(config)#no ip domain lookup
R4(config)#interface FastEthernet0/0
R4(config-if)# ip address 2.2.2.2 255.255.255.252
R4(config-if)# no shut
R4(config-if)#interface loopback0
R4(config-if)# ip address 4.4.4.4 255.255.255.255
R4(config-if)# no shut
R4(config-if)# end
R4#write
Building configuration...
[OK]
R4#
At this step, you have configured basic parameters required for connectivity between routers and PCs in our test network.
Because routing is not yet configured, the routing table of the router will only show directly connected routes. To view the IP routing tables created on router R1, use the command show ip route. The command output is shown as follows:
R1#show ip route
Codes: C - connected, S - static, R - RIP, M - mobile, B - BGP
       D - EIGRP, EX - EIGRP external, O - OSPF, IA - OSPF inter area
       N1 - OSPF NSSA external type 1, N2 - OSPF NSSA external type 2
       E1 - OSPF external type 1, E2 - OSPF external type 2
       i - IS-IS, su - IS-IS summary, L1 - IS-IS level-1, L2 - IS-IS level-2
       ia - IS-IS inter area, * - candidate default, U - per-user static route
       o - ODR, P - periodic downloaded static route

Gateway of last resort is not set

     4.0.0.0/32 is subnetted, 1 subnets
C       4.4.4.4 is directly connected, Loopback0
C    192.168.0.0/24 is directly connected, FastEthernet0/0
C    192.168.1.0/24 is directly connected, FastEthernet0/1
C    202.164.42.0/24 is directly connected, FastEthernet1/0
R1#
Configure Routing on Routers R1, R2, R3 and R4
I am going to start off by describing and implementing static routing on our network because if you can implement static routing and make it work, it means now you have basic understanding of the network.
So let’s get started.
Static Routing
Static routing occurs when you manually add routes in each router’s routing table. There are pros and cons to static routing, but that’s true for all routing processes.
Advantages:
- There is no overhead on the router CPU, which means you could possibly buy a cheaper router than you would use if you were using dynamic routing.
- There is no bandwidth usage between routers, which means you could possibly save money on WAN links.
- It adds security because the administrator can choose to allow routing access to certain networks only.
Disadvantages:
- The administrator must really understand the network and how each router is connected in order to configure routes correctly.
- If a network is added to the network, the administrator has to manually add a route to it on all routers.
- It is not feasible in large networks because maintaining it would be a full-time job in itself.
The command to add static route on a router needed to be run in global configuration mode and the syntax is ip route [destination-network] [mask] [next-hop-address or exit-interface] [administrative-distance] [permanent]
where:
ip route: The command used to create the static route.
destination-network: The network for which you are placing route in the routing table.
mask: The subnet mask being used on the destination network.
next-hop-address: The address of the next-hop router that will receive the packet and forward it to the remote network. This is the IP address of a router interface that’s on a directly connected network. You must be able to ping the router interface before you can successfully add the route.
If you type in the wrong next-hop address or the interface to that router is down, the static route will show up in the router’s configuration but not in the routing table.
exit-interface: Used in place of the next-hop address if you want, and shows up as a directly connected route.
administrative-distance: By default, static routes have an administrative distance of 1 (or even 0 if you use an exit interface instead of a next-hop address). You can change the default value by adding an administrative weight at the end of the command. Administrative distance is the feature that routers use in order to select the best path when there are two or more different routes to the same destination from two different routing protocols. Administrative distance defines the reliability of a routing protocol where route with value 0 is best and 255 is worst.
permanent: If the interface is shut down or the router can’t communicate to the next-hop router, by default the route will automatically be discarded from the routing table. The permanent option keeps the entry in the routing table no matter what happens.
Now, according to our test network, suppose that we want to add a static route on router R1 for destination network 8.8.8.8/32. To make sure that our static route will work, it is recommended that you try to ping next-hop and you should be able to successfully ping the next-hop address 202.164.42.1. If you see exclamation (!) sign in ping, it means ping is successful and dot (.) means time-out. At this point if you try to ping remote network, ping will fail because there is no route in routing table yet.
R1#ping 202.164.42.1

Type escape sequence to abort.
Sending 5, 100-byte ICMP Echos to 202.164.42.1, timeout is 2 seconds:
.!!!!
Success rate is 100 percent (5/5), round-trip min/avg/max = 60/63/64 ms
R1#ping 8.8.8.8

Type escape sequence to abort.
Sending 5, 100-byte ICMP Echos to 8.8.8.8, timeout is 2 seconds:
.....
Success rate is 0 percent (0/5)
R1#
Now it is time to configure our first static route. Note that I will use administrative distance of 150 for our static route but by default static route has AD value 1. The custom value 150 will help us when we will configure dynamic routing. I will show you how. Lets start adding our first route as shown below:
R1(config)#ip route 8.8.8.8 255.255.255.255 202.164.42.1 150
R1(config)#^Z
R1#
*Jun 16 17:07:42.487: %SYS-5-CONFIG_I: Configured from console by console
R1#show ip route
Codes: C - connected, S - static, R - RIP, M - mobile, B - BGP
[output cut]

Gateway of last resort is not set

     4.0.0.0/32 is subnetted, 1 subnets
C       4.4.4.4 is directly connected, Loopback0
     8.0.0.0/32 is subnetted, 1 subnets
S       8.8.8.8 [150/0] via 202.164.42.1
C    192.168.0.0/24 is directly connected, FastEthernet0/0
C    192.168.1.0/24 is directly connected, FastEthernet0/1
C    202.164.42.0/24 is directly connected, FastEthernet1/0
R1#ping 8.8.8.8

Type escape sequence to abort.
Sending 5, 100-byte ICMP Echos to 8.8.8.8, timeout is 2 seconds:
UUUUU
Success rate is 0 percent (0/5)
R1#
In above example, when I run show ip route command, you can see the static route is now listed in routing table but now when I tried ping, this time I got UUUUU which means destination network unreachable. This happened simply because, there is no route for return path. It will be automatically fixed when we will complete adding static routes to all routers.
Similarly, add static routes on all routers R1, R2, R3 and R4 for all the possible remote networks as shown below:
R1(config)#ip route 1.1.1.0 255.255.255.252 202.164.42.1 150
R1(config)#ip route 2.2.2.0 255.255.255.252 202.164.42.1 150
R1(config)#ip route 4.4.4.0 255.255.255.252 202.164.42.1 150
R2(config)#ip route 8.8.8.8 255.255.255.255 1.1.1.2 150
R2(config)#ip route 4.4.4.0 255.255.255.255 2.2.2.2 150
R2(config)#ip route 192.168.0.0 255.255.255.0 202.164.42.2 150
R2(config)#ip route 192.168.1.0 255.255.255.0 202.164.42.2 150
R3(config)#ip route 2.2.2.0 255.255.255.252 1.1.1.1 150
R3(config)#ip route 4.4.4.4 255.255.255.255 1.1.1.1 150
R3(config)#ip route 202.164.42.0 255.255.255.0 1.1.1.1 150
R3(config)#ip route 192.168.0.0 255.255.255.0 1.1.1.1 150
R3(config)#ip route 192.168.1.0 255.255.255.0 1.1.1.1 150
R4(config)#ip route 8.8.8.8 255.255.255.255 2.2.2.1 150
R4(config)#ip route 1.1.1.0 255.255.255.252 2.2.2.1 150
R4(config)#ip route 202.164.42.0 255.255.255.0 2.2.2.1 150
R4(config)#ip route 192.168.0.0 255.255.255.0 2.2.2.1 150
R4(config)#ip route 192.168.1.0 255.255.255.0 2.2.2.1 150
After you have done adding static routes to all routers, you can verify that the routes added are reflecting in routers’ routing table by running show ip route command. You can see below the output of this command on R1:
R1#show ip route
Codes: C - connected, S - static, R - RIP, M - mobile, B - BGP
[output cut]
Gateway of last resort is not set

     1.0.0.0/30 is subnetted, 1 subnets
S       1.1.1.0 [150/0] via 202.164.42.1
     2.0.0.0/30 is subnetted, 1 subnets
S       2.2.2.0 [150/0] via 202.164.42.1
     4.0.0.0/8 is variably subnetted, 2 subnets, 2 masks
C       4.4.4.4/32 is directly connected, Loopback0
S       4.4.4.0/30 [150/0] via 202.164.42.1
     8.0.0.0/32 is subnetted, 1 subnets
S       8.8.8.8 [150/0] via 202.164.42.1
C    192.168.0.0/24 is directly connected, FastEthernet0/0
C    192.168.1.0/24 is directly connected, FastEthernet0/1
C    202.164.42.0/24 is directly connected, FastEthernet1/0
R1#
I will now take one line of static route from above output and break down each word for better understanding.
S 1.1.1.0 [150/0] via 202.164.42.1
S: indicates that this is a static route. Possible values are C – connected, S – static, R – RIP, M – mobile, B – BGP, D – EIGRP, EX – EIGRP external, O – OSPF etc.
1.1.1.0: is the remote network.
[150/0]: First value within square brackets, 150 represents the administrative distance of this route. Administrative distance determines how trustworthy this route is. If there is another route to same remote network but with a smaller administrative distance, it will be used instead, because it is more ‘trustworthy’. The smaller the administrative distance, the more trustworthy the route is. Second value, 0 represents the metric for the routing protocol. Cisco IOS derives this value primarily through bandwidth. RIP uses hop count as a metric whereas metric for OSPF is cost and metric for static route is 0.
via 202.164.42.1 indicates the forwarding router or next-hop address.
After adding static route on all router, every device can now communicate to each other. You can check it by running ping from R1 to R1
R1#ping 8.8.8.8

Type escape sequence to abort.
Sending 5, 100-byte ICMP Echos to 8.8.8.8, timeout is 2 seconds:
!!!!!
Success rate is 100 percent (5/5)
R1#
The above configuration concludes the static routing.
Default Routing
Basically a default route tells the router to take the packets destined to the networks that are not it its routing table and forward these packets to a next-hop. Default route can be configured in stub networks (network with only one exit path).
To make default routing more clear, I have slightly modified our network without changing any IP configuration.
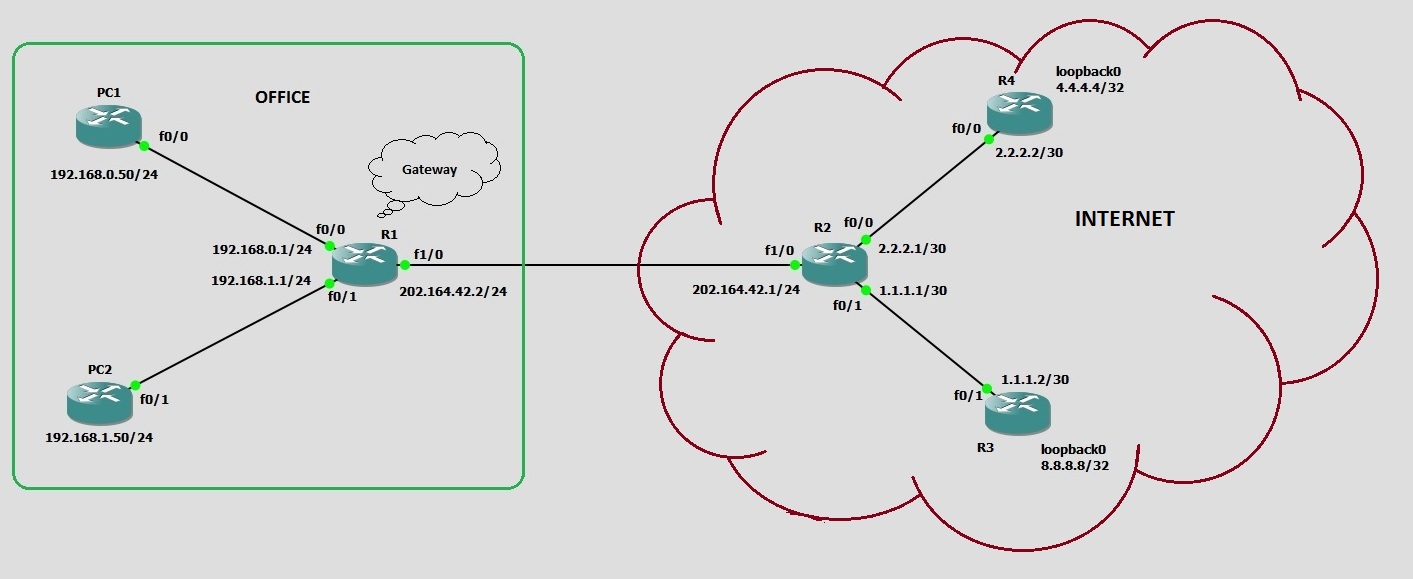
Consider you are working as a network administrator in Office shown in network diagram above and you have been assigned the task to connect your office network to internet using Gateway Router R1.
The easiest way to do this is that you configure default routing on R1 because your Gateway router has only one exit path to internet.
Syntax to add static route is ip route [0.0.0.0] [0.0.0.0] [next-hop-address or exit-interface].
You can see that default route is similar to static route but instead of writing remote network and mask; we use all 0’s which basically means any remote network with any mask.
Now let’s remove static routes we have added earlier on R1 and then add default route.
R1#show running-config | include ip route
ip route 1.1.1.0 255.255.255.252 202.164.42.1 150
ip route 2.2.2.0 255.255.255.252 202.164.42.1 150
ip route 4.4.4.0 255.255.255.252 202.164.42.1 150
ip route 8.8.8.8 255.255.255.255 202.164.42.1 150
R1#config term
Enter configuration commands, one per line.  End with CNTL/Z.
R1(config)#no ip route 1.1.1.0 255.255.255.252 202.164.42.1 150
R1(config)#no ip route 2.2.2.0 255.255.255.252 202.164.42.1 150
R1(config)#no ip route 4.4.4.0 255.255.255.252 202.164.42.1 150
R1(config)#no ip route 8.8.8.8 255.255.255.255 202.164.42.1 150
R1(config)#ip route 0.0.0.0 0.0.0.0 202.164.42.1
R1(config)#end
R1#
*Jun 24 10:41:46.039: %SYS-5-CONFIG_I: Configured from console by console
R1#
I know, you might be thinking about first command show running-config | include ip route. Since we wanted to remove the existing static routes, so the best way was to look for all the static route in running-config by using show running-config command. And | include ip route, is telling the IOS to filter the running-config output and only include lines which contains ‘ip route’ text string. This command produced 4 lines containing static route. Copy these 4 lines into notepad and add no before each line. When you want to negate any command in IOS, you have to type no before actual command. That’s what I did in lines marked with red color and then configured default route (marked green).
Now you can see the routing table of R1 using show ip route command.
R1#show ip route
Codes: C - connected, S - static, R - RIP, M - mobile, B - BGP
       D - EIGRP, EX - EIGRP external, O - OSPF, IA - OSPF inter area
[output cut]

Gateway of last resort is 202.164.42.1 to network 0.0.0.0

     4.0.0.0/32 is subnetted, 1 subnets
C       4.4.4.4 is directly connected, Loopback0
C    192.168.0.0/24 is directly connected, FastEthernet0/0
C    192.168.1.0/24 is directly connected, FastEthernet0/1
C    202.164.42.0/24 is directly connected, FastEthernet1/0
S*   0.0.0.0/0 [1/0] via 202.164.42.1
R1#
The default route is indicated by S* as shown in line marked with green. You can also see the line Gateway of last resort is 202.164.42.1 to network 0.0.0.0. A Gateway of last resort or default gateway is a route used by the router when no other known route exists in router’s routing table.
After adding default route, you can verify that R1 can reach internet by using ping command as shown below:
R1#ping 8.8.8.8

Type escape sequence to abort.
Sending 5, 100-byte ICMP Echos to 8.8.8.8, timeout is 2 seconds:
!!!!!
Success rate is 100 percent (5/5), round-trip min/avg/max = 64/73/104 ms
R1#ping 4.4.4.4

Type escape sequence to abort.
Sending 5, 100-byte ICMP Echos to 4.4.4.4, timeout is 2 seconds:
!!!!!
Success rate is 100 percent (5/5), round-trip min/avg/max = 1/2/4 ms
R1#
This concludes Default Routing.
Next routing technique in Dynamic Routing which is a wide topic. So I will dedicate a complete page for Dynamic Routing here.