
- August 27, 2015
- Posted by: Surender Kumar
- Category: Linux
Basics of Linux
Table of Contents
Linux is an open source UNIX-based operating system (OS). Linux differs from other operating systems because it is multi-user as well as multitasking operating system. It means that more than one user can operate the system at the same time. While your computer will only have one keyboard and monitor, it can still be used by more than one user if your computer is attached to a network. Remote users can log in via Telnet or SSH (secure shell) and operate the computer.
Everything in Linux is either a file or a process.
A process is an executing program identified by a unique PID (process identifier). A file is a collection of data. They are created by users using text editors, running compilers etc.
Parts of Linux OS:
- Bootloader: The software that manages the boot process of your computer. For most users, this will simply be a splash screen that pops up and eventually goes away to boot into the operating system. Linux uses LILO (LInux LOader) and GRUB (GRand Unified Bootloader). GRUB is more feature-rich and supports booting other operating systems like Microsoft Windows.
- Kernel: The kernel is the core of the system and manages the CPU, memory, and peripheral devices. The kernel is the “lowest” level of the OS.
- Daemons: These are background services (printing, sound, scheduling, etc) that either start up during boot, or after you log into the desktop.
- The Shell: You’ve probably heard mention of the Linux command line. This is the shell – a command process that allows you to control the computer via commands typed into a text interface. This is what, at one time, scared people away from Linux the most (assuming they had to learn a seemingly archaic command line structure to make Linux work). This is no longer the case. With modern desktop Linux, there is no need to ever touch the command line.
- Graphical Server: This is the sub-system that displays the graphics on your monitor. It is commonly referred to as the X server or just “X”.
- Desktop Environment: This is the piece of the puzzle that the users actually interact with. There are many desktop environments to choose from (Unity, GNOME, KDE, XFCE etc). Each desktop environment includes built-in applications (such as file managers, configuration tools, web browsers, games, etc).
- Applications: Desktop environments do not offer the full array of apps. Just like Windows and Mac, Linux offers thousands upon thousands of high-quality software titles that can be easily found and installed. Most modern Linux distributions include App Store-like tools that centralize and simplify application installation. For example: Ubuntu Linux has the Software Center which allows you to quickly search among the thousands of apps and install them from one centralized location.
Why Use Linux:
- The Linux operating system is free of cost. No user or server* licenses are required. However, there are various Linux distributions available for purchase, that cost is purely to cover the packaging and possible support available for the distribution.
*Linux Server OS is also available from companies such as RedHat, which is actually paid for a license because of the support and update services they provide for the operating system. - Linux is rock solid and stable, unlike Windows, where crashes & blue screens are more frequent. Runtime errors and crashes are quite rare on the Linux operating system due to the way its kernel is designed and the way processes are allowed to access it.
- Linux is much more secure than Windows, there are almost no viruses for Linux and, because there are so many people working on Linux, whenever a bug is found, a fix is provided much more quickly than Windows. Linux is much more difficult for hackers to break into as it has been designed from the ground up with security in mind.
- Linux uses less system resources as compared to Windows. You don’t need the latest, fastest computer to run Linux. In fact you can run a functional version of Linux on a computer that is 10 years old!
- Linux is fully compatible with all other products. Unlike Microsoft Windows, which is supposed to work best with other Microsoft products like Microsoft office etc, Linux is not owned by any company and thus it keeps its compatibility with all other systems.
- Linux has a large community support. It is developed by hundreds of thousands of people worldwide.
What is Path?
A path is a unique location to a file or a folder in a file system of an OS. A path to a file is a combination of / and alpha-numeric characters.
What is an absolute path?
An absolute path is defined as specifying the location of a file or directory from the root directory(/). In other words we can say absolute path is a complete path from start of actual filesystem from / directory. It is sometimes also referred to as Full Path.
Examples of absolute path:
/etc/samba/smb.conf
/boot/grub/grub.conf
What is the relative path?
Relative path is defined as path related to the present working directory (pwd). Suppose I am located in /var/log directory and I want to change directory to /var/log/samba/old directory. I can use relative path to change directory.

In figure shown above, the line marked Red is present working directory. The marked with Orange is absolute Path. Notice that in order to change the directory, I started typing the name of directories next to present working directory. I did not write the complete name starting from /var/log. This path (samba/old in this example) is called relative path.
Connecting to Linux System
The Linux operating system can be used either in a Command Line or terminal mode where you type commands or in a Windows Explorer style graphical user interface (GUI). But in this guide, I will focus on command line mode since working in GUI is pretty similar to that of Windows. If you have ever worked in Windows command prompt, you will see some sort of similarity in commands but most of the commands are different.
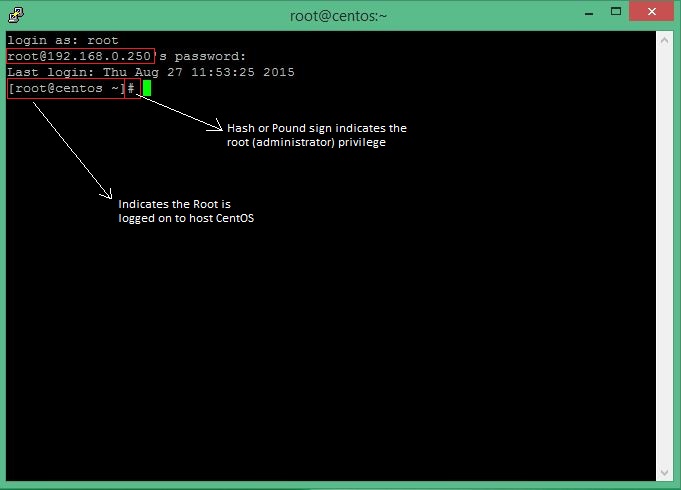
When you first Linux to a system, there are a few configuration steps that you should take early on as part of the basic setup. To login locally, you should know your username and password. To log into your system remotely, you will need to know your system’s IP address, username and the password for the user. By default Linux system is configured to accept remote connections using SSH, which stands for Secure Shell. It is a secure network protocol that is used to remotely login into the system and run the commands. It is the standard method used for accessing and interacting with Linux systems. SSH is secure because every command is encrypted while it is sent over network. There are a variety of SSH clients software like OpenSSH and putty that you can use to connect to a Linux system.
The root user is the administrative user in a Linux environment that has very broad privileges. Because of the heightened privileges of the root account, you are actually discouraged from using it on a regular basis. This is because part of the power inherent with the root account is the ability to make very destructive changes, even by accident. The root user is similar to default administrator found in Windows. The root user is automatically created at the time of operating system installation and password is also set for this user during installation.
In this guide, I am focused on Linux Server administration. So, most of the time I will be working through Root user. But if you are a regular user, you can still learn the basics of Linux like basic commands to manipulate files, directories, file-system etc.
Once you are logged in with root privilege, you will see the screen as shown below:
Basic Commands
If you have experience of working with Windows command line interface, keep this thing in mind that Windows command prompt is not case sensitive while Linux commands are case sensitive. Not even commands but everything like filenames, service names are case sensitive. This means Windows will assume command “Dir” and “dir” as identical but Linux will treat these commands as different. The Windows will treat file with the name “TECHTUTS” and “TechTuts” as same but Linux will treat these two names as different.
Other important point I would like to mention is that Linux command line supports Tab completion feature for commands and file-names. In case there is any ambiguity like more than one commands or more than one file-names, you will have to press Tab key two times and system will list all the possibilities as shown in figure below:

Pressing Tab key will save your lot of time while writing lengthy commands. Isn’t it interesting? Huh!
Lets start with basic commands you should know which can help you get started with Linux command line interface.
- pwd command: This command is used to print the present working directory.
[root@centos ~]# pwd
/root
/root means I am currently working into the home directory for ROOT User.
To get help with any command, you can type any command followed by –help parameter or you can simply use man followed by command as shown below:
[root@centos ~]# man ls
       --show-control-chars
              show nongraphic characters as-is (the default, unless program is
              'ls' and output is a terminal)

       -Q, --quote-name
              enclose entry names in double quotes

       --quoting-style=WORD
              use quoting style WORD for entry names: literal, locale,  shell,
              shell-always, c, escape

       -r, --reverse
              reverse order while sorting

       -R, --recursive
              list subdirectories recursively

       -s, --size
              print the allocated size of each file, in blocks

       -S     sort by file size

       --sort=WORD
              sort  by  WORD instead of name: none (-U), size (-S), time (-t),
              version (-v), extension (-X)

       --time=WORD
              with -l, show time as WORD instead of default modification time:
              atime or access or use (-u) ctime or status (-c); also use spec?
              ified time as sort key if --sort=time

       --time-style=STYLE
              with -l, show times using style STYLE: full-iso, long-iso,  iso,
              locale,  or  +FORMAT;  FORMAT  is interpreted like in 'date'; if
              FORMAT  is  FORMAT1<newline>FORMAT2,  then  FORMAT1  applies  to
              non-recent  files  and FORMAT2 to recent files; if STYLE is pre?
              fixed with 'posix-', STYLE takes effect only outside  the  POSIX
              locale

       -t     sort by modification time, newest first

[output cut]
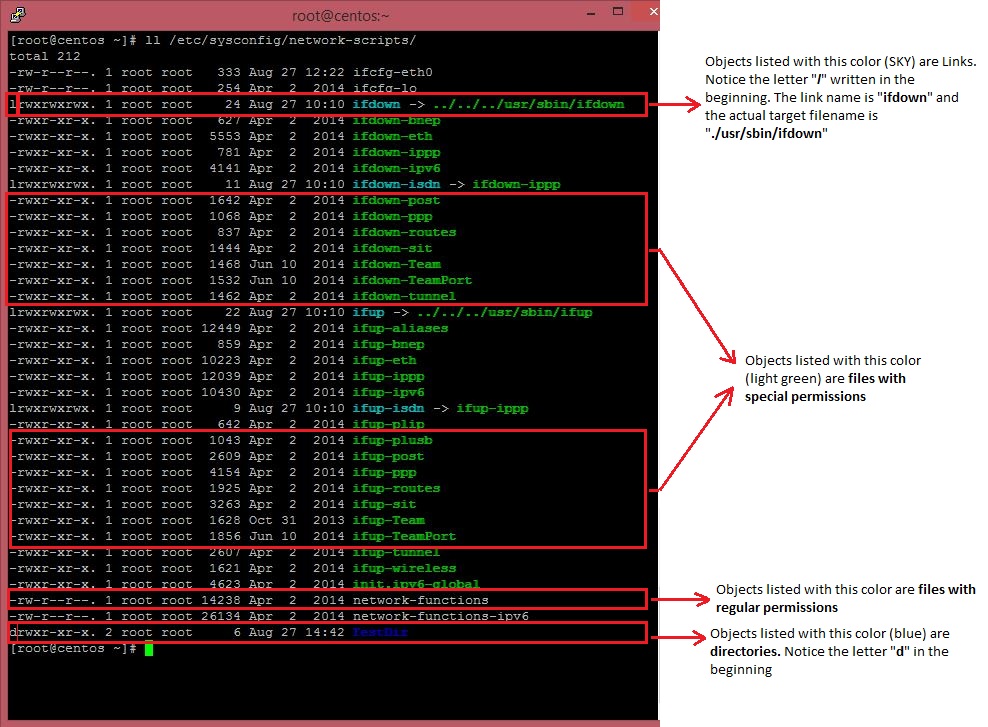
- ls command: ls command lists the contents of the directory. If you run this command without any other option, by default it will list the contents of current working directory. See the below figure for more options of ls command:

You can write the ls -l command in shorthand as ll (double L in lowercase). The output of ls -l or ll command is shown below:
[root@centos ~]# ll
total 12
-rw-------. 1 root root 1253 Aug 27 10:42 anaconda-ks.cfg
-rw-r--r--. 1 root root    0 Aug 27 14:13 Five.txt
-rw-r--r--. 1 root root    0 Aug 27 14:13 Four.txt
-rw-r--r--. 1 root root 1304 Aug 27 10:55 initial-setup-ks.cfg
drwxr-xr-x. 2 root root    6 Aug 27 14:13 MyData
drwxr-xr-x. 2 root root    6 Aug 27 14:16 MyGames
drwxr-xr-x. 2 root root    6 Aug 27 14:13 MyMusic
-rw-r--r--. 1 root root   95 Aug 27 15:06 One.txt
-rw-r--r--. 1 root root    0 Aug 27 14:13 Three.txt
-rw-r--r--. 1 root root    0 Aug 27 14:13 Two.txt
Explanation of output of ls -l or ll command (first line):
- d means directory.
- rwxr-xr-x is the file permission of the file/folder for owner, group and others.
- 1 indicates the number of links to file. By default this value is 1 or 2 for all files.
- The 1st root in the above example means that file is owned by user root.
- The 2nd root in the above example means file belongs to user group root.
- 1253 means file size is 1353 bytes.
- Aug 27 10:42 is the date and time of last modification.
- anaconda-ks.cfg at the end is the name of the file/folder.
You can also specify the path of directory for which you want the ls command to list the contents as shown below:
 You know that we are working in command-line environment. As discussed earlier, you can use ls command with various options to list the contents of a directory. What happens if the directory contains hundred or even thousands of files?
After you hit ls command, it will list the contents and then exits to console for next command and you may be able to see only some of the files at last. What if you want to see complete listing of files? Below is the screen output once you run ls -l /etc/ command:
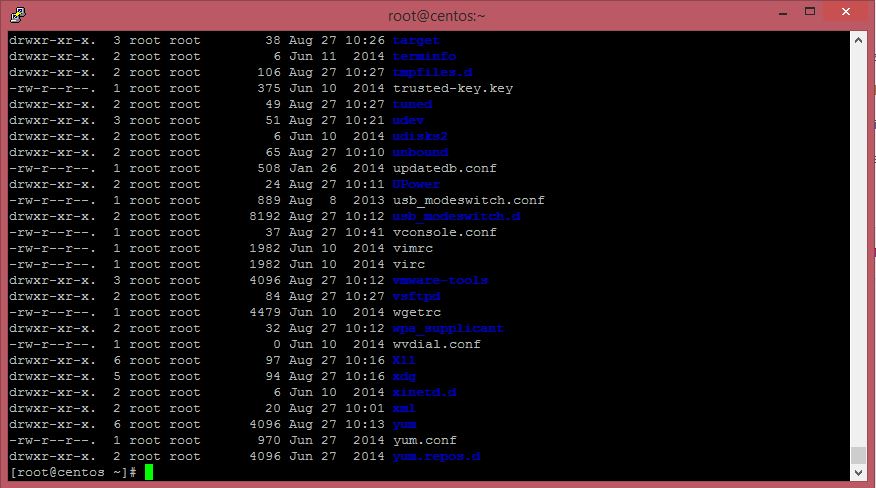 Notice that you are only able to see last some of files while others are skipped from the screen. You can add “| more” and “| less” after the command to instruct the shell to display the list one screen at a time. The difference between “less” and “more” operators is that, more will only allow you to scroll downwards whereas less operator will allow you to scroll the output upwards and downwards.
Below image shows the screen output of ls -l /etc/ | more command:

Notice the –More– option at the end. Use Enter key to scroll down one line at a time or you can also use Spacebar to scroll one screen at a time. To exit the command at any point, simply press q or press Ctrl+C.
Below image shows the screen output of ls -l /etc/ | less command:

Use Enter key to scroll down one line at a time or you can also use Spacebar to scroll one screen at a time. Since “less” allow you to scroll upwards as well as downward, you can use UP and DOWN arrow keys for movement. To exit the command at any point, simply press q or press Ctrl+C.
- grep command: The grep command used to search text or searches the given file for lines containing a match to the given strings or words. By default, grep displays the matching lines. Use grep to search for lines of text that match one or many regular expressions, and outputs only the matching lines.
You can use this command in different manners like grep ‘string1 string2’ filename OR cat filename | grep ‘something’. The real world example is given below:[root@centos ~]# grep surender /etc/passwd surender:x:1000:1000:Surender:/home/surender:/bin/bash [root@centos ~]#
Remember that everything in Linux is either a file or a process. When you create users in Linux, these are stored into a file /etc/passwd. Imagine there are thousands of users in that file and you want to locate one user out of it; grep command comes candy in this case. Another real word example is that when you want to list a particular process running on the system. You know there might be hundreds of processes running simultaneously. The ps -aux command lists all the processes running on Linux system. But if you want to search for a particular process, you can use grep command as follows:
[root@centos ~]# ps -aux | grep sshd
root      1760  0.0  0.3  82956  3576 ?        Ss   Aug27   0:00 /usr/sbin/sshd -D
root     39824  0.0  0.5 135796  5380 ?        Ss   08:55   0:00 sshd: root@pts/0
root     41662  0.0  0.0 112640   972 pts/0    R+   11:37   0:00 grep --color=auto sshd
[root@centos ~]#
- cd command: This command changes the current working directory. You can use this command to navigate into directories. Use cd .. to move out of one directory at a time. To move out of complete directory structure, use cd command without any option.
[root@centos ~]#
[root@centos ~]# cd /etc/sysconfig/network-scripts/TestDir
[root@centos TestDir]#
[root@centos TestDir]# cd ..
[root@centos network-scripts]# cd
[root@centos ~]#
- mkdir command: The mkdir command is used to create a new directory (folder). In fact you can create many directories at once as shown below.
[root@centos ~]# mkdir One Two Three Four Five
[root@centos ~]#
[root@centos ~]# ls
anaconda-ks.cfg  Four                  MyData   One      Three.txt
Five             Four.txt              MyGames  One.txt  Two
Five.txt         initial-setup-ks.cfg  MyMusic  Three    Two.txt
If you want to create a directory inside other directory (sub-directory) and even sub-sub-directory, you can use mkdir -p command as shown below. The command will automatically create any parent directory if it does not exist.
root@centos /]# cd Test
-bash: cd: Test: No such file or directory
[root@centos /]# mkdir -p Test/TestOne/TestTwo/
[root@centos /]# ls Test
TestOne
[root@centos /]#
- touch command: The touch command can be used to create an empty file of 0 byte. However, there are other methods of creating new file but you can use touch command if you want to create multiple 0 byte files with just a single command as we did using mkdir command. If the file already exists it will update the timestamp and does not affect the contents of the file.
[root@centos ~]# ls
[root@centos ~]#
[root@centos ~]# touch One.txt Two.txt Three.txt
[root@centos ~]#
[root@centos ~]# ll
total 0
-rw-r--r--. 1 root root 0 Aug 27 15:44 One.txt
-rw-r--r--. 1 root root 0 Aug 27 15:44 Three.txt
-rw-r--r--. 1 root root 0 Aug 27 15:44 Two.txt
[root@centos ~]#
- cal command: It is used to display calendar of the present month by default. You can add any other month or any year to display the calendar for that month or year.
[root@centos ~]# cal
     August 2015
Su Mo Tu We Th Fr Sa
                   1
 2  3  4  5  6  7  8
 9 10 11 12 13 14 15
16 17 18 19 20 21 22
23 24 25 26 27 28 29
30 31
[root@centos ~]# cal 07 1988
      July 1988
Su Mo Tu We Th Fr Sa
                1  2
 3  4  5  6  7  8  9
10 11 12 13 14 15 16
17 18 19 20 21 22 23
24 25 26 27 28 29 30
31
[root@centos ~]# cal 2015
                               2015

       January               February                 March
Su Mo Tu We Th Fr Sa   Su Mo Tu We Th Fr Sa   Su Mo Tu We Th Fr Sa
             1  2  3    1  2  3  4  5  6  7    1  2  3  4  5  6  7
 4  5  6  7  8  9 10    8  9 10 11 12 13 14    8  9 10 11 12 13 14
11 12 13 14 15 16 17   15 16 17 18 19 20 21   15 16 17 18 19 20 21
18 19 20 21 22 23 24   22 23 24 25 26 27 28   22 23 24 25 26 27 28
25 26 27 28 29 30 31                          29 30 31

        April                   May                   June
Su Mo Tu We Th Fr Sa   Su Mo Tu We Th Fr Sa   Su Mo Tu We Th Fr Sa
          1  2  3  4                   1  2       1  2  3  4  5  6
 5  6  7  8  9 10 11    3  4  5  6  7  8  9    7  8  9 10 11 12 13
12 13 14 15 16 17 18   10 11 12 13 14 15 16   14 15 16 17 18 19 20
19 20 21 22 23 24 25   17 18 19 20 21 22 23   21 22 23 24 25 26 27
26 27 28 29 30         24 25 26 27 28 29 30   28 29 30
                       31
        July                  August                September
Su Mo Tu We Th Fr Sa   Su Mo Tu We Th Fr Sa   Su Mo Tu We Th Fr Sa
          1  2  3  4                      1          1  2  3  4  5
 5  6  7  8  9 10 11    2  3  4  5  6  7  8    6  7  8  9 10 11 12
12 13 14 15 16 17 18    9 10 11 12 13 14 15   13 14 15 16 17 18 19
19 20 21 22 23 24 25   16 17 18 19 20 21 22   20 21 22 23 24 25 26
26 27 28 29 30 31      23 24 25 26 27 28 29   27 28 29 30
                       30 31
       October               November               December
Su Mo Tu We Th Fr Sa   Su Mo Tu We Th Fr Sa   Su Mo Tu We Th Fr Sa
             1  2  3    1  2  3  4  5  6  7          1  2  3  4  5
 4  5  6  7  8  9 10    8  9 10 11 12 13 14    6  7  8  9 10 11 12
11 12 13 14 15 16 17   15 16 17 18 19 20 21   13 14 15 16 17 18 19
18 19 20 21 22 23 24   22 23 24 25 26 27 28   20 21 22 23 24 25 26
25 26 27 28 29 30 31   29 30                  27 28 29 30 31
- date command: The date command prints the current date and time on the standard output. You can use date –set command to set the date and time of system as shown below.
[root@centos ~]#
[root@centos ~]# date
Thu Aug 27 15:54:20 IST 2015
[root@centos ~]# date --set='28 Jul 1988 13:00'
Thu Jul 28 13:00:00 IST 1988
[root@centos ~]#
- cat command: The cat stands for concatenation. Concatenate (join) two or more plain file and/or print contents of a file on standard output.
[root@centos ~]# cat One.txt
This is a Test File

Sample Text

Sample Text

End of File
[root@centos ~]#
“>>” and “>” are append symbols. They are used to append the output to a file and not on standard output. “>” symbol will delete a file already existed and create a new file hence for security reason it is advised to use “>>” that will write the output without overwriting or deleting the file.
- cp command: The “copy” stands for copy. This command copies a file from one location to another location.
Note:- cp is one of the most commonly used command in shell scripting and it can be used with wildcard characters (* or ?), for customized and desired file copying.
- mv command: The mv command moves a file from one location to another location.
[root@centos ~]# ls
One.txt  Three.txt  Two.txt
[root@centos ~]# cp One.txt NewFile.txt
[root@centos ~]# cat NewFile.txt
This is a Test File

Sample Text

Sample Text

End of File

[root@centos ~]# ls
NewFile.txt  One.txt  Three.txt  Two.txt
[root@centos ~]# mkdir Files
[root@centos ~]# mv *.txt Files/
[root@centos ~]# ls Files/
NewFile.txt  One.txt  Three.txt  Two.txt
[root@centos ~]#
- rm command: rm (short for remove) is used to delete files/directories from a filesystem. Usually, on most filesystems, deleting a file requires write permission on the parent directory (and execute permission, in order to enter the directory in the first place). The syntax is rm [options] [file-name]. The options can be -r (recursively remove sub-directories) and -f (forcefully without confirmation).
[root@centos ~]# rm -rf One.txt
[root@centos ~]# ls
Files
Notice that the file One.txt does no longer exist after running above command.
The vi Text Editor
The vi editor is available on almost all Unix/Linux systems. vi can be used from any type of terminal because it does not depend on arrow keys and function keys — it uses the standard alphabetic keys for commands.
vi (pronounced “vee-eye”) is short for visual editor. It displays a window into the file being edited that shows 24 lines of text. vi is a text editor that lets you add, change, and delete text to files, but does not provide such formatting capabilities as centering lines or indenting paragraphs.
Starting vi
You can use vi to open an already existing file by typing vi filename, where filename is the name of the existing file. If the file is not in your current directory, you must use the absolute path.
vi One.txt
Or you can create a new file by typing vi newname, where newname is the name you wish to give the new file.
vi Test.txt
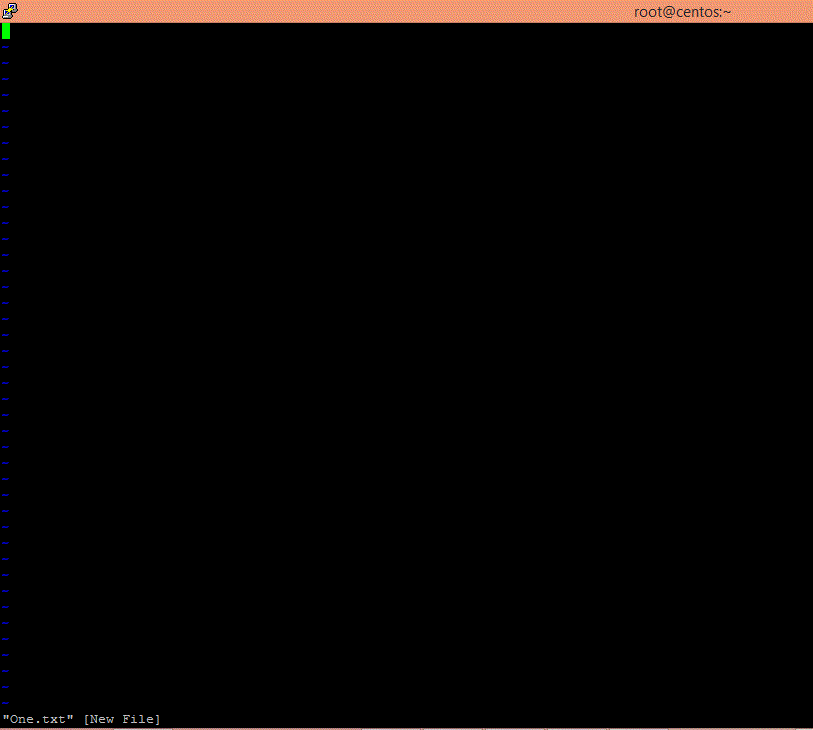
On-screen, you will see blank lines, each with a tilde (~) at the left, and a line at the bottom giving the name and status of the new file:
vi Modes
vi has two modes:
- Command mode: In command mode, the keyboard keys perform editing functions (like moving the cursor, deleting text, etc.). By default, when vi editor opens any file, it is already in command mode. To manually enter command mode, press the escape “Esc” key.
- Insert mode: In insert mode, the the keyboard keys make letters and alphabets as the contents of file. To enter into Insert mode, you need to press “Insert” key on keyboard or simply press “i” key. When in insert mode, you will see –INSERT– at the bottom of the screen as shown in image below:

Entering Text
In order to begin entering text in this empty file, you must change from command mode to insert mode by either pressing “Insert” key or typing “i”.
Now you can start typing the text you want to save into the file. Each line is ended by pressing Enter <Return> button.
Type a few short lines and press <Return> at the end of each line. If you type a long line, you will notice the vi does not word wrap, it merely breaks the line unceremoniously at the edge of the screen.
Pressing <Backspace> or <Delete> can delete the word just like you do in GUI text editors.
Moving the Cursor
To move the cursor to another position, you must be in command mode. If you have just finished typing text, you are still in insert mode. Go back to command mode by pressing <Esc>. If you are not sure which mode you are in, press <Esc> once or twice.
The cursor is controlled with four keys: h, j, k, l.
     Key      Cursor Movement
     ---      ---------------
     h        left one space
     j        down one line
     k        up one line
     l        right one space
Basic Editing
Editing commands require you to be command mode. Many of the editing commands have a different function depending on whether they are typed as upper- or lowercase. Often, editing commands can be preceded by a number to indicate a repetition of the command.
Deleting Characters
To delete a character from a file, move the cursor until it is on the incorrect letter, then type x. The character under the cursor disappears. To remove five characters (the one under the cursor and the next four) type 5x. To delete the character before the cursor, type X (uppercase).
Deleting Words
To delete a word, move the cursor to the first letter of the word, and type dw. This command deletes the word and the space following it. To delete four words type 4dw.
Deleting Lines
To delete a whole line, type dd. The cursor does not have to be at the beginning of the line. Typing dd deletes the entire line containing the cursor and places the cursor at the start of the next line. To delete two lines, type 2dd. To delete from the cursor position to the end of the line, type D (uppercase).
Replacing Characters
To replace one character with another:
- Move the cursor to the character to be replaced.
- Type r
- Type the replacement character.
The new character will appear, and you will still be in command mode.
Replacing Words
To replace one word with another, move to the start of the incorrect word and type cw. The last letter of the word to be replaced will turn into a $. You are now in insert mode and may type the replacement. The new text does not need to be the same length as the original. Press <Esc> to get back to command mode. To replace three words, type 3cw.
Replacing Lines
To change text from the cursor position to the end of the line:
- Type C (uppercase).
- Type the replacement text.
- Press <Esc>.
Inserting Text
To insert text in a line:
- Position the cursor where the new text should go.
- Type i or press Insert key
- Enter the new text. The text will be inserted before the cursor.
- Press <Esc> to get back to command mode.
Appending Text
To add text to the end of a line:
- Position the cursor on the last letter of the line.
- Type a
- Enter the new text. This adds text after the cursor.
- Press <Esc> to get back to command mode.
Opening a Blank Line
To insert a blank line below the current line, type o (lowercase).
To insert a blank line above the current line, type O (uppercase).
Joining Lines
To join two lines together:
- Put the cursor on the first line to be joined.
- Type J
To join three lines together:
- Put the cursor on the first line to be joined.
- Type 3J.
Undoing
To undo your most recent edit, type u (lowercase) while in command mode.
To undo all the edits on a single line, type U (uppercase).
Undoing all edits on a single line only works as long as the cursor stays on that line. Once you move the cursor off a line, you cannot use U to restore the line.
Moving Around in a File
There are shortcuts to move more quickly though a file. All these work in command mode.
    Key           Movement
    ---           --------
     w            forward word by word
     b            backward word by word
     $            to end of line
     0 (zero)     to beginning of line
     H            to top line of screen
     M            to middle line of screen
     L            to last line of screen
     G            to last line of file
     1G           to first line of file
     <Control>f   scroll forward one screen
     <Control>b   scroll backward one screen
     <Control>d   scroll down one-half screen
     <Control>u   scroll up one-half screen
Moving by Searching
To move quickly by searching for text, while in command mode:
- Type / (slash).
- Enter the text to search for.
- Press <Return>.
The cursor moves to the first occurrence of that text.
To repeat the search in a forward direction, type n. To repeat the search in a backward direction, type N.
Copying the Lines
While in command mode, place the cursor in the line you want to copy, then type yy (yank) to copy the line. Place the cursor at the line and type p to paste the lines. Precede with a count for multiple lines.
Closing and Saving a File
With vi, you edit a copy of the file, rather than the original file. Changes are made to the original only when you save your edits.
To save the file and quit vi, type ZZ (uppercase).
The vi editor editor is built on an earlier Unix text editor called ex. ex commands can be used within vi. ex commands begin with a : (colon) and end with a <Return>. The command is displayed on the status line as you type. Some ex commands are useful when saving and closing files.
To save the edits you have made, but leave vi running and your file open:
- Press <Esc>.
- Type :w
- Press <Return>.
To quit vi, and discard any changes your have made since last saving:
- Press <Esc>.
- Type :q!
- Press <Return>.
To save the edits you have made, and exit the vi editor:
- Press <Esc>.
- Type :wq!
- Press <Return>.
There is the improved version of vi editor known as vim. It is not installed by default on every Linux distribution. To get it installed, run yum install vim -y command if your system is connected to internet. vim offers all the functionalities of vi but the difference is that it uses different colors to identify the type of text in the file. Below figure shows a file open in vim editor.

File/Folder Permissions in Linux
Linux uses the same permissions scheme as Unix. Each file and directory on your system is assigned access rights for the owner of the file, the members of a group of related users, and everybody else. Rights can be assigned to read a file, to write a file, and to execute a file (i.e., run the file as a program).
To see the permissions of a file, we can use the ls -l or ll command as shown below:
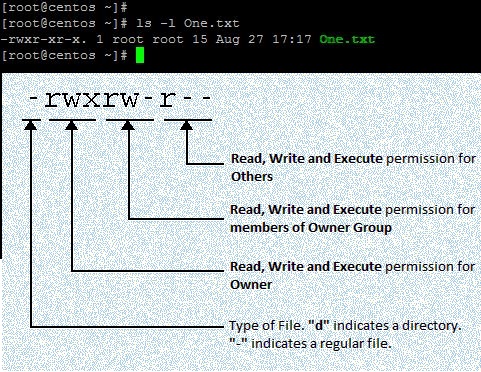
There are 3 types of permissions:
- r (read) : Who can view the contents of the file.
- w (write) – Who can change the contents of the file.
- x (execute) – Who can execute or run the file if it is a program or script.
These permissions can be denoted in numeric format as show below:
- r (Read) = 4
- w (Write) = 2
- x (eXecute) = 1
You can create the effective permissions by adding above digits. For example,
- To represent rwx (full permission), use 4+2+1 = 7
- To represent rw- (read & write permission, but not execute), use 4+2+0 = 6
- To represent r– (read only permission), use 4+0+0 = 4
- To represent r-x (read & execute permission), use 4+0+1 = 5
As shown in diagram, permissions are divided in 3 blocks, each block representing:
- owner : A single person who owns the file. (typically the person who created the file but ownership can be changed)
- group : Every file belongs to a single group.
- others : Everyone else who is not in the group or the owner.
Remember that there are Three permissions for Three groups of people. That’s all about permissions in Linux. Lets take a look at example:
[root@centos ~]# ls -l One.txt
-rwxr-xr-x 1 root root 15 Aug 27 17:17 One.txt
[root@centos ~]#
In above example, the permission on file One.txt is “-rwxr-xr-x” which means:
- The leading “–” indicates this is a regular file. You would see “d” if it is a directory.
- Owner can read, write and execute. In other words, the owner has full permission (7).
- Group members can read and execute, but can not write to file. In other words, the group members has read and execute permission (4+1= 5).
- Others can read and execute, but can not write to file. In other words, everyone else has read and execute permission (4+1= 5).
Modifying the Permissions
To change permissions on a file or directory you can use a chmod command. The syntax of command is chmod [permissions] [filename].
You can change permissions using either numeric value format or symbolic (alphabetical) format as shown above.
To use symbolic format, there are 3 components
- changing the permission for – indicated with user or owner (u), group (g), others (g), all (a).
- grant or revoke the permission – indicated with either a plus ( + ) or minus ( – ).
- permission – read (r), write (w) or execute (x).
The following examples will make this easy to understand:
[root@centos ~]# ls -l One.txt
-rwxr-xr-x 1 root root 15 Aug 27 17:17 One.txt
See that group members do not have write permission on file One.txt.
[root@centos ~]# chmod g+w One.txt
[root@centos ~]#
[root@centos ~]# ls -l One.txt
-rwxrwxr-x 1 root root 15 Aug 27 17:17 One.txt
So, I used chmod g+w One.txt command, where g+w means “grant write permission to Group“.
To revoke the permission, I will use chmod g-w One.txt command, where g-w means “revoke write permission from group“
[root@centos ~]# chmod g-w One.txt
[root@centos ~]# ls -l One.txt
-rwxr-xr-x 1 root root 15 Aug 27 17:17 One.txt
[root@centos ~]#
Notice that the permission is reset to default.
Let’s do this using numerical format:
We have to give write permission. Remember read = 4, write = 2, execute = 1.
Owner has full control (4+2+1=7) permission. Group members already has read and execute (4+1=5) permission. Other people also has read and execute (4+1=5) permission. We have to change the permission for Group only. To give write permission, we need to assign 4+1+2=7 permission to group.
[root@centos ~]# chmod 775 One.txt
[root@centos ~]#
[root@centos ~]# ls -l One.txt
-rwxrwxr-x 1 root root 15 Aug 27 17:17 One.txt
[root@centos ~]#
Notice that now the group has read, write and execute permission. To revert it back use the chmod 755 One.txt command, where 7 is full control for owner, 5 is read+execute permission for group, third (5) is read+execute permission for others.
[root@centos ~]# chmod 755 One.txt
[root@centos ~]# ls -l One.txt
-rwxr-xr-x. 1 root root 15 Aug 27 17:17 One.txt
Notice that the permission is reset to default after running chmod 755 command.
Becoming the SuperUser Temporarily
It is often useful to become the superuser to perform important system administration tasks, but as you have been warned, you should not stay logged on as the superuser. In most Linux distributions, there is a program that can give you temporary access to the superuser’s privileges. The program is su which stands for substitute user. It can be used in those cases when you need to be the superuser temporarily. To become the superuser, simply type the su command followed by root and hit enter. You will be prompted for the root’s password:
[surender@centos ~]$
[surender@centos ~]$ su root
Password:*********
[root@centos surender]#
Notice that I was initially logged in using regular user privilege “surender” as indicated by dollar ($) sign. After I run su root command and entered password for root, the prompt changed to hash (#) sign indicating superuser privilege.
Change Ownership of File/Folder
You can change the owner of a file by using the chown command. Here’s an example: Suppose that I want to change the owner of One.txt file from “root” user to “surender”.
[root@centos ~]# ls -l One.txt
-rwxr-xr-x. 1 root root 15 Aug 27 17:17 One.txt
[root@centos ~]#
[root@centos ~]# chown surender One.txt
[root@centos ~]#
[root@centos ~]# ls -l One.txt
-rwxr-xr-x. 1 surender root 15 Aug 27 17:17 One.txt
[root@centos ~]#
Notice that in order to change the owner of a file, you must have the root access. The chown command works the same way on directories as it does on files.