
- February 17, 2020
- Posted by: Surender Kumar
- Categories: Kali Linux, Linux, Tips & Tricks
Fix installation errors in Kali Linux
Table of Contents
Since the Kali Linux 2020.1 is released on 28th January 2020, so I thought to give it a try and install it on my HP Pavilion 15 laptop. I went over to https://www.kali.org/downloads page and downloaded the Kali Linux 64-Bit (Installer) which is about 2GB. I used Rufus on Windows to write the bootable ISO images onto my USB drive.
When I booted up and started the installation of Kali, I came across various errors, which took quite a lot of time to fix all the errors and get the new Kali 2020.1 version up and running on my laptop. I am sharing all the possible errors and how to fix them so that it can help others.
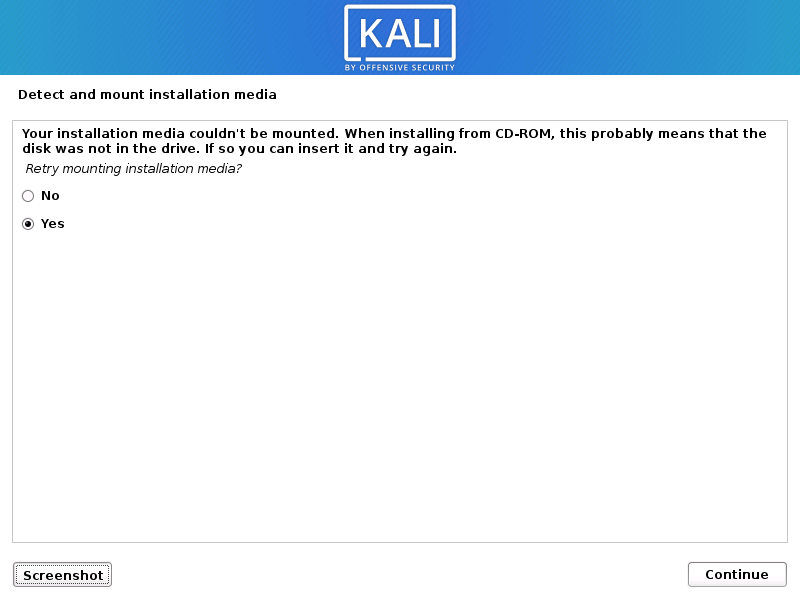
Problem 1: Your installation CD-ROM couldn’t be mounted.
Solutions
You have three options to fix this error:
Solution 1:
- Just unplug the USB storage drive that you’re installing from for a few moments and plug it in again.
- Select Yes on Retry mounting installation media? and click on Continue button to try again. The installation should now go ahead without any error.
- If this solution doesn’t work, try the next one.
Solution 2:
- On “Retry mounting the CD-ROM?” option, select the No and click Continue.

- You will see an installation step failed page but that is okay, just click on Continue.
- Now you will see an installer menu with various options. Navigate and select “Execute a shell” option and click on Continue twice.
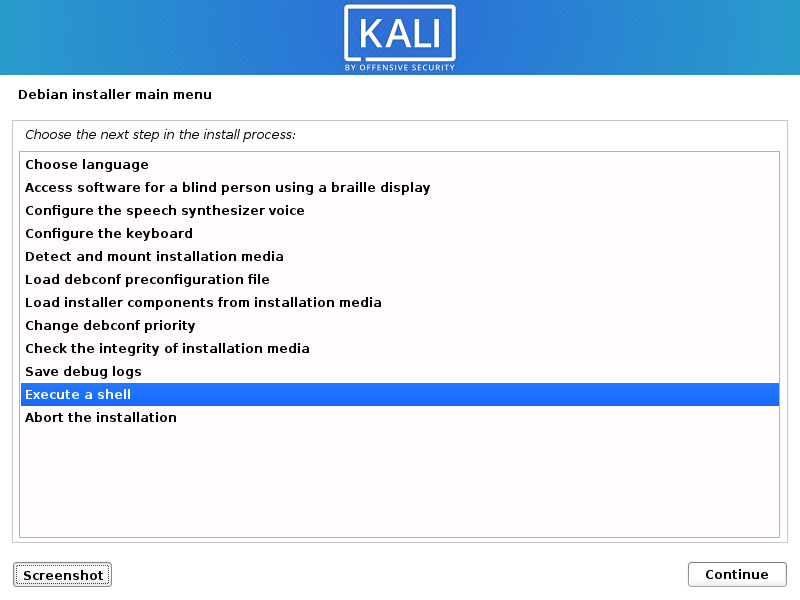
- You will get a terminal window where you can execute commands. From here, we will manually mount our bootable USB to cdrom directory so the installer can continue.
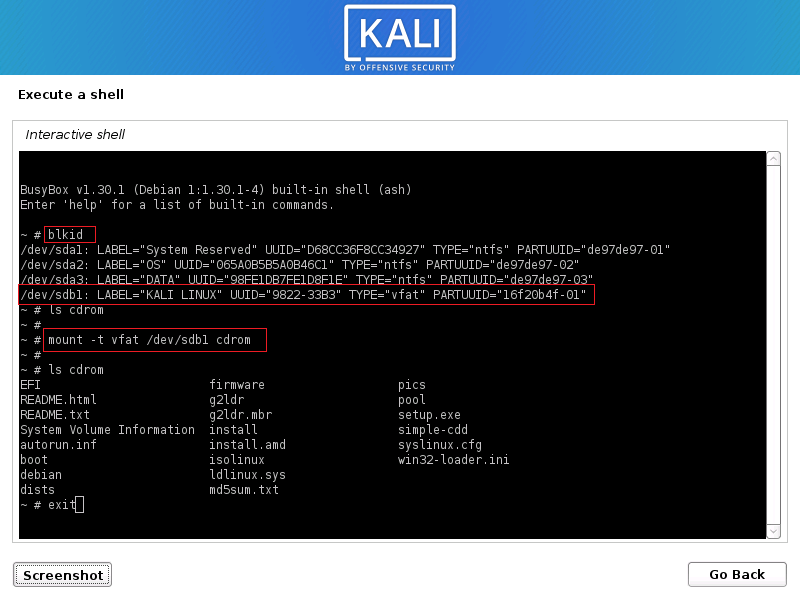
- First, to determine the block ID of USB drive, use the “blkid” command without quotes.Usually it is the last option in the list. Take a note of the device name i.e. /dev/sdb1 and file system type i.e. vfat. You will need these two things to manually mount the USB.
- Now type “ls cdrom” command without quotes. If you do not get anything, you can skip the next command but if you get an error like “No such file or directory”, continue to next command.
- Type “mkdir cdrom” command
- Type “mount -t vfat /dev/sdb1 cdrom” command. Make sure you adjust the device name noted in first step
- If above command is successful, you can verify the contents of cdrom directory using “ls cdrom” command.
- Now type exit and hit enter. (see the following image for all the commands)
- You will get back to the list of installer menu with various options. You need to start over; Just highlight the first option i.e. Choose Language and click Continue.
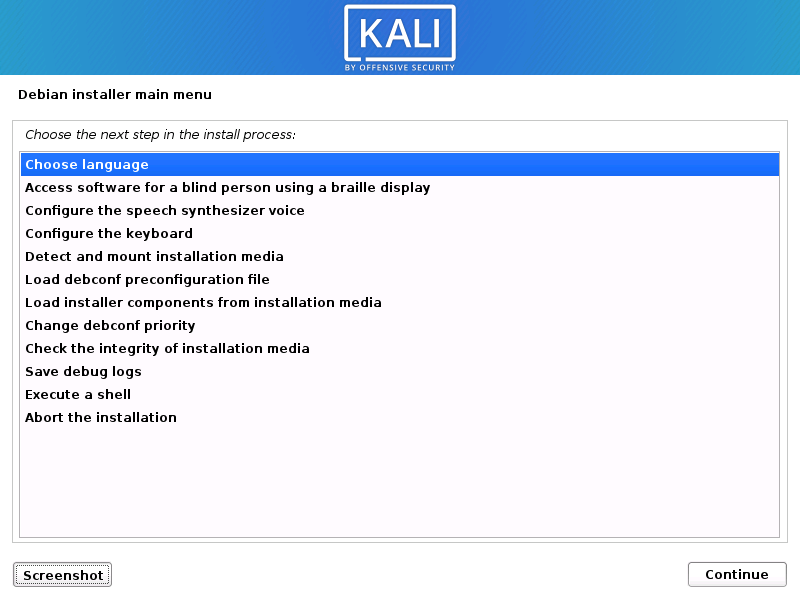
- Hopefully, your system will now detect and mount the CDROM since you manually mounted it this time.
If above steps do not work for you, you can follow the next solution.
Solution 2:
For this, you will need to re-format your USB device. You can download and use rufus to write the bootable kali iso image onto your USB drive.
-
- Launch rufus.
- Rufus will auto detect your USB drive, just make sure right device is selected, then select the kali iso image and click on Start button.
- As soon as you hit the Start button, rufus will detect that the selected ISO image is ISOHybrid type and gives you two ways of writing this image to USB.
- Just select the second option i.e. Write in DD image mode and click OK.
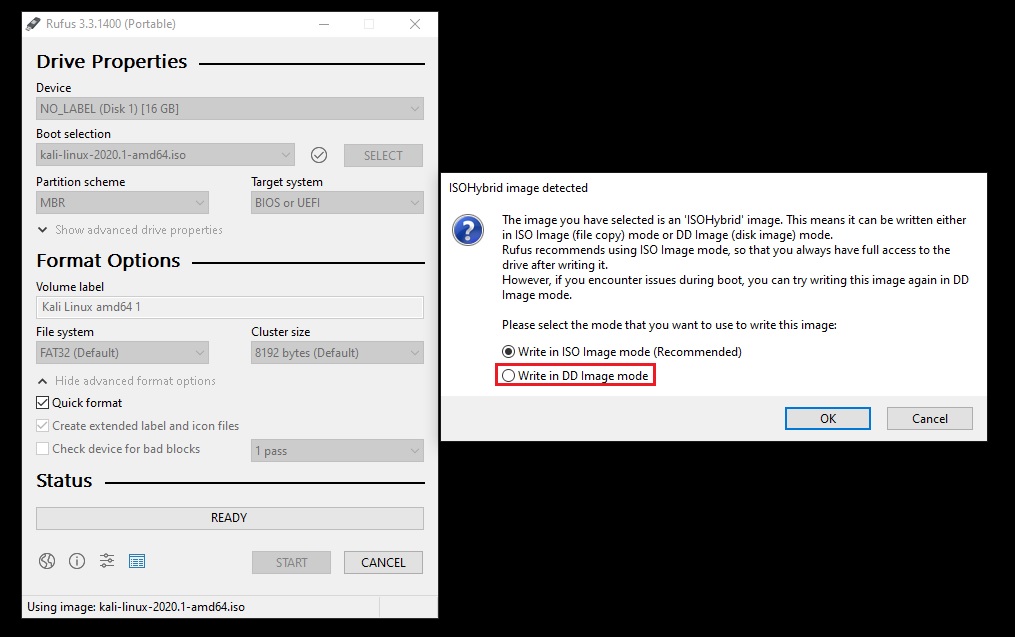

- No matter what software you use for writing the Kali iso to USB, you need to do it via DD mode. Once your USB is ready, plug it in and start the installation.
- Now you will not get CD-ROM detect and mount error.
Tip: The problem with DD image mode is that you can no longer make any changes to your USB device i.e. you will not be able to add or delete any file to/from your USB device (until you re-format it). To be able to use the USB again you will have to clean it and remove the Kali Linux image from it.

Problem 2: Some of your hardware needs non-free firmware files to operate.
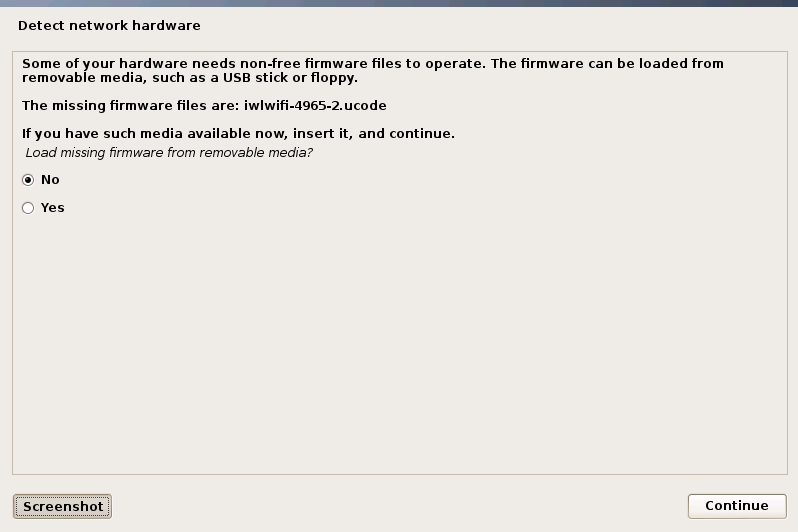
To fix this error you will need a PC with an active internet connection. Just take a note of the missing firmware file names. In my case, it is “rtlwifi/rtl8723befw.bin”.
Now follow these steps:
- Launch any web browser and open https://www.debian.org/distrib/packages#search_contents URL.
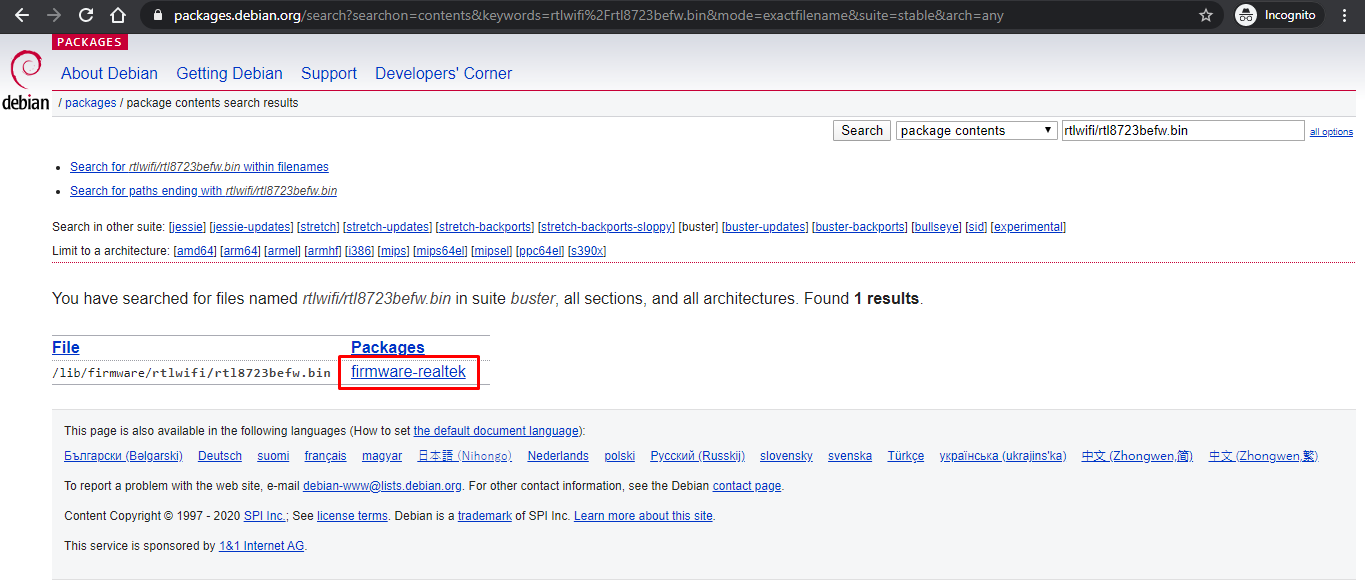
- Under keywords text box type the firmware file name noted initially, and then select “packages that contain files named like this” under display and then click on the Search button.

- If your firmware matches the search criteria, you will get a list of files. Click on the link under Packages and you will be redirected to package contents page.
- Now, scroll down until you see download firmware section, just click on the all link under Architecture column.
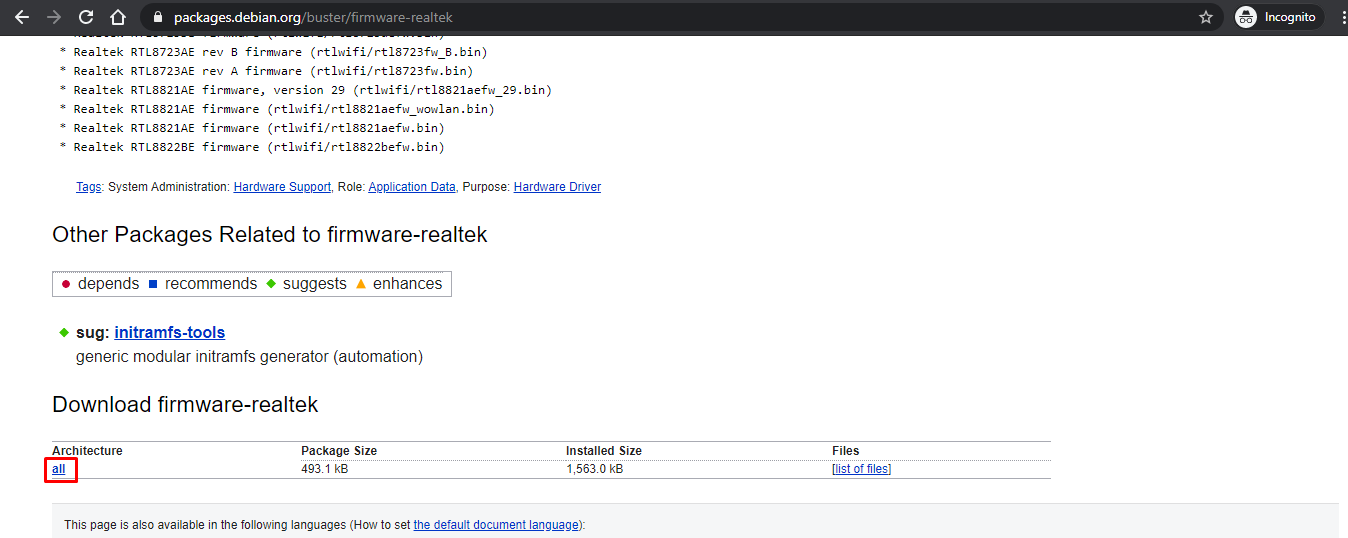
- You will now see a list of servers in various geographical regions. Click on the link of sever which is nearest to you and a .deb package will be downloaded.
- You will need to repeat the steps 2 – 5 for each missing firmware file.
- Now connect the bootable USB containing kali image to your computer. Make sure your USB device is not written using DD mode. If it is in DD mode, you won’t be able to copy files across. You will need to re-format it in ISO mode.
- Browse to USB device via File Explorer and navigate to F:\pool\non-free\ (USB device is mounted under F: drive, you need to adjust it accordingly)
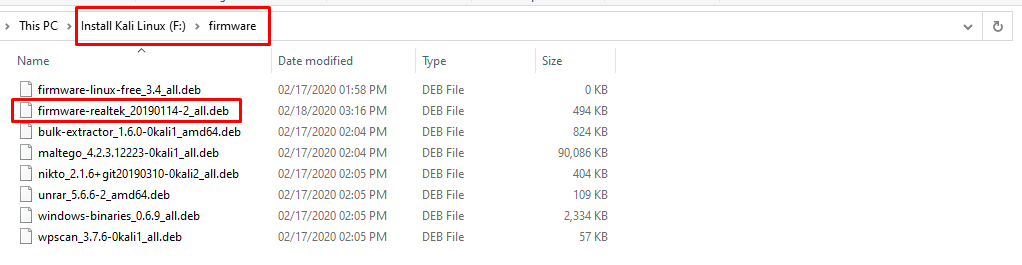
- You will see some subdirectories in there. You need to go inside each subdirectory, copy all the files and paste them right inside F:\firmware\. If there are already some files with same name, just click replace.
- After copying all the files from F:\pool\non-free subdirectories, you also need to copy the firmware files that you downloaded earlier into same F:\firmware folder. Please see the following image for reference.
- That is it. Now plug-in your USB and start the kali installation again.
- Hopefully, you will no longer get any missing non-free firmware error. If you do get the error, just repeat the steps 2 – 5 to download the missing firmware files.
Problem 3: No GUI after successful installation of Kali 2020.1
Problem Description
After installation is successful, GRUB is installed to MBR, but when I rebooted the system there was no grub splash screen; just a text based booting menu. After Kali is booted up, there was no GUI; but only a text based login option.
Reason of Problem
By spending some time on googling it, I found that there is bug in 2020.1 installer ISO and about 140+ packages are missing in offline installer. Also, there are a few packages that are missing in APT package manager. To install Kali Linux with default options (XFCE DE), installer needs Internet connection to download missing packages from Kali repository. If you try to install Kali Linux offline, you will end up with text mode install.
Workaround
To remediate the situation, we can connect the Kali Linux to internet, convert our installation to GUI mode, and install any missing firmware and packages.
You will need an Android phone with good internet connection, USB cable that can connect your phone to PC where you just installed the Kali Linux. The idea is to use USB tethering option to share mobile’s internet connection on PC. Just to mention that I don’t really use an iPhone. So, I don’t know if there is any option to use USB tethering in iPhone as well. If there is, you can surely use iPhone too.
Tip: If your mobile internet is not too fast, first connect your mobile to a WiFi network which is fast enough and then follow these steps.
Since you don’t have any GUI in Kali Linux yet, so you will have to do everything in text mode.
-
- Login to kali linux in text mode
- Connect the USB cable to your PC and phone.
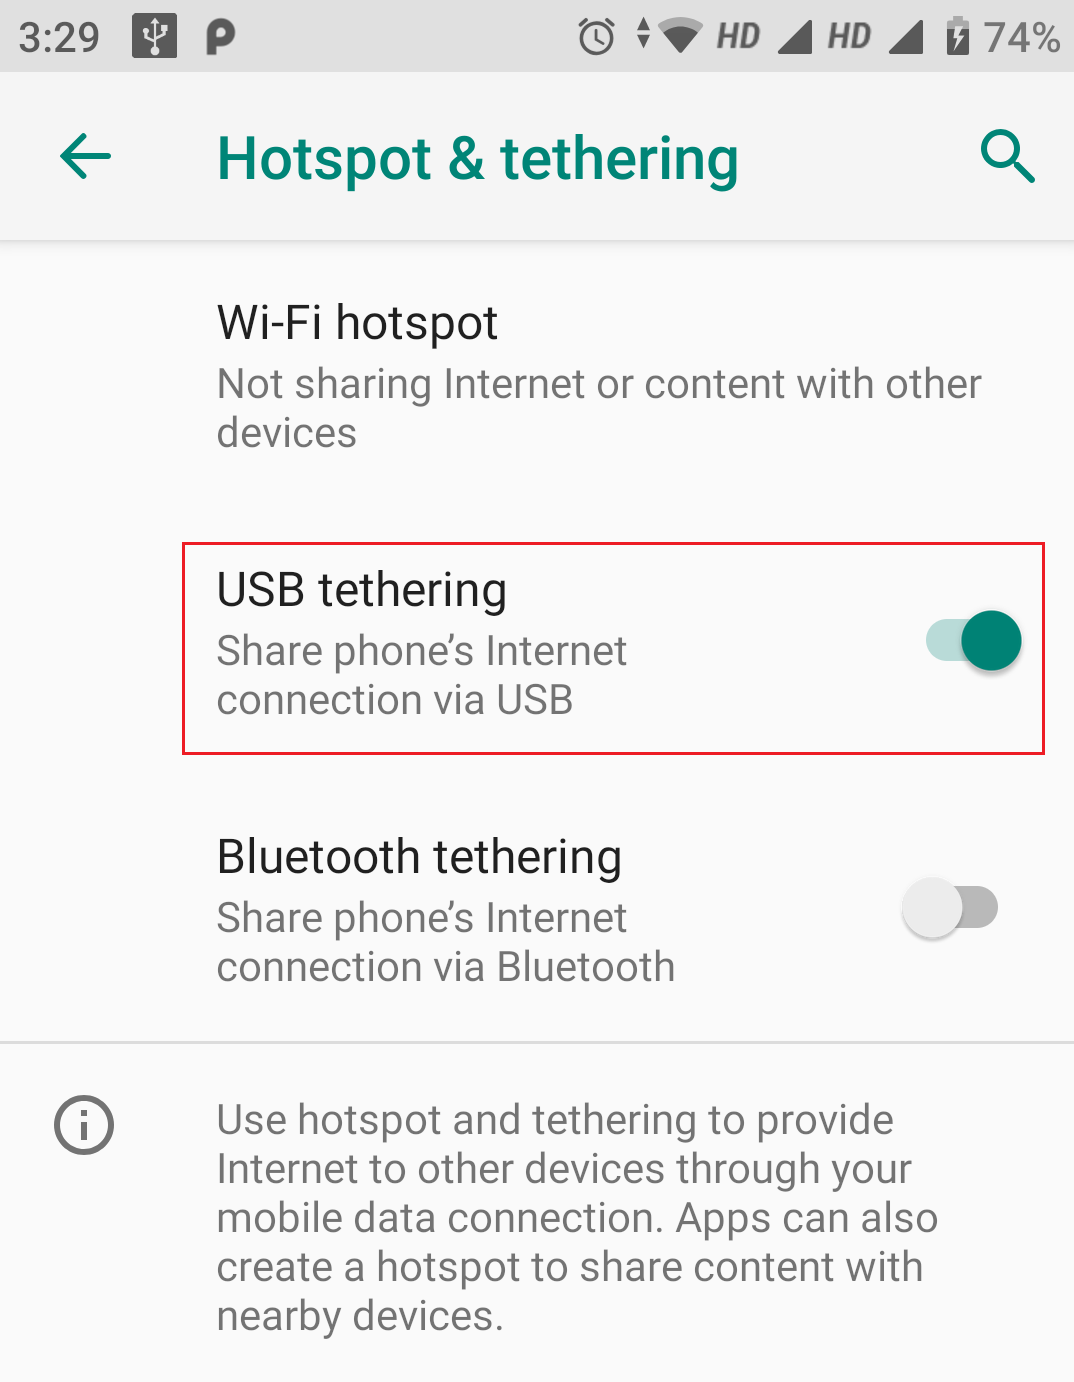
- Go to settings in your phone and enable USB tethering
- Now wait a few seconds and use the following commands in right order. We will make sure that kali linux can connect to internet using USB.
- Type “ip a” command without quotes and hit enter.This command will list all the network adapters and their IP configurations. The last device i.e. usb0 will probably be the USB network adapter created by USB tethering. If you see it, you are good to go to next step.
- Now type “sudo dhclient” command without quotes and hit enter.
- The command could take a few seconds. When completed, use “ip a” command again to verify that usb0 adapter has successfully received the IP configuration.
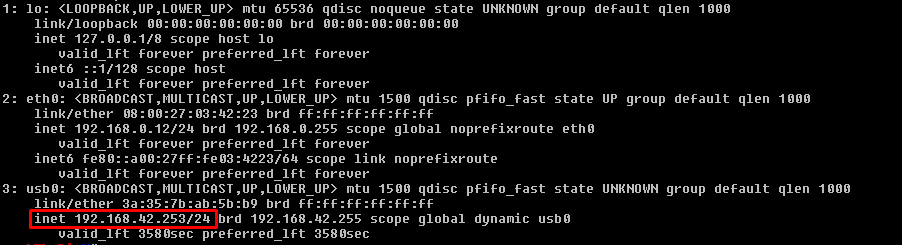
- If you see the IP address assigned (as highlighted in picture above), you are connected to internet.
- Now that you are connected to internet, make sure that the sources.list is updated with following information:
    	deb http://http.kali.org/kali kali-rolling main non-free contrib
    	deb-src http://http.kali.org/kali kali-rolling main non-free contrib
- If it is not, use following command to add kali-rolling repositories to sources.list:
cat <<EOF | sudo tee /etc/apt/sources.list
> deb http://http.kali.org/kali kali-rolling main non-free contrib
> deb-src http://http.kali.org/kali kali-rolling main non-free contrib
> EOF

- Use “cat /etc/apt/sources.list” command to view the file and comment out if there is any other line except above two
- Now type “sudo apt update ” command and wait for it to complete.
- Make sure your platform microcode is updated. Use following command just in case:
sudo apt install intel-microcode -y && sudo apt install amd64-microcode -y
- Now type “sudo apt install kali-desktop-xfce -y ”. This could take a while depending upon the speed of your internet connection. Wait for it complete and then restart. This command will convert your text mode installation of kali linux into default XFCE based desktop environment.
- After reboot, you will be able to login using GUI mode but you will still notice that there is no GNOME tweaks tool, no applications menu, no Places menu. To re-activate all these, follow the next step.
- Type “sudo apt install gnome-core kali-defaults kali-root-login desktop-base -y ” command and hit enter. Wait for it to finish and then reboot.
- Now you can see the Applications menu, Places menu, and GNOME tweaks tool is also installed so that you can customize the GNOME interface.
After following this guide, you will be able to get latest version of Kali Linux up and running. Let me know if you still face any error that is not mentioned in this guide and I will try to get back to you with a solution as soon as possible.
Tip: See the best WiFi routers supporting monitor mode and packet injection in Kali Linux.
Hi Mr. Kumar,
Thank you for the solutions although I had the problem of no GUI after installation and followed the steps mentioned above but did not worked as it shows that RTNETLINK answers: Operation not permitted and couldn’t update the kali linux 2020 therefor i request to help in this regard.
Hello Bahman,
I am afraid I couldn’t quite understand your issue. Can you try to explain a bit more about the issue?
What command you are running which is throwing “RTNETLINK answers: Operation not permitted” error?
Please retry running your command with “sudo” and see if it helps.
Hello sir as you said in step 11 that after reboot you will be able to login using gui mode, but in my case nothing happened like this . After the completion of download of kali-desktop-xfce when I typed reboot the laptop rebooted and after reboot the same Kali GNU//Linux Rolling Kali tty1 interface started appearing. Please help me out asap.
Hello Mridul,
What is the result of this command:
sudo apt install kali-desktop-xfce -yWas it successful or you got any error there?
You could also try the following command and see it helps:
sudo apt install kali-defaults kali-root-login desktop-base xfce4 xfce4-places-plugin xfce4-goodies -yTried all the above commands in systemd version with successful execution still getting no GUI. I have upgrades to 2020.1 from 2019.2.
Can you run the following commands and see if it helps:
i like this article, though i have the problem of gui, iam going to try it out hopefully it will work, and i will be glad, thank you, i will be back with the comment
Hello sir I followed all the steps as it is but still my PC is booting on Kali GNU//Linux Rolling Kali tty1.
Please help ASAP
Thank you
Did you get any error while running any command as mentioned in tutorial? Make sure all the commands worked without any error.
I have Kali Linux 2020.2 32bit iso imahe(official) and installed it by usb mounting in offline mode..I didn’t get into GUI mode(even I selected xfce in desktop environment while installation). I tried all the commands such as “sudo startx” but nothing works.. My question is
1. whether I need internet while installation?
2.you said that Kali 2020.1 don’t have some packages..likewise Kali 2020.2 installer too has some missing files?
Waiting for your answers..asap….thanks in advance
If you haven’t got the GUI like you said, you could try connecting your Kali machine to internet as suggested in this article and use the commands to convert your installation into full GUI if installer has some files missing.
Hello every one
i got back GUI after tried “” sudo apt install kali-desktop-xfce -y “” this command.
Glad to hear that
i cant use command “dhclient” can you help me
Do you get any error when you run the “dhclient” command? If possible, please share the screenshot via pastebin.com.
Min, I want to ask whether installing Linux 2020.1 times does indeed have to use an internet connection? and why did 2 attempts always fail in the selection and installation of the system which was supposed to be a 1900 file, already 1800 files instead failed?
can you gitft me your email?
You can reach me via website’s contact form
I have a laptop that does not have ethernet port. Is it possible to still download the mirror during installation?
During installation it asks for Ethernet hardware which is not on the laptop.
I downloaded without the mirror but it will install a very basic Kali Linix that is only the shell and has no internet connection (which im assuming the no wifi issue is normal for Linux”
Yes, after you get the shell install for Kali, you could follow this guide to convert your shell install into a fully functional Kali with GUI. All you need is USB cable and a smartphone with a good internet connection on your phone. You could connect your phone to WiFi and then enable the USB tethering.
I tried to copy non free firmware but then to save it, I have to pay money to softwares to save that iso file, like winiso, power iso, etc. Is there any free software to do it with 2gb+ iso file – kali linux installer
I haven’t actually tried these myself but you could download and use the following software:
http://www.anyburn.com/tutorials/edit-iso-file.htm
https://cdburnerxp.se/en/home
Sir,
I left the install in the middle what to do… there is no terminal or applications..
please help.
Regards,
Pratyush
You could retry the installation and follow the guide if you run into any issues
Wow! Thanks for this mehn. Almost gave the installation but this made it work. Thanks.
When I tried the “dhclient” I had errors too but “sudo dhclient” that worked for me and I could connect and download the packages.
Thanks again
I am glad it worked for you!
I am so happy I found your blog and I absolutely love your information about fix the installation errors in kali linux 2020-1 offline installer and the tips you have shared are awesome. I liked and it is wonderful to know about so many things that are useful for all of us! Thanks a lot for this amazing blog!!