
- September 8, 2015
- Posted by: Surender Kumar
- Category: Linux
RAID Configuration in Linux
Table of Contents
RAID stands for Redundant Array of Independent (Inexpensive) Disks. This is a solution where several physical hard disk drives (two or more) are governed by a unit called RAID controller, which turns them into a single logical data storage block. This article can help you if you are new to RAID. I will outline the basic concepts of RAID and its configuration in Linux.
An example of a RAID configuration would be to take two hard disks of 80 GB each and RAID them into a single unit 160 GB in size. Another example of RAID would be to take these two disks and write data to each, creating two identical copies (mirror) of everything.
Do I need RAID?
The first question you might ask yourself before configuring RAID is “Do I really need RAID?“
Well, It depends. RAID can be used to increase the logical capacity of storage devices used, improve read/write performance and ensure redundancy in case of a hard drive failure. All these needs can be addressed by other means, usually more expensive than the RAID configuration of several hard disks. The term “inexpensive“ used in the name is not without a reason. The data storage has become very inexpensive these days due to reduced size of hard disks and increased capacity. In this modern era of computing, everyone want his data to be safe from hardware failure. If you think you have some precious data on your computer hard drive, you can say that “YES, I need RAID“.
Advantages of RAID
The major advantages of RAID are the cost and flexibility. It is possible to dynamically adapt to the growing or changing needs of a storage center, server performance or machine backup requirements merely by changing parameters in software, without physically touching the hardware. This makes RAID more easily implemented than equivalent hardware solutions.
For example, improved performance can be achieved by buying better, faster hard disks and using them instead of the old ones. This requires spending money, turning off the machine, swapping out physical components, performing new installation and discarding the old hard drives. RAID can achieve the same with only a new installation required. RAID offers:
- Improved read/write performance.
- Improved redundancy in the case of drive failure
- Increased flexibility in hard disk & partition layout.
Disadvantages of RAID
The problems with RAID directly relates to its advantages. For instance, with increased redundancy, space efficiency is reduced. On the other hand, while RAID can improve performance, this setup necessarily reduces the safety of the implementation. In fact, you can say that every RAID implementation (RAID Level) has its own pros and cons.
Choosing the right RAID level
There are several different RAID configurations, known as “levels” such as RAID 0, RAID 1, RAID 5, RAID 6, RAID 10 and so on. While there is little difference in their naming, there are big differences in their characteristics and when/where they should be used.
You should consider the following factors when choosing the right RAID level for you:
- Capacity
- Performance
- Redundancy (reliability/safety)
- Price
There is no “one size fits all” approach to RAID because focusing on one factor typically comes at the expense of another. Some RAID levels designate drives to be used for redundancy, which means they can’t be used for capacity. Other RAID levels focus on performance but not on redundancy. A large, fast, highly redundant array will be expensive. Conversely, a small, average speed redundant array won’t cost much, but will not be anywhere near as fast as the previous expensive array.
Hardware vs Software RAID
RAID can be hardware-based or software-based. Hardware RAID resides on a PCI controller card, or on a motherboard integrated RAID-on-Chip (ROC). The controller handles all RAID functions in its own hardware processor and memory. The server CPU is not loaded with storage workload so it can concentrate on handling the software requirements of the server operating system and applications.
| Pros: |
|
| Cons: |
|
Software RAID runs entirely on the CPU of the host computer system.
| Pros: |
|
| Cons: |
|
RAID Levels
This article covers the following RAID levels:
- RAID 0 – striping
- RAID 1 – mirroring
- RAID 5 – striping with parity
- RAID 6 – striping with double parity
- RAID 10 – combining mirroring and striping
The software to perform the RAID-functionality and control the drives can either be located on a separate controller card (a hardware RAID controller) or it can simply be a driver. Some versions of Windows, such as Windows Server 2012 as well as Mac OS X, include software RAID functionality. Hardware RAID controllers cost more than pure software, but they also offer better performance, especially with RAID 5 and 6.
RAID-systems can be used with a number of interfaces, including SCSI, IDE, SATA or FC (fibre channel). There are systems that use SATA disks internally, but that have a FireWire or SCSI-interface for the host system. The disks in a storage system are sometimes called JBOD, which stands for ‘Just a Bunch Of Disks’. This means that those disks do not use a specific RAID level and acts as stand-alone disks. This is often done for drives that contain swap files or spooling data.
Below is an overview of the most popular RAID levels:
RAID level 0 (Striping)
In a RAID 0, the data is split up in blocks that get written across all the drives in the array. By using multiple disks (at least 2) at the same time, this offers superior I/O performance. This performance can be enhanced further by using multiple controllers, ideally one controller per disk.

Advantages
- RAID 0 offers great performance, both in read and write operations. There is no overhead caused by parity controls.
- All storage capacity is used, there is no storage capacity loss.
- The technology is easy to implement.
Disadvantages
- RAID 0 does not provide fault-tolerance. If one drive fails, all data in the RAID 0 array is lost. It should not be used for mission-critical systems.
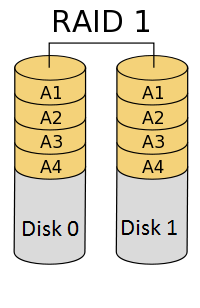
RAID level 1 (Mirroring)
RAID 1 requires minimum 2 hard drives. The data is stored twice by writing to both the drives. If a drive fails, the controller uses either the data drive or the mirror drive for data recovery and continues operation.
Advantages
- RAID 1 offers excellent read speed and a write-speed that is comparable to that of a single drive.
- In case a drive fails, data do not have to be rebuild, it is just copied to the replacement drive.
- RAID 1 is a very simple technology.
Disadvantages
- The main disadvantage is that the effective storage capacity is only half of the total drive capacity because all data gets mirrored.
- Software RAID 1 solutions do not always allow a hot swap of a failed drive. That means the failed drive can only be replaced after powering down the computer. For servers that need high availability, this may not be acceptable. Such systems typically use hardware controllers that do support hot swapping.
RAID level 5 (striping with parity)
RAID 5 is the most commonly used RAID level. It requires at least 3 drives but can work with up to 16 drives. The data blocks are striped across the drives and on one drive a parity checksum of all the block data is written. The parity data is not written to a fixed drive but it is spread across all drives, as shown in the diagram below.
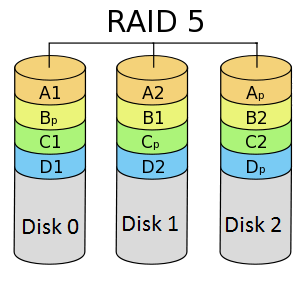
Using the parity data, the computer can recalculate the data of one of the other data blocks when that data is no longer available. That means a RAID 5 array can withstand a single drive failure without losing data or access to data. Although RAID 5 can be achieved in software, a hardware controller is recommended. Often extra cache memory is used on these controllers to improve the write performance.
Advantages
- Data read operation is very fast while data write operation is somewhat slower (due to the parity that has to be calculated).
- If a drive fails, you still have access to all data, even while the failed drive is being replaced and the storage controller rebuilds the data on the new drive.
Disadvantages
- Drive failures have an effect on throughput, although this is still acceptable.
- This is complex technology. If one of the disks in an array using 4TB disks fails and is replaced, the rebuild time may take a day or longer, depending on the load on the array and the speed of the controller. If another disk goes bad during that time, data is lost forever.
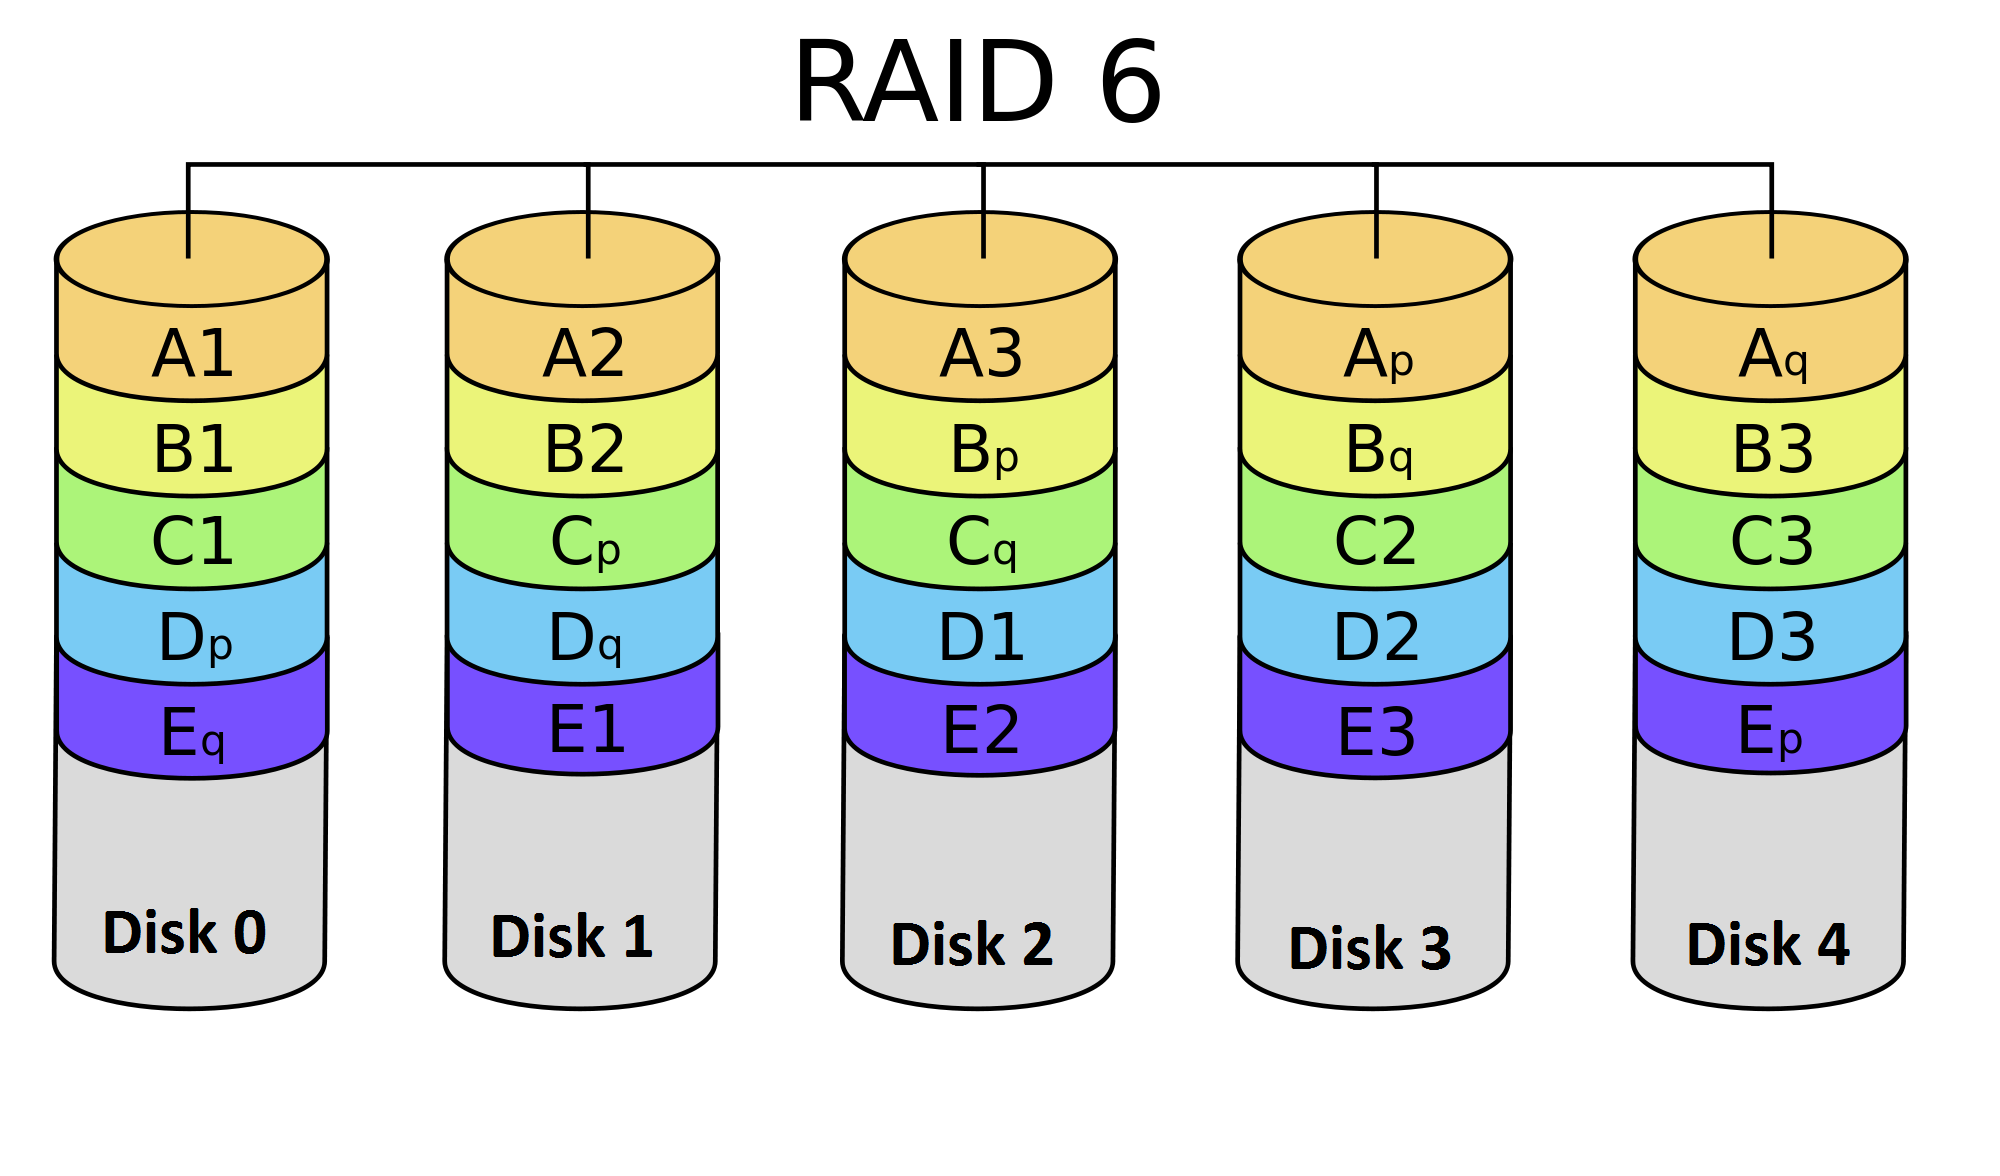
RAID level 6 (Striping with double parity)
RAID 6 is like RAID 5, but the parity data is written to two drives. That means it requires at least 4 drives. RAID 6 can withstand 2 drive failures simultaneously. The chances that two drives break down at exactly the same moment are of course very small. However, if a drive in a RAID 5 systems fails and is replaced by a new drive, it takes hours to rebuild the swapped drive. If another drive fails during that time, with RAID 6, you will still not lose all of your data.
Advantages
- Like with RAID 5, read data operation is very fast.
- If two drives fail, you still have access to all data, even while the failed drives are being replaced. So RAID 6 is more secure than RAID 5.
Disadvantages
- Write data operation is slowed down due to the parity calculation.
- Drive failures have an effect on throughput, although this is still acceptable.
- This is complex technology. Rebuilding an array in which one drive failed can take a long time.
RAID level 10 (Combining RAID 1 & RAID 0)
It is possible to combine the advantages (and disadvantages of course) of RAID 0 and RAID 1 in one single system. This is a nested or hybrid RAID configuration. It provides security by mirroring all data on secondary drives while using striping across each set of drives to speed up data transfers.
Advantages
- If something goes wrong with one of the disks in a RAID 10 configuration, the rebuild time is very fast since all that is needed is copying all the data from the surviving mirror to a new drive. This can take as little as 30 minutes for drives of 1 TB.
Disadvantages
- Half of the storage capacity goes to mirroring, so compared to large RAID 5 or RAID 6 arrays, this is an expensive way to have redundancy.
RAID levels 2, 3, 4 and 7
These levels do exist but are not common (RAID 3 is essentially like RAID 5 but with the parity data always written to the same drive). I will not cover these levels since these are not commonly used.
RAID vs Backup
Some people might be wondering that RAID provides security to data. So why not it should be used in place of regular backups? Let me clarify one thing that all RAID levels except RAID 0 offer protection from a single drive failure. A RAID 6 system even survives 2 disk failures simultaneously. But RAID will not be able to replace your regular data backups because:
- Back-up will come in handy if all drives fail simultaneously because of a power surge.
- It is a safeguard when the storage system gets stolen.
- Backups can be kept off-site at a different location. This can come in handy if a natural disaster or fire destroys your workplace.
- If someone accidentally deletes some important data and this goes unnoticed for several hours, days or weeks, a good set of backups ensure you can still retrieve user deleted files.
- RAID will not guard against data corruption on the media. Backup will come handy if the data on device gets corrupted.
RAID Notation in Linux
In Linux, hard drives are represented as sda, sdb, sdc etc. but the RAID devices are represented by two letters md followed by a number. For example: md0, md2, md4. By themselves, the RAID device names tell us nothing about their type.
To be able to get more information about our RAID devices, we need additional tools.
/proc/mdstat
/proc is a pseudo-filesystem on Linux operating system. The term pseudo is used here, because /proc does not monitor a data structure on the disk; instead, it monitors the kernel. In other words, /proc is a sort of a windows into kernel, providing live information about the system internals, at any given moment.
Many parameters about the operating system can be extracted from different files under the /proc tree. For example, we can check memory information, CPU information, mounts, and much more.
We can also check the status of our RAID devices. This is done by printing out the contents of the mdstat file under /proc as shown below.
[root@centos ~]# cat /proc/mdstat
Personalities :
unused devices: <none>
If there are no RAID arrays on the system, the output of the command would be as shown above.
mdadm
The mdadm is a very important, powerful Linux software RAID management utility. It has no less than seven modes of operation, which include assemble, build, create, monitor, grow, manage, and misc. It is a command-line utility and requires super-user (root) privileges.
RAID Configuration
RAID configuration is done using mdadm utility which is installed by default in Linux server operating system. By the way, you can install it with the following command:
[root@centos ~]# yum install mdadm -y
Loaded plugins: fastestmirror, langpacks
Determining fastest mirrors
Package mdadm-3.2.6-31.el7.x86_64 already installed and latest version
Nothing to do
Creating RAID0
In a RAID0, the data is split up in blocks that get written across all the drives in the array.
Step 1 : Identify the Hard Drives
Since RAID0, requires minimum 2 hard drives, make sure that the attached hard drives are detected by the system. To verify the hard drives, enter the following command:
[root@centos ~]# ls -l /dev | grep sd[b-c]
brw-rw----. 1 root disk      8,  16 Sep  8 14:41 sdb
brw-rw----. 1 root disk      8,  32 Sep  8 14:41 sdc
Once the new hard drives detected, it’s time to check whether the attached drives are already using any existing raid with the help of following ‘mdadm’ command ash shown below:
[root@centos ~]# mdadm --examine /dev/sd[b-c]
mdadm: No md superblock detected on /dev/sdb.
mdadm: No md superblock detected on /dev/sdc.
In the above output, we come to know that no RAID configuration is done on two hard drives sdb and sdc.
Step 2 : Creating Partitions for RAID
Now create RAID partitions on hard drive sdb and sdc, with the help of parted command. You can also use fdisk utility but I would recommend using parted. For more information on creating partitions using parted tool, visit this page.
Run parted command as root to create a partition table and raid partition.
[root@centos ~]# parted -a optimal /dev/sdb
Create a GPT partition table
(parted) mklabel gpt
Create a partition that is optimally aligned starting at 1MB of the disk (2048 sectors) and ends at the end of the disk (-1).
(parted) mkpart
Partition type?  primary/extended? primary
File system type?  [ext2]? ext4
Start? 2048s
End? -1
Mark the partition as a software raid partition
(parted) set 1 raid on
Verify the partition is aligned
(parted) align-check
alignment type(min/opt)  [optimal]/minimal? optimal
Partition number? 1
1 aligned
List the partitions on selected hard drive (sdb)
(parted) print
Model: Msft Virtual Disk (scsi)
Disk /dev/sdb: 85.9GB
Sector size (logical/physical): 512B/512B
Partition Table: gpt
Disk Flags:

Number  Start   End     Size    File system  Name  Flags
 1      1049kB  85.9GB  85.9GB  ext4               raid
Now, I am going to create the RAID partition on second hard drive sdc:
[root@centos ~]# parted -a optimal /dev/sdc
GNU Parted 3.1
Using /dev/sdc
Welcome to GNU Parted! Type 'help' to view a list of commands.
(parted) mklabel gpt
(parted) mkpart primary ext4 2048s -1
(parted) set 1 raid on
(parted) align-check optimal
Partition number? 1
1 aligned
(parted) print
Model: Msft Virtual Disk (scsi)
Disk /dev/sdc: 85.9GB
Sector size (logical/physical): 512B/512B
Partition Table: gpt
Disk Flags:

Number  Start   End     Size    File system  Name     Flags
 1      1049kB  85.9GB  85.9GB               primary  raid

(parted) q
Information: You may need to update /etc/fstab.
After creating partitions, verify both the drives are correctly defined for RAID using following command:
[root@centos ~]# mdadm --examine /dev/sd[b-c]
/dev/sdb:
   MBR Magic : aa55
Partition[0] :    167772159 sectors at            1 (type ee)
/dev/sdc:
   MBR Magic : aa55
Partition[0] :    167772159 sectors at            1 (type ee)
Step 3: Creating RAID Array
Now it is time to create RAID array (md device) for instance, dev/md0 and apply RAID level using below command:
[root@centos ~]# mdadm -C /dev/md0 -l raid0 -n 2 /dev/sd[b-c]1
mdadm: /dev/sdb1 appears to contain an ext2fs file system
    size=20971520K  mtime=Tue Sep  8 14:41:29 2015
Continue creating array? y
mdadm: Defaulting to version 1.2 metadata
mdadm: array /dev/md0 started.
In above command,
- -C refers to create
- -l refers to RAID level
- -n refers to number of drives.
Once the RAID array (md device) has been created, verify the status with the help of following command:
[root@centos ~]# cat /proc/mdstat
Personalities : [raid0]
md0 : active raid0 sdc1[1] sdb1[0]
      167767040 blocks super 1.2 512k chunks
Step 4 : Creating Filesystem on RAID Device
Now create ext4 filesystem on RAID device /dev/md0.
[root@centos ~]# mkfs.ext4 /dev/md0
mke2fs 1.42.9 (28-Dec-2013)
Filesystem label=
OS type: Linux
Block size=4096 (log=2)
Fragment size=4096 (log=2)
Stride=128 blocks, Stripe width=256 blocks
10485760 inodes, 41941760 blocks
2097088 blocks (5.00%) reserved for the super user
First data block=0
Maximum filesystem blocks=2189426688
1280 block groups
32768 blocks per group, 32768 fragments per group
8192 inodes per group
Superblock backups stored on blocks:
        32768, 98304, 163840, 229376, 294912, 819200, 884736, 1605632, 2654208, 4096000, 7962624, 11239424, 20480000, 23887872

Allocating group tables: done
Writing inode tables: done
Creating journal (32768 blocks): done
Writing superblocks and filesystem accounting information:
done
Once ext4 filesystem has been created for RAID device, now create a mount point directory (i.e. /raid0) and mount the device /dev/md0 under it.
[root@centos ~]# mkdir /raid0
[root@centos ~]# mount /dev/md0 /raid0/
To permanently mount it, add the entries into /etc/fstab file as shown below:
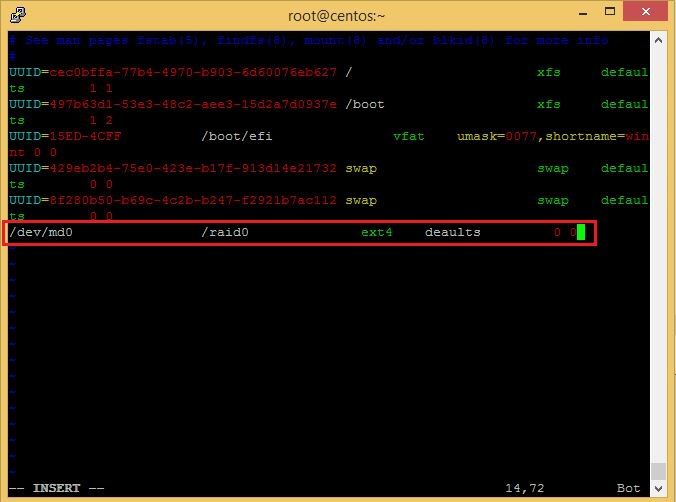
You can verify that the device /dev/md0 is mounted under /raid0 directory using df command.
[root@centos ~]# df -h | grep md0
/dev/md0        158G   61M  150G   1% /raid0
Step 5 : Saving RAID Configurations
Finally, save the raid configuration to one of the file to keep the configurations for future use. Use ‘mdadm’ command with ‘-s‘ (scan) and ‘-v‘ (verbose) options as shown below:
[root@centos ~]# mdadm -E -s -v >> /etc/mdadm.conf
[root@centos ~]# mdadm --detail --scan --verbose >> /etc/mdadm.conf
[root@centos ~]# cat /etc/mdadm.conf
ARRAY /dev/md/0  level=raid0 metadata=1.2 num-devices=2 UUID=c58acf0a:bf025256:73049d1a:6bd1ba33 name=centos.airvoice.local:0
   devices=/dev/sdc1,/dev/sdb1
ARRAY /dev/md0 level=raid0 num-devices=2 metadata=1.2 name=centos.airvoice.local:0 UUID=c58acf0a:bf025256:73049d1a:6bd1ba33
   devices=/dev/sdb1,/dev/sdc1
You have seen the configuration of RAID0. Next we will look into the configuration of RAID1.
Creating RAID1
The steps for creating RAID 1 and RAID 5 are approximately same as that of RAID 0. The only difference is mdadm –create command.
RAID1 (Mirroring) means an exactly cloning of the same data writing to two drives. A minimum of two hard disks are required in an array to create RAID1. RAID1 is useful when read performance or reliability is your priority over the storage capacity because 50% of space will be lost. This means connecting 2 hard drives of 80 GB each, which makes the overall capacity of 160 GB, with RAID1 you will be ale to store only 80 GB of data since the other 80 GB space will be used for mirror.
We have already configured RAID0 on drives sdb and sdc. For creating RAID1, I will use hard drives sdd and sde. So, let’s get started.
Step 1 : Identify the Hard Drives
Since RAID1, requires minimum 2 hard drives, make sure that the attached hard drives are detected by the system. To verify the hard drives, enter the following command:
[root@centos ~]# ls -l /dev/ | grep sd[d-e]
brw-rw----. 1 root disk      8,  48 Sep  9 17:21 sdd
brw-rw----. 1 root disk      8,  64 Sep  9 16:51 sde
Once the new hard drives detected, it’s time to check whether the attached drives are already using any existing raid with the help of following ‘mdadm’ command ash shown below:
[root@centos ~]# mdadm --examine /dev/sd[d-e]
mdadm: No md superblock detected on /dev/sdd.
mdadm: No md superblock detected on /dev/sde.
In the above output, we come to know that no RAID configuration is done on two hard drives sdd and sde.
Step 2 : Creating Partitions for RAID
Now create RAID partitions on hard drive sdd and sde, with the help of parted command. You can also use fdisk utility but I would recommend using parted.
Run the following parted commands as root to create a partition table and raid partition.
[root@centos ~]# parted -a optimal /dev/sdd
GNU Parted 3.1
Using /dev/sdd
Welcome to GNU Parted! Type 'help' to view a list of commands.
(parted) mklabel gpt
(parted) mkpart primary ext4 2048s -1
(parted) set 1 raid on
(parted) align-check optimal
Partition number? 1
1 aligned
(parted) print
Model: Msft Virtual Disk (scsi)
Disk /dev/sdd: 85.9GB
Sector size (logical/physical): 512B/512B
Partition Table: gpt
Disk Flags:

Number  Start   End     Size    File system  Name     Flags
 1      1049kB  85.9GB  85.9GB               primary  raid

(parted) q
Information: You may need to update /etc/fstab.
Similarly create the RAID partition on second hard drive sde:
[root@centos ~]# parted -a optimal /dev/sde
GNU Parted 3.1
Using /dev/sde
Welcome to GNU Parted! Type 'help' to view a list of commands.
(parted) mklabel gpt
(parted) mkpart primary ext4 2048s -1
(parted) set 1 raid on
(parted) align-check optimal
Partition number? 1
1 aligned
(parted) p
Model: Msft Virtual Disk (scsi)
Disk /dev/sde: 85.9GB
Sector size (logical/physical): 512B/512B
Partition Table: gpt
Disk Flags:

Number  Start   End     Size    File system  Name     Flags
 1      1049kB  85.9GB  85.9GB               primary  raid

(parted) q
Information: You may need to update /etc/fstab.
After creating partitions, verify both the drives are correctly defined for RAID using following command:
[root@centos ~]# mdadm --examine /dev/sd[d-e]
/dev/sdd:
   MBR Magic : aa55
Partition[0] :    167772159 sectors at            1 (type ee)
/dev/sde:
   MBR Magic : aa55
Partition[0] :    167772159 sectors at            1 (type ee)
Step 3: Creating RAID Array
Now create the RAID array /dev/md1 (md0 is being used for RAID0) and apply RAID level using below command:
[root@centos ~]# mdadm --create /dev/md1 --level=mirror --raid-devices=2 /dev/sd[d-e]1
mdadm: Note: this array has metadata at the start and
    may not be suitable as a boot device.  If you plan to
    store '/boot' on this device please ensure that
    your boot-loader understands md/v1.x metadata, or use --metadata=0.90
Continue creating array? y
mdadm: Defaulting to version 1.2 metadata
mdadm: array /dev/md1 started.
Now you can check the status of RAID using cat /proc/mdstat command as shown below:
[root@centos ~]# cat /proc/mdstat
Personalities : [raid0] [raid1]
md1 : active raid1 sde1[1] sdd1[0]
      83818368 blocks super 1.2 [2/2] [UU]
      [====>................]  resync = 24.0% (20200064/83818368) finish=5.1min speed=205714K/sec

md0 : active raid0 sdc1[1] sdb1[0]
      167767040 blocks super 1.2 512k chunks

unused devices: <none>
One of my favorite RAID monitoring command is mdadm –detail because this command gives you the complete information and health state of RAID.
[root@centos ~]# mdadm --detail /dev/md1
/dev/md1:
        Version : 1.2
  Creation Time : Thu Sep 10 10:28:44 2015
     Raid Level : raid1
     Array Size : 83818368 (79.94 GiB 85.83 GB)
  Used Dev Size : 83818368 (79.94 GiB 85.83 GB)
   Raid Devices : 2
  Total Devices : 2
    Persistence : Superblock is persistent

    Update Time : Thu Sep 10 10:32:39 2015
          State : clean, resyncing
 Active Devices : 2
Working Devices : 2
 Failed Devices : 0
  Spare Devices : 0

  Resync Status : 58% complete

           Name : centos.airvoice.local:1  (local to host centos.airvoice.local)
           UUID : cf1b5380:488f0c81:038a4be7:8d9b2fda
         Events : 9

    Number   Major   Minor   RaidDevice State
       0       8       49        0      active sync   /dev/sdd1
       1       8       65        1      active sync   /dev/sde1
Step 4 : Creating Filesystem on RAID Device
Now create ext4 filesystem on RAID device /dev/md1.
[root@centos ~]# mkfs.ext4 /dev/md1
mke2fs 1.42.9 (28-Dec-2013)
Filesystem label=
OS type: Linux
Block size=4096 (log=2)
Fragment size=4096 (log=2)
Stride=0 blocks, Stripe width=0 blocks
5242880 inodes, 20954592 blocks
1047729 blocks (5.00%) reserved for the super user
First data block=0
Maximum filesystem blocks=2168455168
640 block groups
32768 blocks per group, 32768 fragments per group
8192 inodes per group
Superblock backups stored on blocks:
        32768, 98304, 163840, 229376, 294912, 819200, 884736, 1605632, 2654208,
        4096000, 7962624, 11239424, 20480000

Allocating group tables: done
Writing inode tables: done
Creating journal (32768 blocks): done
Writing superblocks and filesystem accounting information: done
Once ext4 filesystem has been created for RAID device, now create a mount point directory (i.e. /raid1) and mount the device /dev/md1 under it.
[root@centos ~]# mkdir /raid1
[root@centos ~]# mount /dev/md1 /raid1
To permanently mount it, add the following entry into /etc/fstab file:
/dev/md1 /raid1 ext4 defaults 0 0
You can verify that the device md1 is accessible to system by using df -Th command ash shown below:
[root@centos ~]# df -Th
Filesystem     Type      Size  Used Avail Use% Mounted on
/dev/sda7      xfs        17G  9.7G  6.5G  61% /
devtmpfs       devtmpfs  485M     0  485M   0% /dev
tmpfs          tmpfs     493M   80K  493M   1% /dev/shm
tmpfs          tmpfs     493M  6.8M  486M   2% /run
tmpfs          tmpfs     493M     0  493M   0% /sys/fs/cgroup
/dev/sda3      xfs       197M   92M  105M  47% /boot
/dev/sda1      vfat      200M  9.6M  191M   5% /boot/efi
/dev/md0       ext4      158G  3.2G  147G   3% /raid0
/dev/md1       ext4       79G   57M   75G   1% /raid1
Remember that RAID1 gives you fault tolerance in case of drive failures. If either of two hard drives fail, your data is still safe and you can continue accessing your data while the faulty hard drive is being replaced and RAID is rebuild.
Simulating a Drive Failure
You may want to test your setup of RAID1, to see if it really works. Now, how can you simulate a disk failure?
Simulate Failure by Hardware
If you want to simulate a drive failure, you can just plug out the drive. If your hardware does not support disk hot-unplugging, you should do this with the power off (if you are interested in testing whether your data can survive with a disk less than the usual number, there is no point in being a hot-plug cowboy here. Take the system down, unplug the disk, and boot it up again).
Look at the syslogs, and look at /proc/mdstat to see how the RAID is doing. Did it work?
Faulty disks should appear marked with an (F) if you run cat /proc/mdstat command.
When you have re-connected the disk (with the power off, of course, remember), you can add the “new” device to the RAID again, with the mdadm –add command.
Remember, that you must be running RAID{1,4,5,6,10} for your array to be able to survive a disk failure. Linear or RAID0 will fail completely when one of the hard drive fails.
Simulate Failure by Software
You can just simulate a drive failure without unplugging things. Linux gives you command that can simulate the drive failure. But before actually causing a failure on disk, let me create some files on RAID1 so that I can make sure if one of the drive fails, I could still access my files. This seems more practical.
[root@centos ~]# cd /raid1
[root@centos raid1]# mkdir MyFiles
[root@centos raid1]# cd MyFiles/
[root@centos MyFiles]# echo This is my first file >>One.txt
[root@centos MyFiles]# echo This is my second file >>Two.txt
[root@centos MyFiles]#
[root@centos MyFiles]# cat One.txt
This is my first file
[root@centos MyFiles]# cat Two.txt
This is my second file
Notice that I have created a new subdirectory (MyFiles) under /raid1 directory. Remember that RAID1 device (/dev/md1) is mounted under /raid directory. Then I created two text files and added some content to these files.
Now it is time to cause a failure. You can do this by running following command:
[root@centos ~]# mdadm --manage --set-faulty /dev/md1 /dev/sde1
mdadm: set /dev/sde1 faulty in /dev/md1
After running above command, you can see the health state of RAID by running the command as shown below:
[root@centos ~]# mdadm --detail /dev/md1
/dev/md1:
        Version : 1.2
  Creation Time : Thu Sep 10 10:28:44 2015
     Raid Level : raid1
     Array Size : 83818368 (79.94 GiB 85.83 GB)
  Used Dev Size : 83818368 (79.94 GiB 85.83 GB)
   Raid Devices : 2
  Total Devices : 2
    Persistence : Superblock is persistent

    Update Time : Thu Sep 10 14:20:45 2015
          State : clean, degraded
 Active Devices : 1
Working Devices : 1
 Failed Devices : 1
  Spare Devices : 0

           Name : centos.airvoice.local:1  (local to host centos.airvoice.local)
           UUID : cf1b5380:488f0c81:038a4be7:8d9b2fda
         Events : 21

    Number   Major   Minor   RaidDevice State
       0       8       49        0      active sync   /dev/sdd1
       1       0        0        1      removed

       1       8       65        -      faulty   /dev/sde1
If you check the contents of /proc/mdstat, you will see the (F) in front of specific drive indicating that the drive is failed.
[root@centos ~]# cat /proc/mdstat
Personalities : [raid0] [raid1]
md1 : active raid1 sde1[1](F) sdd1[0]
      83818368 blocks super 1.2 [2/1] [U_]
If you are running CentOS/RedHat ver 7 or above, you can see the system log message by running following command:
[root@centos ~]# journalctl --dmesg | grep md1
Sep 10 10:28:44 centos.airvoice.local kernel: md/raid1:md1: not clean -- starting background reconstruction
Sep 10 10:28:44 centos.airvoice.local kernel: md/raid1:md1: active with 2 out of 2 mirrors
Sep 10 10:28:44 centos.airvoice.local kernel: md1: detected capacity change from 0 to 85830008832
Sep 10 10:28:44 centos.airvoice.local kernel: md: resync of RAID array md1
Sep 10 10:28:44 centos.airvoice.local kernel:  md1: unknown partition table
Sep 10 10:35:42 centos.airvoice.local kernel: md: md1: resync done.
Sep 10 10:40:47 centos.airvoice.local kernel: EXT4-fs (md1): mounted filesystem with ordered data mode. Opts: (null)
Sep 10 10:40:47 centos.airvoice.local kernel: SELinux: initialized (dev md1, type ext4), uses xattr
Sep 10 14:20:45 centos.airvoice.local kernel: md/raid1:md1: Disk failure on sde1, disabling device. md/raid1:md1: Operation continuing on 1 devices.
One of the drive is now failed. You might be wondering “Is my data safe?”. “Can I still access and write to my files?”. Let’s check it out.
[root@centos ~]# cat /raid1/MyFiles/One.txt
This is my first file
[root@centos ~]# cat /raid1/MyFiles/Two.txt
This is my second file
[root@centos ~]#
[root@centos ~]# echo New content added to file >>/raid1/MyFiles/Two.txt
[root@centos ~]# cat /raid1/MyFiles/Two.txt
This is my second file
New content added to file
[root@centos ~]#
Notice that I can still read my files. And even I can still write to my files because one hard disk is failed while other hard drive is operational. If this were to be RAID0, all of my files would have been lost forever because RAID0 does not provide fault tolerance.
Now you have seen how it goes when a device fails. Let’s fix the things up.
First, we will remove the failed disk from the array by running the following command:
[root@centos ~]# mdadm /dev/md1 -r /dev/sde1
mdadm: hot removed /dev/sde1 from /dev/md1
Note that mdadm utility cannot pull a disk out of a running array. For obvious reasons, only faulty disks can be hot-removed from an array. Even stopping and unmounting the device won’t help. If you ever want to remove a ‘good’ disk, you have to tell the array to put it into the ‘failed’ state as we did above.
Now we have RAID array (/dev/md1) which has just lost a device. This could be a degraded RAID or perhaps a system in the middle of a reconstruction process. We wait until recovery ends before setting things back to normal.
Once the failed drive is replaced with a new (good) drive, we need to this disk to RAID1 array. This is done with the help of following command:
[root@centos ~]# mdadm /dev/md1 -a /dev/sde1
mdadm: added /dev/sde1
Once the disk is replaced and added to RAID array, you will see it becoming an active member of /dev/md1 if necessary. If not, it will be marked as a spare disk.
[root@centos ~]# mdadm --detail /dev/md1
/dev/md1:
        Version : 1.2
  Creation Time : Thu Sep 10 10:28:44 2015
     Raid Level : raid1
     Array Size : 83818368 (79.94 GiB 85.83 GB)
  Used Dev Size : 83818368 (79.94 GiB 85.83 GB)
   Raid Devices : 2
  Total Devices : 2
    Persistence : Superblock is persistent

    Update Time : Thu Sep 10 14:39:05 2015
          State : clean, degraded, recovering
 Active Devices : 1
Working Devices : 2
 Failed Devices : 0
  Spare Devices : 1

 Rebuild Status : 20% complete

           Name : centos.airvoice.local:1  (local to host centos.airvoice.local)
           UUID : cf1b5380:488f0c81:038a4be7:8d9b2fda
         Events : 29

    Number   Major   Minor   RaidDevice State
       0       8       49        0      active sync   /dev/sdd1
       2       8       65        1      spare rebuilding   /dev/sde1
Notice the Rebuild Status is 20%. This means currently the data of healthy drive is being copied (mirrored) on to the new replacement drive. Once the rebuild process is complete, the status of RAID will be started reporting as clean, resyncing.
The cat /proc/mdstat command will remove the (F) flag from disk and you can also see the rebuild status.
[root@centos ~]# cat /proc/mdstat
Personalities : [raid0] [raid1]
md1 : active raid1 sde1[2] sdd1[0]
      83818368 blocks super 1.2 [2/1] [U_]
      [=>...................]  recovery =  25.0% (4204032/83818368) finish=6.6min speed=200192K/sec

[output cut]
I would like to mention one thing that if you can afford, add one more hard disk to RAID array. This disk will be set as Hot Spare. As soon as any of the hard drive in RAID array fails, the RAID rebuild process will be kicked in onto Hot Spare device. This can save your life on production servers containing very sensitive data. To add a spare disk to array, create the RAID partition on new drive and run the following command:
[root@centos ~]# mdadm /dev/md1 -a /dev/sdf1
mdadm: added /dev/sdf1
Where /dev/sdf1 is new spare hard drive. Once the Spare drive is added to array, use the following command:
[root@centos ~]# mdadm --detail /dev/md1
/dev/md1:
        Version : 1.2
  Creation Time : Thu Sep 10 10:28:44 2015
     Raid Level : raid1
     Array Size : 83818368 (79.94 GiB 85.83 GB)
  Used Dev Size : 83818368 (79.94 GiB 85.83 GB)
   Raid Devices : 2
  Total Devices : 3
    Persistence : Superblock is persistent

    Update Time : Thu Sep 10 15:31:49 2015
          State : clean
 Active Devices : 2
Working Devices : 3
 Failed Devices : 0
  Spare Devices : 1

           Name : centos.airvoice.local:1  (local to host centos.airvoice.local)
           UUID : cf1b5380:488f0c81:038a4be7:8d9b2fda
         Events : 88

    Number   Major   Minor   RaidDevice State
       0       8       49        0      active sync   /dev/sdd1
       2       8       65        1      active sync   /dev/sde1

       3       8       81        -      spare   /dev/sdf1
Now, see what happens within one second when I manually set the drive status as faulty. Let us assume that drive /dev/sdd has failed. As soon as it fails, the rebuild process starts onto the spare drive.
[root@centos ~]# mdadm --manage --set-faulty /dev/md1 /dev/sdd1
mdadm: set /dev/sdd1 faulty in /dev/md1
[root@centos ~]#
[root@centos ~]# mdadm --detail /dev/md1
/dev/md1:
        Version : 1.2
  Creation Time : Thu Sep 10 10:28:44 2015
     Raid Level : raid1
     Array Size : 83818368 (79.94 GiB 85.83 GB)
  Used Dev Size : 83818368 (79.94 GiB 85.83 GB)
   Raid Devices : 2
  Total Devices : 3
    Persistence : Superblock is persistent

    Update Time : Thu Sep 10 15:37:58 2015
          State : clean, degraded, recovering
 Active Devices : 1
Working Devices : 2
 Failed Devices : 1
  Spare Devices : 1

 Rebuild Status : 1% complete

           Name : centos.airvoice.local:1  (local to host centos.airvoice.local)
           UUID : cf1b5380:488f0c81:038a4be7:8d9b2fda
         Events : 90

    Number   Major   Minor   RaidDevice State
       3       8       81        0      spare rebuilding   /dev/sdf1
       2       8       65        1      active sync   /dev/sde1

       0       8       49        -      faulty   /dev/sdd1
Creating RAID5 (striping with parity)
RAID5 requires at least 3 drives but can work with up to 16 drives. The data blocks are striped across the drives and on one drive a parity checksum of all the block data is written. This means connecting 3 hard drives of 80 GB each, which makes the overall capacity of 240 GB, with RAID5 you will be ale to store 160 GB of data. The other 80 GB space will be used for storing parity data. Remember that RAID1 reserves 50% of space resulting in only 50% of usable capacity but RAID5 gives you 75% of space for data storage and only wastes 25% of space. This is the reason that RAID5 is most commonly used.
I have now cleaned up the previously configured RAID levels. Now I can use the hard drives sdb, sdc and sdd for creating RAID5. I will also add a drive sde as hot spare to minimize the risk of data loss since the rebuild time of RAID5 is very high. The rebuild process totally depends upon processor speed of host computer as well as the amount of data need to be recalculated from parity disk. If you are using Hardware based RAID, the rebuild speed will depend upon the speed of RAID controller card.
Lets start configuring RAID5.
Step 1 : Identify the Hard Drives
Since RAID5, requires minimum 3 hard drives, make sure that the attached hard drives are detected by the system. To verify the hard drives, enter the following command:
[root@centos ~]# ls -l /dev/ | grep sd[b-d]
brw-rw----. 1 root disk      8,  16 Sep 10 16:36 sdb
brw-rw----. 1 root disk      8,  32 Sep 10 16:36 sdc
brw-rw----. 1 root disk      8,  48 Sep 10 16:36 sdd
Once the new hard drives detected, it’s time to check whether the attached drives are already using any existing raid with the help of following ‘mdadm’ command ash shown below:
[root@centos ~]# mdadm --examine /dev/sd[b-d]
mdadm: No md superblock detected on /dev/sdb.
mdadm: No md superblock detected on /dev/sdc.
mdadm: No md superblock detected on /dev/sdd.
In the above output, we come to know that no RAID configuration is done on two hard drives sdb, sdc and sdd.
Step 2 : Creating Partitions for RAID
Now create RAID partitions on hard drive sdb, sdc,sdd and sde with the help of parted command.
Run the following parted commands as root to create a partition table and raid partition on all drives.
[root@centos ~]# parted -a optimal /dev/sdb
GNU Parted 3.1
Using /dev/sdb
Welcome to GNU Parted! Type 'help' to view a list of commands.
(parted) mklabel gpt
(parted) mkpart primary ext4 2048s -1
(parted) set 1 raid on
(parted) align-check optimal 1
1 aligned
(parted) select /dev/sdc
Using /dev/sdc
(parted) mklabel gpt
(parted) mkpart primary ext4 2048s -1
(parted) set 1 raid on
(parted) align-check optimal 1
1 aligned
(parted) select /dev/sdd
Using /dev/sdd
(parted) mklabel gpt
(parted) mkpart primary ext4 2048s -1
(parted) set 1 raid on
(parted) align-check optimal 1
1 aligned
(parted) select /dev/sde
Using /dev/sde
(parted) mklabel gpt
(parted) mkpart primary ext4 2048s -1
(parted) set 1 raid on
(parted) align-check optimal 1
1 aligned
(parted) print all
Model: Msft Virtual Disk (scsi)
Disk /dev/sdb: 85.9GB
Sector size (logical/physical): 512B/512B
Partition Table: gpt
Disk Flags:

Number  Start   End     Size    File system  Name     Flags
 1      1049kB  85.9GB  85.9GB  ext4         primary  raid

Model: Msft Virtual Disk (scsi)
Disk /dev/sdc: 85.9GB
Sector size (logical/physical): 512B/512B
Partition Table: gpt
Disk Flags:

Number  Start   End     Size    File system  Name     Flags
 1      1049kB  85.9GB  85.9GB               primary  raid

Model: Msft Virtual Disk (scsi)
Disk /dev/sdd: 85.9GB
Sector size (logical/physical): 512B/512B
Partition Table: gpt
Disk Flags:

Number  Start   End     Size    File system  Name     Flags
 1      1049kB  85.9GB  85.9GB               primary  raid

Model: Msft Virtual Disk (scsi)
Disk /dev/sde: 85.9GB
Sector size (logical/physical): 512B/512B
Partition Table: gpt
Disk Flags:

Number  Start   End     Size    File system  Name     Flags
 1      1049kB  85.9GB  85.9GB               primary  raid

Model: Msft Virtual Disk (scsi)
Disk /dev/sda: 64.4GB
Sector size (logical/physical): 512B/512B
Partition Table: gpt
Disk Flags:

Number  Start   End     Size    File system     Name                  Flags
 1      1049kB  211MB   210MB   fat16           EFI System Partition  boot
 2      211MB   735MB   524MB   xfs
 3      735MB   945MB   210MB   xfs
 4      945MB   42.9GB  41.9GB  xfs
 5      42.9GB  45.1GB  2181MB  linux-swap(v1)
 6      45.1GB  47.2GB  2147MB  linux-swap(v1)
 7      47.2GB  64.4GB  17.2GB  xfs
12      64.4GB  64.4GB  1032kB

(parted)q
Information: You may need to update /etc/fstab.
After creating partitions on all drives, verify that the drives are correctly defined for RAID using following command:
[root@centos ~]# mdadm --examine /dev/sd[b-e]
/dev/sdb:
   MBR Magic : aa55
Partition[0] :    167772159 sectors at            1 (type ee)
/dev/sdc:
   MBR Magic : aa55
Partition[0] :    167772159 sectors at            1 (type ee)
/dev/sdd:
   MBR Magic : aa55
Partition[0] :    167772159 sectors at            1 (type ee)
/dev/sde:
   MBR Magic : aa55
Partition[0] :    167772159 sectors at            1 (type ee)
Step 3: Creating RAID Array
Now create the RAID array /dev/md2 and apply RAID level using below command:
[root@centos ~]# mdadm --create /dev/md2 --level=5 --raid-devices=3 /dev/sd[b-d]1
mdadm: /dev/sdb1 appears to contain an ext2fs file system
    size=20971520K  mtime=Tue Sep  8 14:41:29 2015
mdadm: /dev/sdb1 appears to be part of a raid array:
    level=raid0 devices=2 ctime=Wed Sep  9 17:23:00 2015
mdadm: /dev/sdc1 appears to be part of a raid array:
    level=raid1 devices=2 ctime=Thu Sep 10 10:28:44 2015
Continue creating array? y
mdadm: Defaulting to version 1.2 metadata
mdadm: array /dev/md2 started
Now you can check the status of RAID using cat /proc/mdstat command as shown below:
[root@centos ~]# cat /proc/mdstat
Personalities : [raid6] [raid5] [raid4]
md2 : active raid5 sde1[4](S) sdd1[3] sdc1[1] sdb1[0]
      167635968 blocks super 1.2 level 5, 512k chunk, algorithm 2 [3/3] [UUU]

unused devices: <none>
You can use mdadm –detail command to list the complete information and health state of RAID.
[root@centos ~]# mdadm --detail /dev/md2
/dev/md2:
        Version : 1.2
  Creation Time : Thu Sep 10 17:37:09 2015
     Raid Level : raid5
     Array Size : 167635968 (159.87 GiB 171.66 GB)
  Used Dev Size : 83817984 (79.94 GiB 85.83 GB)
   Raid Devices : 3
  Total Devices : 3
    Persistence : Superblock is persistent

    Update Time : Thu Sep 10 17:39:11 2015
          State : clean, degraded, recovering
 Active Devices : 2
Working Devices : 3
 Failed Devices : 0
  Spare Devices : 1

         Layout : left-symmetric
     Chunk Size : 512K

 Rebuild Status : 21% complete

           Name : centos.airvoice.local:2  (local to host centos.airvoice.local)
           UUID : c716c776:fa03473a:2cacda03:625a27fd
         Events : 4

    Number   Major   Minor   RaidDevice State
       0       8       17        0      active sync   /dev/sdb1
       1       8       33        1      active sync   /dev/sdc1
       3       8       49        2      spare rebuilding   /dev/sdd1
Step 4 : Creating Filesystem on RAID Device
Now create ext4 filesystem on RAID device /dev/md2.
[root@centos ~]# mkfs.ext4 /dev/md2
mke2fs 1.42.9 (28-Dec-2013)
Filesystem label=
OS type: Linux
Block size=4096 (log=2)
Fragment size=4096 (log=2)
Stride=128 blocks, Stripe width=256 blocks
10477568 inodes, 41908992 blocks
2095449 blocks (5.00%) reserved for the super user
First data block=0
Maximum filesystem blocks=2189426688
1279 block groups
32768 blocks per group, 32768 fragments per group
8192 inodes per group
Superblock backups stored on blocks:
        32768, 98304, 163840, 229376, 294912, 819200, 884736, 1605632, 2654208,
        4096000, 7962624, 11239424, 20480000, 23887872

Allocating group tables: done
Writing inode tables: done
Creating journal (32768 blocks): done
Writing superblocks and filesystem accounting information: done
Once ext4 filesystem has been created for RAID device, now create a mount point directory (i.e. /raid5) and mount the device /dev/md2 under it.
[root@centos ~]# mkdir /raid5
[root@centos ~]# mount /dev/md2 /raid5
To permanently mount it, add the following entry into /etc/fstab file:
/dev/md2 /raid5 ext4 defaults 0 0
You can verify that the device md2 is accessible to system by using df -Th command ash shown below:
[root@centos ~]# df -Th
Filesystem     Type      Size  Used Avail Use% Mounted on
/dev/sda7      xfs        17G  9.7G  6.5G  61% /
devtmpfs       devtmpfs  485M     0  485M   0% /dev
tmpfs          tmpfs     493M   80K  493M   1% /dev/shm
tmpfs          tmpfs     493M  6.8M  486M   2% /run
tmpfs          tmpfs     493M     0  493M   0% /sys/fs/cgroup
/dev/sda3      xfs       197M   92M  105M  47% /boot
/dev/sda1      vfat      200M  9.6M  191M   5% /boot/efi
/dev/md2       ext4      158G   61M  150G   1% /raid5
Remember that RAID5 gives you fault tolerance in case of failure of one drive. If either of two hard drives fail, your data is still safe and you can continue accessing your data while the faulty hard drive is being replaced and RAID is rebuild. Since the RAID5 rebuild time is usually high and depends upon the CPU speed and amount of data, if one more drive fails during rebuild process of RAID5, your data will be permanently lost. Thats why I would recommend adding 1 or 2 hot spare drives to RAID5 array to minimize the risk of data loss.
To add hot spare drive to RAID5 array, enter the following command:
[root@centos ~]# mdadm /dev/md2 -a /dev/sde1
mdadm: added /dev/sde1
Where /dev/sde1 is the spare hard drive. Once the Spare drive is added to array, use the following command:
[root@centos ~]# mdadm --detail /dev/md2
/dev/md2:
        Version : 1.2
  Creation Time : Thu Sep 10 17:37:09 2015
     Raid Level : raid5
     Array Size : 167635968 (159.87 GiB 171.66 GB)
  Used Dev Size : 83817984 (79.94 GiB 85.83 GB)
   Raid Devices : 3
  Total Devices : 4
    Persistence : Superblock is persistent

    Update Time : Thu Sep 10 17:47:29 2015
          State : clean
 Active Devices : 3
Working Devices : 4
 Failed Devices : 0
  Spare Devices : 1

         Layout : left-symmetric
     Chunk Size : 512K

           Name : centos.airvoice.local:2  (local to host centos.airvoice.local)
           UUID : c716c776:fa03473a:2cacda03:625a27fd
         Events : 163

    Number   Major   Minor   RaidDevice State
       0       8       17        0      active sync   /dev/sdb1
       1       8       33        1      active sync   /dev/sdc1
       3       8       49        2      active sync   /dev/sdd1

       4       8       65        -      spare   /dev/sde1
[root@centos ~]#
One spare drive is now added to array which can help in automatically start the rebuild process if any of the 3 drives fails. Similarly you can add one more spare drive to array. This will make our RAID5 configuration more robust and secure from data failure.
Monitoring RAID Arrays
You can run mdadm as a daemon by using the follow-monitor mode. If needed, that will make mdadm send email alerts to the system administrator when arrays encounter errors or fail. Also, follow mode can be used to trigger contingency commands if a disk fails, like giving a second chance to a failed disk by removing and reinserting it, so a non-fatal failure could be automatically solved.
Let’s see a basic example.
[root@centos ~]# mdadm --monitor --daemonise [email protected] --delay=1800 /dev/md1
The above command runs the mdadm as daemon (background process) to monitor /dev/md1. The –daemonise switch tells mdadm to run as a deamon. The –delay parameter means that polling will be done in intervals of 1800 seconds. Finally, critical events and fatal errors should be e-mailed to the system manager. That’s RAID monitoring made easy. You can also use the –program or –alert parameters to specify the program to be run whenever an event is detected.
Once a device fails, you will see the following message on console:
You have mail in /var/spool/mail/root
You can read the mail sent by mdadm by using cat /var/spool/mail/root command.
[root@centos ~]# cat /var/spool/mail/root
From [email protected]  Thu Sep 10 15:51:38 2015
Return-Path: <[email protected]>
X-Original-To: [email protected]
Delivered-To: [email protected]
Received: by centos.airvoice.local (Postfix, from userid 0)
        id E322162A6434; Thu, 10 Sep 2015 15:51:37 +0530 (IST)
From: mdadm monitoring <[email protected]>
To: [email protected]
Subject: Fail event on /dev/md1:centos.airvoice.local
Message-Id: <[email protected]>
Date: Thu, 10 Sep 2015 15:51:37 +0530 (IST)

This is an automatically generated mail message from mdadm
running on centos.airvoice.local

A Fail event had been detected on md device /dev/md1.

It could be related to component device /dev/sde1.

Faithfully yours, etc.

P.S. The /proc/mdstat file currently contains the following:

Personalities : [raid0] [raid1]
md1 : active raid1 sdf1[3] sde1[2](F) sdd1[0](F)
      83818368 blocks super 1.2 [2/1] [U_]

md0 : active raid0 sdc1[1] sdb1[0]
      167767040 blocks super 1.2 512k chunks

unused devices: <none>
Isn’t it interesting? You can also use mdadm to monitor a RAID array and send email alerts. This is simple and cost effective method of monitoring RAID.
Removing RAID Array
To remove an existing RAID device, first you need to unmount it then deactivate it.
[root@centos ~]# umount /dev/md0
[root@centos ~]# umount /dev/md1
[root@centos ~]# mdadm -S /dev/md0
mdadm: stopped /dev/md0
[root@centos ~]# mdadm -S /dev/md1
mdadm: stopped /dev/md1
If you try to stop the device without unmounting the device first, you will see the following error:
mdadm: Cannot get exclusive access to /dev/md1:Perhaps a running process, mounted filesystem or active volume group?
Once deactivated, remove the RAID device itself suing the following command:
[root@centos ~]# mdadm -R /dev/md1
Finally, zero superblocks on all devices that were associated with the particular array:
[root@centos ~]# mdadm --zero-superblock /dev/md1
That’s all about configuring RAID in Linux. The basic concept of RAID is same for Windows and any other platform.
2 Comments
Comments are closed.
Your article has proven useful to me.
Enjoyed reading through this, very good stuff, thankyou.