
- April 12, 2022
- Posted by: Surender Kumar
- Category: PowerShell
PowerShell Script Signing
Table of Contents
Scripts are a great way to automate things – particularly in system and server administration. Most of the IT admins rely on scripts for performing their day-to-day job. With the rise of Internet popularly, scripts have now became the main source of malware and other malicious code. When people find any script on internet that is intriguing for their work, first thing that comes in mind is the fear of getting infected. If you’re a blogger or a script writer, you might be wondering how could we give a sense of trust to users so they can download the script from your blog without any fear.
One thing that you could do is script signing. While signing does not guarantee a completely clean and bug-free script, it helps to identify the publisher of signed script and verifies that the script hasn’t been tampered with. As a result, the end users can make an informed decision of trusting the publisher and whether or not to download script. The first thing you need to sign a script is a digital certificate – a code signing digital certificate to be precise. You might have heard or even used an SSL certificate with a website or blog. The certificate that is used on website is used to verify the identity of a web server based on its domain name. The code signing certificate on the other hand is used to certify the company or organization who writes and signs the code.
The thing with a regular domain validation certificate is that it is very easy to get (even for Free). But the code signing certificate has some strict requirements and are generally pricier. You can go ahead a buy a code signing certificate from same SSL vendors such as DigiCert, Comodo, GoDaddy etc. If you’re a really small organization or even a freelancer and couldn’t afford to by a code signing certificate from trusted vendor, you could also use a self-signed certificate.
In this article, we will look at how to generate a self-signed code signing certificate and then use it to sign a script. It is not that a self-signed certificate is any less secure or powerful when compared to a valid certificate. The only benefit of buying a certificate from a trusted vendor is that it will be trusted by most of user’s computers. If you sign a script using a self-signed certificate, the users may see the Untrusted Publisher warning while running your script. In the end, it all boils down to Trust.
Creating a self-signed code signing certificate
The first thing we will do is to create a self-signed certificate. If you have purchased a certificate from a trusted certificate authority, you could skip this step. Simply install that certificate and move on to next step. To generate the self-signed certificate, use the New-SelfSignedCertificate cmdlet as shown below:
New-SelfSignedCertificate -CertStoreLocation Cert:\LocalMachine\My\ -Subject "TechTutsOnline" -Type CodeSigningCert
This command will create a code signing certificate in local machine store which is accessible by all the users on same computer. If you want, you could generate the certificate in your user’s store only which will be accessible by your user account only. To do that, set the value of -CertStoreLocation parameter to “Cert:\CurrentUser\My” in the above command.
Once the certificate is generated, you could check it using the following command:
Get-ChildItem Cert:\LocalMachine\My | Where-Object {$_.Subject -eq "cn=TechTutsOnline"}

If you see the certificate, you are good to go to next step.
Signing the script
Now that you have your code signing certificate in place, you can use it to sign a script. In this example, I will sign my New-PsPing PowerShell script. First, I will store the code signing certificate in a PowerShell variable using the following command:
$crt = Get-ChildItem Cert:\LocalMachine\My | Where-Object {$_.Subject -eq "cn=TechTutsOnline"}
If you have purchased a valid code signing certificate, make sure to use that one in this step. Now to sign a script, use the Set-AuthenticodeSignature cmdlet as shown in the following command:
Set-AuthenticodeSignature -FilePath D:\MyScripts\New-PsPing.ps1 -Certificate $crt -TimeStampServer http://timestamp.comodoca.com
The -Certificate parameter is used to specify the code signing certificate which was stored in $crt variable. The -TimeStampServer parameter is used to specify a valid time stamping server. For the record, every certificate authority have their own time stamping server which prevents the script from failing even if the certificate expires.

If you get a Status: Valid after running this command, it means the script was signed successfully.
Verifying the digital signature
To verify if your script was successfully signed, you can use the Get-AuthenticodeSignature cmdlet as shown below:
Get-AuthenticodeSignature -FilePath D:\MyScripts\New-PsPing.ps1

The valid status indicates the script is signed. To get the more detailed information about digital signatures, you could run the following command:
Get-AuthenticodeSignature -FilePath D:\MyScripts\New-PsPing.ps1 | select -Property *
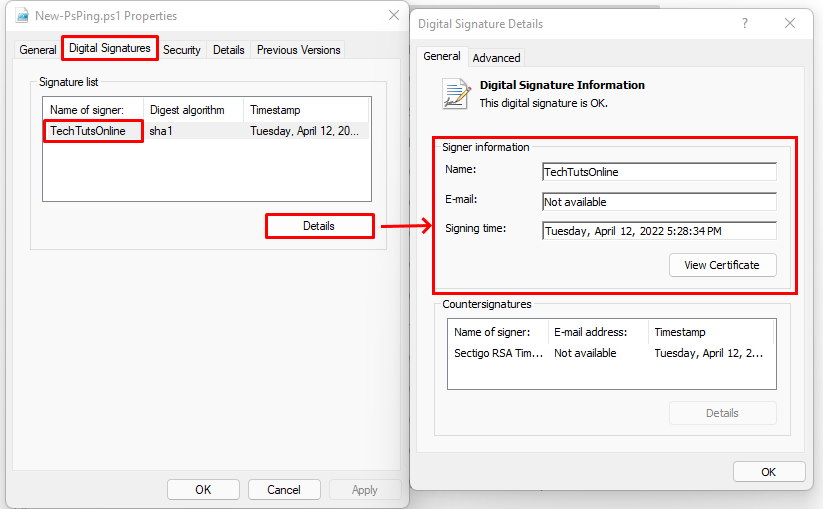
Alternatively, you could also see the Digital Signatures tab of file’s properties as shown in the following screenshot:
That’s it. You just learnt how to sign a PowerShell script.