
- June 12, 2015
- Posted by: Surender Kumar
- Category: Cisco Routers
Cisco Router Configuration Guide
Table of Contents
Let’s first discuss about configuration files and default configuration on startup. Then will we cover the information required before starting to configure the router.
Startup-Config: This is the configuration file saved in the NVRAM of your router/switch. Every time you reboot your device, the router will load this configuration file into main memory and it is converted to running-config.
Running-config: This configuration file is stored in router’s RAM and it is the real-time configuration your router is using while working. At any point of time, when you want to make any changes to your device, you are making changes to your device’s running-config. As this file is stored in RAM which is temporary memory, this configure will be lost once you reboot the router. You can save your running-config before rebooting your router by using “copy running-config startup-config” or “write memory” commands without quotes in privileged EXEC Mode. You can also shorten these commands to “copy run start” and “write” respectively.
When you first boot up your Cisco router, some basic configuration has already been performed. All of the LAN and WAN interfaces have been created, console and VTY ports are configured. When you connect to your router (either via console or vty), you are taken to what is known as User EXEC mode.
If you are prompted to enter initial configuration dialog; just type n and hit enter or press Ctrl+Z to skip. Type “enable“ without quotes to enter Privileged EXEC Mode from User EXEC mode.
Viewing the Default Configuration
Use the show running-config command to view the initial configuration, as shown below:
Router# show running-config
Building configuration...
Current configuration : 1090 bytes
!
version 12.3
no service pad
service timestamps debug datetime msec
service timestamps log datetime msec
no service password-encryption
!
hostname Router
!
boot-start-marker
boot-end-marker
!
no aaa new-model
ip subnet-zero
!
ip cef
ip ips po max-events 100
no ftp-server write-enable
!
interface FastEthernet0
 no ip address
 shutdown
!
interface FastEthernet1
 no ip address
 shutdown
!
interface FastEthernet2
 no ip address
 shutdown
!
interface FastEthernet3
 no ip address
 shutdown
!
interface FastEthernet4
 no ip address
 duplex auto
 speed auto
!
interface Dot11Radio0
 no ip address
 shutdown
 speed basic-1.0 basic-2.0 basic-5.5 6.0 9.0 basic-11.0 12.0 18.0 24.0 36.0 48.0
 54.0
 rts threshold 2312
 station-role root
!
interface Vlan1
 no ip address
!
ip classless
!
no ip http server
no ip http secure-server
!
control-plane
!
line con 0
 no modem enable
 transport preferred all
 transport output all
line aux 0
 transport preferred all
 transport output all
line vty 0 4
 login
 transport preferred all
 transport input all
 transport output all
!
end
Information Needed for Configuration
Before starting the configuration, you need to gather following information, depending on your planned network scenario:
- If you are setting up an Internet connection, gather the following information:
– Point-to-Point Protocol (PPP) client name that is assigned as your login name
– PPP authentication type: Challenge Handshake Authentication Protocol (CHAP) or Password Authentication Protocol (PAP)
– PPP password to access your Internet service provider (ISP) account
– DNS server IP address and default gateway address. - If you are setting up a connection to a corporate network, you and the network administrator must generate and share the following information for the WAN interfaces of the routers:
– PPP authentication type: CHAP or PAP
– PPP client name to access the router
– PPP password to access the router - If you are setting up IP routing:
– Generate the addressing scheme for your IP network.
– Determine the IP routing parameter information, including IP address, and routing protocols etc. - If you plan to connect over an ADSL or SHDSL line:
– Order the appropriate line from your public telephone service provider.
Once you have collected the appropriate information, you can move ahead to configure your router.
Cisco Router Configuration steps:
Router>enable
Router#clock set 16:15:00 12 Jun 2015
Router#configure terminal
Router(config)#clock timezone IST 5 30
Router(config)#hostname Cisco
Cisco(config)#enable secret cisco@321
Cisco(config)#service password-encryption
Cisco(config)#no ip domain-lookup
Cisco(config)#line vty 0 4
Cisco(config-line)#password Passw0rd
Cisco(config-line)#login
Cisco(config-line)#exit
Cisco(config)#line console 0
Cisco(config-line)#password Passw0rd1
Cisco(config-line)#login
Cisco(config-line)#exit
Cisco(config)#banner motd * --- Unauthorized Access Prohibited --- *
Cisco(config)#end
Cisco#
Now I am going to break each and every command line to tell you in detail:
Router>enable
When you connect to router for very first time, you will be taken to User EXEC Mode. In User EXEC Mode you can not make any configuration changes. So this enable command will take you to Privileged EXEC Mode. To get back to User EXEC Mode, you can simply type disable command.
Router#clock set 16:15:00 12 Jun 2015
This command can be used to set the Router’s clock. The format used is hh:mm:ss dd mm yyyy.
Router#configure terminal
In order to make system wide configuration changes, you need to enter into what is known as Global configuration mode. The above configure terminal command will take you into Global configuration mode from Privileged EXEC Mode. Baically configure terminal command is telling IOS that you want to modify the running-config file through terminal. To get back to Privileged EXEC Mode from Global Configuration Mode, you can use exit or end command. The difference between both is that exit command will take you only one step back while end command will take you back to Privileged EXEC Mode; no matter whether you are working in any of higher configuration modes (like interface config, line config, router config, router-map config).
Note:- You can also use configure memory command if you directly want to modify startup-config stored in NVRAM and even configure network command to directly modify config file stored on network. I don’t know why you would do that, but you can do. IOS gives you this option after-all.
Router(config)# clock timezone IST 5 30
The above command will set the router’s timezone to Indian Standard Time with 5:30 offset.
Router(config)#hostname Cisco
hostname command will change the router’s name. You can see that the name of router will get changed with immediate effect because you are working in running-config which router uses in real-time.
Cisco(config)#enable secret cisco@321
The above command will set the secure password (cisco@321 in our case; you can set whatever you want) which router will ask you when entering to Privileged EXEC Mode from User EXEC Mode. You saw when we run enable command in beginning, we were not prompted for any password. To secure the router’s configuration, this command is needed.
Note:- You can also use enable password <your password here> command. Both the commands will set security on privileged EXEC Mode, but difference is that enable password command will store the password in router’s config file in plain text format. So anyone who has access to router’s config file can easily read the password string. Furthermore, if you run both enable secret as well as enable password commands; the enable secret command will take the precedence over other.
Cisco(config)#service password-encryption
This command will encrypt every password before storing in router’s configuration. If you have used enable password command instead of enable secret command, then service password-encryption command will do the encryption for you. It will encrypt the plain text password.
Cisco(config)#no ip domain-lookup
Cisco IOS is by default configured in a way that when you mistype any command, the router believes that this is the host name of a device that you are attempting to reach using telnet. Therefore, the router tries to resolve the unrecognized command into an IP address by doing an IP domain lookup. If no specific domain server has been configured on the router, the router will issue a broadcast for the command to be translated into an IP address. It can take several seconds for the router prompt to return while the router waits for a response to its Domain Name System (DNS) broadcast. So, it is always considered as a good idea to disable domain lookup by using above command.
Cisco(config)#line vty 0 4
Cisco(config-line)#password Passw0rd
Cisco(config-line)#login
Cisco(config-line)#exit
First command will take you to line configuration mode and second command password followed by some phrase will set a password to protect vty (virtual teletype) lines which are commonly used while accessing router/switch through telnet. You will get error message “password required, but none set” if you do not set the password. login command will enable password checking on vty lines. If you don’t want the router to prompt for password during telnet; you can type no login command instead of login command. Exit command will take you out from line config mode.
Cisco(config)#line console 0
Cisco(config-line)#password Passw0rd1
Cisco(config-line)#login
Cisco(config-line)#exit
Above commands will set the password protection on console interface. When you try to login into router using console; you will have to type in this password.
Cisco(config)#banner motd * --- Unauthorized Access Prohibited --- *
banner motd command is used to set message of the day banner to router. It means that the router will display this message every time when someone try to login into router using telnet or ssh. In above example, * is delimiting character. You can continue typing the banner until you type * once again.
Interfaces Configuration
Now you are familiar with the basic parameter configuration on a Cisco Router. This is time to move towards interface configuration commands. If you are new to Cisco routers I would recommend using show ip interface brief command in privileged EXEC mode. This command will give you list of available interfaces on router, IP Address assigned or unassigned, status and protocol etc. Novice users should take a look at the naming convention used in interface names; it will be something like FastEthernet0/0, FastEthernet0/1 etc. where FastEthernet denotes the interface with 100Mbps transfer rate; 0/1 denotes 1st interface of default card slot (slot numbering starts from 0) on router.
Now I am going to explain the output of show ip interface brief command.
Interface column lists the available interfaces on router
IP-Address column lists the IP address (if assigned), unassigned or DHCP if interface is configured to obtain IP address from DHCP server.
OK? Yes signifies that the IP address is currently valid. No signifies that the IP address is not currently valid.
Method field can list the following possible values:
- RARP or SLARP—Reverse Address Resolution Protocol (RARP) or Serial Line Address Resolution Protocol (SLARP) request
- BOOTP—Bootstrap protocol
- TFTP—Configuration file obtained from TFTP server
- manual—Manually changed by CLI command
- NVRAM—Configuration file in NVRAM
- IPCP—ip address negotiated command
- DHCP—ip address dhcp command
- unassigned—No IP address
- unset—Unset
- other—Unknown
Status Indicates the status of interface. Possible values and their meanings are:
- up – Interface is administratively up.
- down – Interface is administratively down.
- administratively down – Interface is administratively down or shutdown command issued.
Protocol indicates the operational status of the routed protocol (IP) on this interface. Possible values are:
- up – operational
- down – not operational
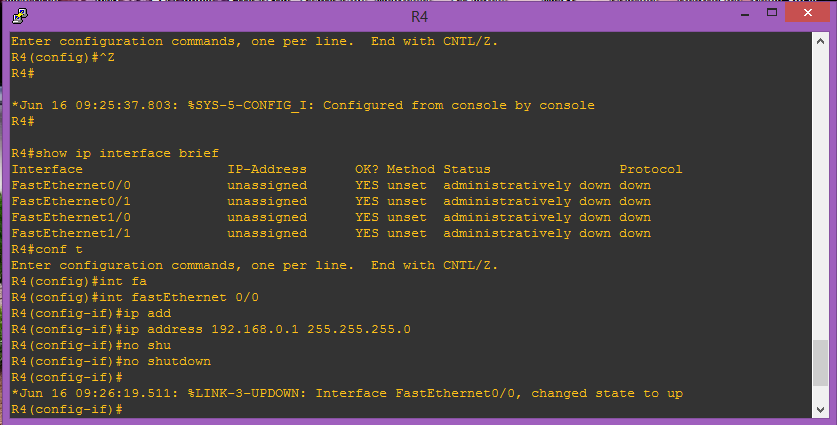
Configuring IP Address on Interfaces
Follow these steps in order to assign IP address:
- Enter global configuration mode by using configure terminal command.
- Once decided which interface to assign IP address, enter interface configuration mode by using interface command followed by interface name. You can see in above diagram I have selected interface FastEthernet0/0.
- Enter ip address command followed by ip address and subnet mask. In the diagram, I have configured selected interface with IP address 192.168.0.1 and subnet mask of 255.255.255.0.
- Enter no shutdown command to bring interface up. By default Cisco router’s interface is in shut down state unlike Cisco switches. After this command you will see a console message like Interface FastEthernet0/0, changed state to up.
In this way, you can configure IP address on every interface of router.
Saving Router Configuration
Whatever configuration changes you have made till now is saved into router’s running-config file which is saved in RAM which is temporary memory. Means once the router is reloaded, the contents of running-config will be lost. In order to permanently save the configuration, router maintains a file known as startup-config which is stored in NVRAM. The contents of startup-config are retained after reload and router builds its running-config by copying contents from startup-config during bootup.
So, to save the router’s configuration, you can run copy running-config startup-config or write-memory command in privileged EXEC mode.
Cisco#copy running-config startup-config
Destination file [startup-config]?
Building configuration...
[OK]
Cisco#
Building configuration [OK] means startup-config file build successfully.