
- September 4, 2015
- Posted by: Surender Kumar
- Category: Linux
Logical Volume Management in Linux
Table of Contents
Logical Volume Management (LVM) is a method of partitioning hard disk drives that provides more flexibility in managing storage space than the traditional method of disk partitioning. Logical volume management is a widely-used technique for deploying logical rather than physical storage.
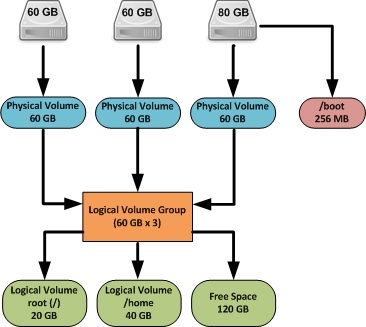
With LVM, the logical partitions can span across multiple physical hard drives and can be resized easily. A physical disk is divided into one or more Physical Volumes (PVs), and logical Volume Groups (VGs) are created by combining Physical Volumes (PVs). The Logical Volumes (LVs) are created on Volume Groups (VGs) as shown in figure below.
The logical volumes created using LVM has following advantages over physical partitions:
- Logical volumes can be resized while they are online and in use.
- Data from one (faulty or damaged) physical device may be relocated to another device that is newer, faster or more resilient, while the original volume remains online and accessible.
- Logical volumes can be constructed by aggregating physical devices to increase performance (via disk striping) or redundancy (via disk mirroring).
- Logical volume snapshots can be created to represent the exact state of the volume at a certain point-in-time, allowing accurate backups.
You see that the administrator can perform any volume management task without taking the volume offline which increases the overall reliability and availability of Linux Server.
The new release of LVM is LVM2 which is available only on Red Hat Enterprise Linux 4 and later kernels. It is backward compatible with LVM1 and retains the same command line interface structure. However it uses a new, more scalable and resilient metadata structure that allows for transactional metadata updates (that allow quick recovery after server failures), very large numbers of devices, and clustering. For Enterprise Linux servers deployed in mission-critical environments that require high availability, LVM2 is the right choice for Linux volume management.
LVM Configuration
To configure LVM, the following steps are involved:
- Create physical volumes (PVs) on each of hard disk drives.
- Create a volume group (VG). A volume group is a virtual container for one or more physical volumes (hard disks).
- Add physical volumes to volume group. The size of the VG equals the size of the PV, or the sum of the PVs if there are more than one.
- Create logical volumes (LVs).
- Create the filesystem on logical volumes.
Once the file system created on logical volume, you can start using it after mounting it to any directory.
In this test lab, I have 4 physical hard disk drives connected to my Linux system. The operating system is installed on separate drive /dev/sda which I will touch here. I will use the other 3 drives /dev/sdb, /dev/sdc, and /dev/sdd for demonstration of LVM configuration. So, let’s get started.
Caution: The following commands will destroy any data on hard drives /dev/sdb, /dev/sdc and /dev/sdd.
Create Physical Volumes
Use the pvcreate command to create physical volumes on all drives.
[root@centos ~]# pvcreate /dev/sdb /dev/sdc /dev/sdd
  Physical volume "/dev/sdb" successfully created
  Physical volume "/dev/sdc" successfully created
  Physical volume "/dev/sdd" successfully created
The pvdisplay command displays all physical volumes on your system.
[root@centos ~]# pvdisplay
  "/dev/sdc" is a new physical volume of "80.00 GiB"
  --- NEW Physical volume ---
  PV Name               /dev/sdc
  VG Name
  PV Size               80.00 GiB
  Allocatable           NO
  PE Size               0
  Total PE              0
  Free PE               0
  Allocated PE          0
  PV UUID               LLNiYt-ybQI-LkCn-yrSj-24gY-vQXX-vBZjTL

  "/dev/sdb" is a new physical volume of "80.00 GiB"
  --- NEW Physical volume ---
  PV Name               /dev/sdb
  VG Name
  PV Size               80.00 GiB
  Allocatable           NO
  PE Size               0
  Total PE              0
  Free PE               0
  Allocated PE          0
  PV UUID               xa6Zhe-2tlW-zAAe-nXLL-VROo-lZCY-tTrXNI

  "/dev/sdd" is a new physical volume of "80.00 GiB"
  --- NEW Physical volume ---
  PV Name               /dev/sdd
  VG Name
  PV Size               80.00 GiB
  Allocatable           NO
  PE Size               0
  Total PE              0
  Free PE               0
  Allocated PE          0
  PV UUID               gR8Fr9-Aw7D-VWCz-oLuv-SDPS-FMMz-G3vtZ5
To display the physical volume for a specific drive /dev/sdb only, use pvdisplay /dev/sdb command.
Create Volume Group
Create a volume group which will serve as a container for your physical volumes. To create a volume group with the name “my_vg1” which will include all the /dev/sdb, /dev/sdc and /dev/sdd physical volumes, you can issue the following command:
[root@centos ~]# vgcreate my_vg1 /dev/sdb /dev/sdc /dev/sdd
  Volume group "my_vg1" successfully created
In future, if you want to add one more physical volume (hard drive) to existing volume group, you can do this using the vgcreate my_vg1 /dev/sde command and then you have to use vgextend command to extend its size.
The vgdisplay command displays the information about volume group.
[root@centos ~]# vgdisplay
  --- Volume group ---
  VG Name               my_vg1
  System ID
  Format                lvm2
  Metadata Areas        3
  Metadata Sequence No  1
  VG Access             read/write
  VG Status             resizable
  MAX LV                0
  Cur LV                0
  Open LV               0
  Max PV                0
  Cur PV                3
  Act PV                3
  VG Size               239.99 GiB
  PE Size               4.00 MiB
  Total PE              61437
  Alloc PE / Size       0 / 0
  Free  PE / Size       61437 / 239.99 GiB
  VG UUID               jt0eJs-gdm1-Hs11-WMnQ-3vMI-7aC1-OZFYpS
Create Logical Volumes
You can create desired number of logical volumes (LVs) on volume group (VG) which will be treated as partitions for your Linux system. To create a logical volume, named “lv01”, with a size of 20 GB on virtual group “my_vg” use the following command:
[root@centos ~]# lvcreate -L 20G -n lv01 my_vg1
  Logical volume "lv01" created
The lvdisplay command displays the information about logical volumes.
[root@centos ~]# lvdisplay
  --- Logical volume ---
  LV Path                /dev/my_vg1/lv01
  LV Name                lv01
  VG Name                my_vg1
  LV UUID                gJePW5-7SpI-H8L7-tV5g-ttS3-R7FJ-jtWEtY
  LV Write Access        read/write
  LV Creation host, time centos.airvoice.local, 2015-09-04 16:28:06 +0530
  LV Status              available
  # open                 0
  LV Size                20.00 GiB
  Current LE             5120
  Segments               1
  Allocation             inherit
  Read ahead sectors     auto
  - currently set to     8192
  Block device           253:0
Let’s create another logical volume with the name lv02.
[root@centos ~]# lvcreate -L 10G -n lv02 my_vg1
  Logical volume "lv02" created
Now take a look at volume group once again by using vgdisplay command.
[root@centos ~]# vgdisplay
  --- Volume group ---
  VG Name               my_vg1
  System ID
  Format                lvm2
  Metadata Areas        3
  Metadata Sequence No  3
  VG Access             read/write
  VG Status             resizable
  MAX LV                0
  Cur LV                2
  Open LV               0
  Max PV                0
  Cur PV                3
  Act PV                3
  VG Size               239.99 GiB
  PE Size               4.00 MiB
  Total PE              61437
  Alloc PE / Size       7680 / 30.00 GiB
  Free  PE / Size       53757 / 209.99 GiB
  VG UUID               jt0eJs-gdm1-Hs11-WMnQ-3vMI-7aC1-OZFYpS
The vgdisplay command reports that 30 GB space is allocated and 209.99 GB is free out of 239.99 GB.
Create File System on Logical Volumes
The logical volume is almost ready to use. All you need to do is to create a filesystem as shown below.
[root@centos ~]# mkfs.ext4 /dev/my_vg1/lv01
mke2fs 1.42.9 (28-Dec-2013)
Filesystem label=
OS type: Linux
Block size=4096 (log=2)
Fragment size=4096 (log=2)
Stride=0 blocks, Stripe width=0 blocks
1310720 inodes, 5242880 blocks
262144 blocks (5.00%) reserved for the super user
First data block=0
Maximum filesystem blocks=2153775104
160 block groups
32768 blocks per group, 32768 fragments per group
8192 inodes per group
Superblock backups stored on blocks:
        32768, 98304, 163840, 229376, 294912, 819200, 884736, 1605632, 2654208,
        4096000

Allocating group tables: done
Writing inode tables: done
Creating journal (32768 blocks): done
Writing superblocks and filesystem accounting information: done

[root@centos ~]# mkfs.ext4 /dev/my_vg1/lv02
mke2fs 1.42.9 (28-Dec-2013)
Filesystem label=
OS type: Linux
Block size=4096 (log=2)
Fragment size=4096 (log=2)
Stride=0 blocks, Stripe width=0 blocks
655360 inodes, 2621440 blocks
131072 blocks (5.00%) reserved for the super user
First data block=0
Maximum filesystem blocks=2151677952
80 block groups
32768 blocks per group, 32768 fragments per group
8192 inodes per group
Superblock backups stored on blocks:
        32768, 98304, 163840, 229376, 294912, 819200, 884736, 1605632

Allocating group tables: done
Writing inode tables: done
Creating journal (32768 blocks): done
Writing superblocks and filesystem accounting information: done
Mount the Logical Volumes
Create the directories which will act as mount points for newly created logical volumes.
[root@centos ~]# mkdir /data
[root@centos ~]# mkdir /software
Mount the logical volumes using following commands.
[root@centos ~]# mount /dev/my_vg1/lv01 /data
[root@centos ~]# mount /dev/my_vg1/lv02 /software
You can use df -Th command to report the file system disk usage.
[root@centos ~]# df -Th
Filesystem              Type      Size  Used Avail Use% Mounted on
/dev/sda7               xfs        17G  9.7G  6.5G  60% /
devtmpfs                devtmpfs  485M     0  485M   0% /dev
tmpfs                   tmpfs     493M   80K  493M   1% /dev/shm
tmpfs                   tmpfs     493M  6.8M  486M   2% /run
tmpfs                   tmpfs     493M     0  493M   0% /sys/fs/cgroup
/dev/sda3               xfs       197M   92M  105M  47% /boot
/dev/sda1               vfat      200M  9.6M  191M   5% /boot/efi
/dev/mapper/my_vg1-lv01 ext4       20G   45M   19G   1% /data
/dev/mapper/my_vg1-lv02 ext4      9.8G   37M  9.2G   1% /software
The logical volumes are temporarily mounted yet. If the system is restarted you have to remount these logical volumes. To mount these permanently, edit the /etc/fstab file and add the entries of newly created logical volumes as shown below:
/dev/my_vg1/lv01    /data      ext4    defaults        0 0
/dev/my_vg1/lv02    /software  ext4    defaults        0 0
You may need to use mount -a command, if you have not used mount command before.
Extend the Logical Volume
The biggest advantage of logical volume manager is that you can extend your logical volumes any time when you run out of the space without taking the volume offline. To increase the size of a logical volume by another 5 GB you can run following command:
[root@centos ~]# lvextend -L +5G /dev/my_vg1/lv01
  Extending logical volume lv01 to 25.00 GiB
  Logical volume lv01 successfully resized
The command above does not actually increase the physical size of volume, to do that you need to run resize2fs command as shown below:
[root@centos ~]# resize2fs /dev/my_vg1/lv01
resize2fs 1.42.9 (28-Dec-2013)
Filesystem at /dev/my_vg1/lv01 is mounted on /data; on-line resizing required
old_desc_blocks = 3, new_desc_blocks = 4
The filesystem on /dev/my_vg1/lv01 is now 6553600 blocks long.
Confirm the new size of logical volume using df -h command.
[root@centos ~]# df -h
Filesystem               Size  Used Avail Use% Mounted on
/dev/sda7                 17G  9.7G  6.5G  60% /
devtmpfs                 485M     0  485M   0% /dev
tmpfs                    493M   80K  493M   1% /dev/shm
tmpfs                    493M  6.8M  486M   2% /run
tmpfs                    493M     0  493M   0% /sys/fs/cgroup
/dev/sda3                197M   92M  105M  47% /boot
/dev/sda1                200M  9.6M  191M   5% /boot/efi
/dev/mapper/my_vg1-lv01   25G   44M   24G   1% /data
/dev/mapper/my_vg1-lv02  9.8G   37M  9.2G   1% /software
Create the Snapshots
LVM snapshot is a feature which can be used as a complete backup of your volume. It will allow you to restore the full volume in case something goes wrong. You can create a new snapshot using the lvcreate –snapshot command as shown below:
[root@centos ~]# lvcreate --size 1G --snapshot --name shadow1 /dev/MY_VG1/MY_LV1
Logical volume "shadow1" created
The LVM snapshots initially doesn’t contain any data, it will only store changes you make to the original volume, this will save a lot of space. The snapshot increases in size as the origin volume changes, you can monitor the percentage usage of the snapshot volume regularly with the lvs command and make sure it does not completely full. A snapshot that is 100% full is lost completely.
You can use lvdisplay command to check the status of volume snapshot.
 --- Logical volume ---
  LV Path                /dev/MY_VG1/shadow1
  LV Name                shadow1
  VG Name                MY_VG1
  LV UUID                FdQgsP-aeVu-ewG1-MIf9-WpyA-soEp-IkX6mu
  LV Write Access        read/write
  LV Creation host, time centos.airvoice.local, 2015-09-07 14:56:12 +0530
  LV snapshot status     active destination for MY_LV1
  LV Status              available
  # open                 0
  LV Size                20.00 GiB
  Current LE             5120
  COW-table size         1.00 GiB
  COW-table LE           256
  Allocated to snapshot  0.00%
  Snapshot chunk size    4.00 KiB
  Segments               1
  Allocation             inherit
  Read ahead sectors     auto
  - currently set to     8192
  Block device           253:0
Once the volume snapshot is ready, you can use the lvm snapshot as a normal volume by mounting it to a directory and make changes to it. You can merge the changes to the original LVM volume if you want to.
To mount it you just need to create a directory and use the mount command like as shown below:
[root@centos ~]# mkdir /shadow1
[root@centos ~]# mount /dev/MY_VG1/shadow1 /shadow1/
Now you can test anything you wish on the /shadow1 directory without changing the original system. Also you can restore the snapshot into the original volume if anything wrong happens to the original volume. To restore the snapshot or to merge the changes into the original volume you can use the lvconvert command with the —merge parameter as shown below:
[root@centos ~]# lvconvert --merge /dev/MY_VG1/shadow1
  Logical volume MY_VG1/MY_LV1 contains a filesystem in use.
  Can't merge over open origin volume.
  Merging of snapshot shadow1 will start next activation.
Since the original volume is mounted, you will have to reboot the system for the changes to take effect. Once the system is restarted, you will notice that the data is restored to the point-in-time when the snapshot was taken.
You can also remove the snapshot if you don’t need it anymore with the following command:
[root@centos ~]# lvremove /dev/MY_VG1/shadow1
Remove the Logical Volume
The command lvremove can be used to remove logical volume. Make sure that it does not have any important data stored on it before you attempt to remove logical volume. Also make sure that the volume is unmounted. If you try to remove the volume without unmounting, you will get the following error:
[root@centos ~]# lvremove /dev/my_vg1/lv02
  Logical volume my_vg1/lv02 contains a filesystem in use.
To successfully remove the volume, you need to remove the entry of respective logical volume from /etc/fstab file and then use umount command to unmount it.
[root@centos ~]# umount /dev/my_vg1/lv02
Once the volume is unmounted, you can remove it.
[root@centos ~]# lvremove /dev/my_vg1/lv02
Do you really want to remove active logical volume lv02? [y/n]: y
  Logical volume "lv02" successfully removed
If you want to remove the volume group (VG), you need to unmount all the logical volumes and then use the vgremove command. Similarly, the pvremove command removes the physical volumes.
[root@centos ~]# umount /dev/my_vg1/lv01
[root@centos ~]#
[root@centos ~]# lvremove /dev/my_vg1/lv01
Do you really want to remove active logical volume lv01? [y/n]: y
  Logical volume "lv01" successfully removed
[root@centos ~]#
[root@centos ~]# vgremove my_vg1
  Volume group "my_vg1" successfully removed
[root@centos ~]# pvremove /dev/sdb /dev/sdc /dev/sdd
  Labels on physical volume "/dev/sdb" successfully wiped
  Labels on physical volume "/dev/sdc" successfully wiped
  Labels on physical volume "/dev/sdd" successfully wiped
That should cover most of what you need to know to use LVM.