
- April 19, 2022
- Posted by: Surender Kumar
- Categories: Website Security, WordPress
Protect a website using CloudFlare
Table of Contents
Are you tired of unnecessary bot traffic on your website? Does your WordPress website get a lot of unnecessary hits by bots which is causing high resource utilization on your server? Do you own a website or a blog which is gaining popularity but is frequently slowed-down by pesky bots?
If you’re on this page, I suppose you are looking for a solution to these problems. In this article, I will cover how you can use free plan of CloudFlare to protect your website from bad bots. After setting up CloudFlare account, we will define a few rules in CloudFlare’s web application firewall (WAF) which will help filter most of the unwanted traffic on your website.
Getting Started with CloudFlare
CloudFlare is a highly popular company offering content delivery network (CDN), distributed denial-of-service (DDoS) mitigation, a whole lot of other networking and security services. Covering everything is beyond the scope of this article so we will focus on CDN and WAF to protect our website. The best thing about CloudFlare is that it offers a Free plan which is suitable for small websites and personal blogs.
- To get started with CloudFlare, visit the signup page and create a free account.
- Activate the account and then login using your credentials.
- Click on Add a Site button, type your site or domain name (e.g., awesomeblog.com) and click on Add Site button.
- You will be asked to select a plan. Select the Free plan and click on Continue button.
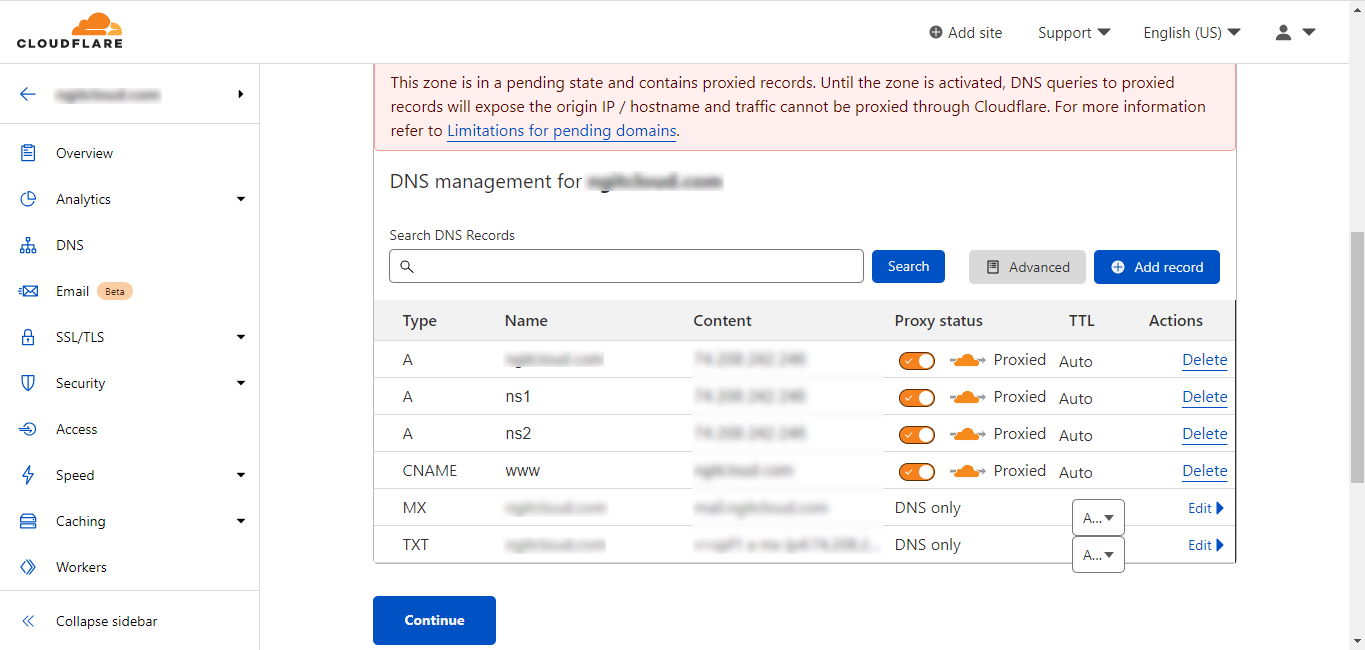
- CloudFlare will now scan and automatically populate the DNS records for your domain as shown in the following screenshot:

CloudFlare DNS Record Management The orange cloud icon for a record means it is being proxied or masked by CloudFlare. Turning-off the orange cloud icon for a record means you’re exposing that record to public.
- If you think any record is missing, you could click on the Add Record button and create that record right here. Once done, click on Continue button.
- You will now see CloudFlare’s name servers. Login to your domain registrar control panel and change the domain’s name servers to CloudFlare’s name servers that you see on this screen.
- After changing the name servers, wait a few minutes and click on Done, check nameservers button.
- If everything goes fine, you will see a quick start guide. Click on Get Started button.
- Make sure Automatic HTTPS Rewrites option is toggled-on and click on Save.
- If you want, you could toggle-on the Always Use HTTPS option and click on Save.
- Now you will see Auto Minify options where you could select the JavaScript, CSS and HTML check-boxes to help CloudFlare reduce the size of source code of your website. If you have a static website, you could check all the boxes and click on Save. This will allow CloudFlare to cache most of static content in CDN for optimized delivery using their edge servers. If something breaks up due to these settings, you could uncheck the Auto Minify options as needed.
- Make sure Brotli compression is toggled-on and click on Save.
- Now click on Finish button. Your website is now all set to use CloudFlare CDN.
Protect a website using Security Levels
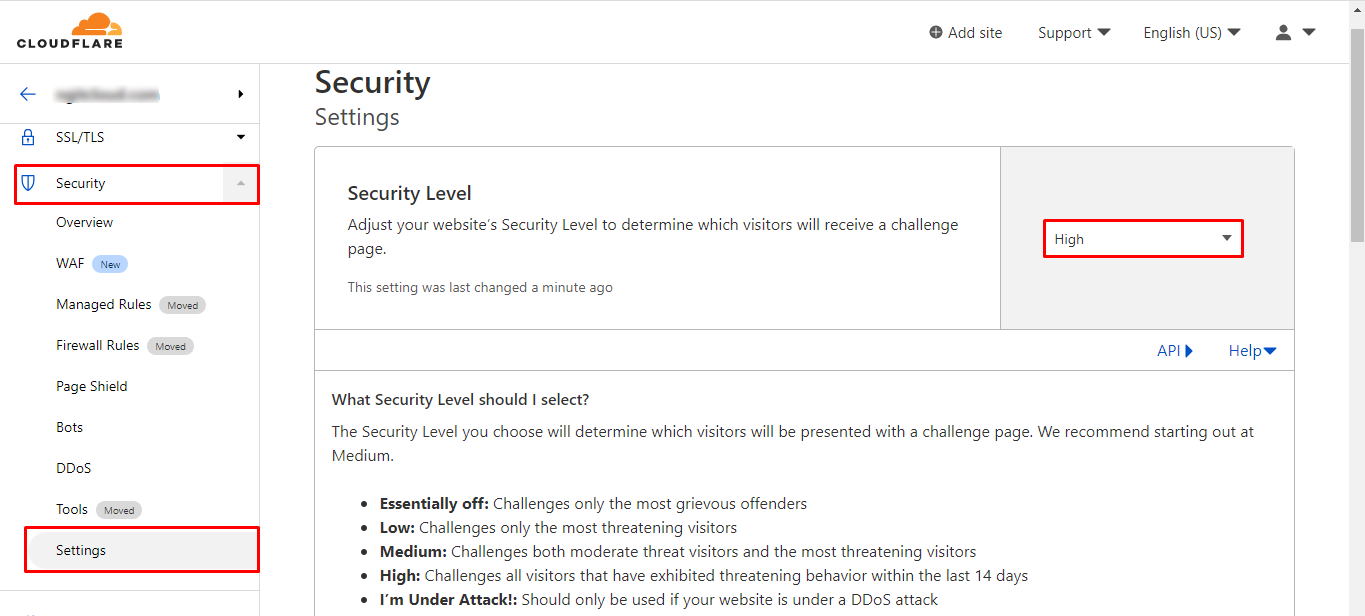
CloudFlare allows you to configure a security level for your website. The security level determines how the visitors or bots are presented with a JavaScript-based challenge page on the fly before they can access your website. The default security level is Medium which is suitable for most of the websites. If you still get a lot of hits from bots, you could set the security level to High. If you suspect your website is under a DDoS attack, you could set the security level to I’m Under Attack! mode.
To change the security level, expand the Security menu in navigation pane and then click on Settings.
Protect a website with WAF
CloudFlare also offers a built-in web application firewall (WAF) that you can use to thwart the bad bots. With Free plan, you could define up to 5 rules in WAF which are enough for small websites or blogs. In my case, I am using a WordPress website. While I could install a security plugin like Wordfence, the main benefit of using CloudFlare’s built-in WAF is that most of the unnecessary traffic is blocked way before it reaches the webserver or website so that the precious server resources are not wasted due to unnecessary bot traffic and your webserver can spend more time serving important web requests.
To create a rule in WAF, expand the Security menu in navigation pane and then click on WAF. Now click on Create firewall rule button. You can use the predefined set of fields in CloudFlare to create the rules in WAF.
Restrict Website Login Page
For my website, I know, only I am supposed to login into WordPress back-end. So it is a good idea to block the WordPress login page (/wp-login.php) in all other countries except where I live. To create such rule, I will define the rule like this:
Rule Name: Any descriptive name
- Field: URI Path
- Operator: contains
- Value: /wp-login.php (change this to match your target webpage)
- And
- Field: Country
- Operator: does not equal
- Value: India (change this to match your country)
Action: Block
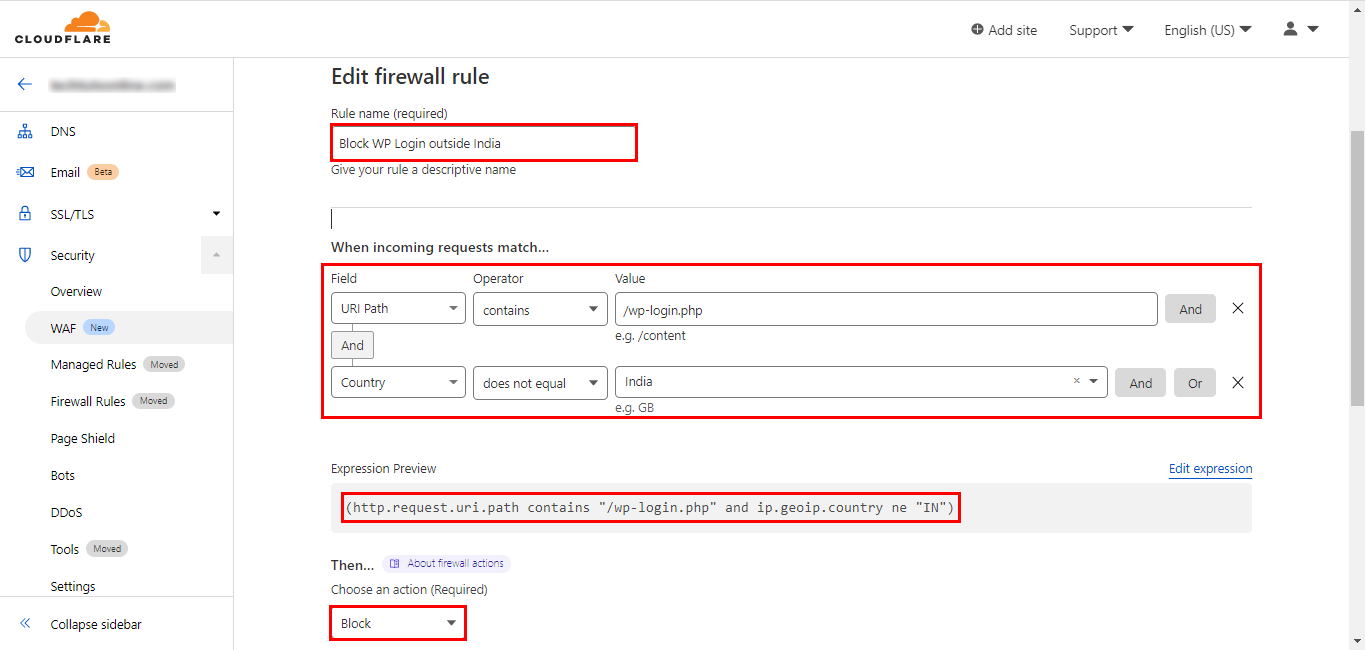
If you don’t want to waste your time selecting drop-downs, click on Edit expression link and paste the following expression straight away:
(http.request.uri.path contains "/wp-login.php" and ip.geoip.country ne "IN")
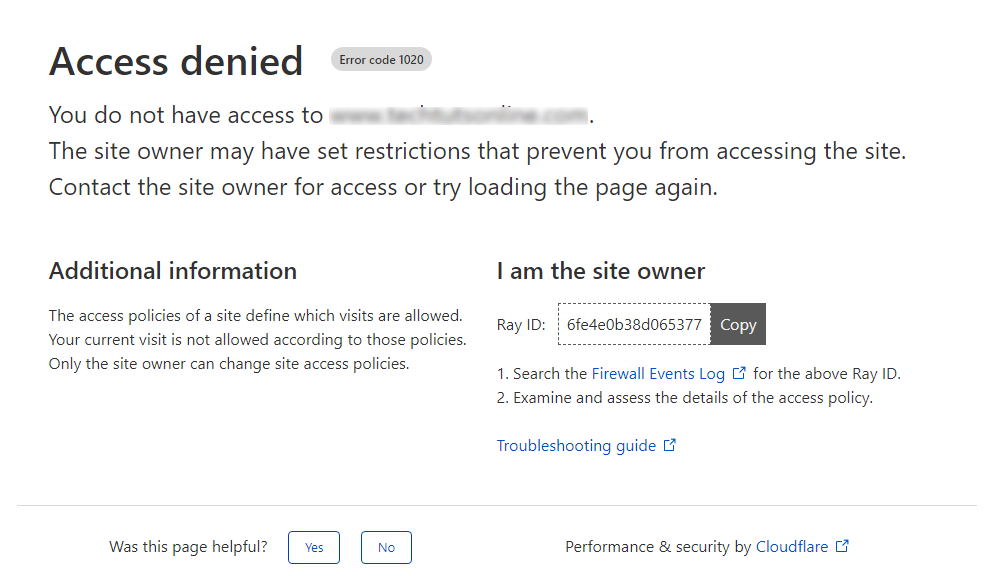
Make sure to change the parameters as per your requirements and click on Deploy firewall rule button. Once you do that, the WordPress login page will only work in the country you defined. When someone tries to access this page from a different country, they will see an Access denied error powered by CloudFlare as shown below:
You can use the similar idea to block certain webpages of your website. For example, you could block a webpage containing a contact form to prevent bot submissions or something like that.
Block XML-RPC Requests
WordPress has XML-RPC functionality enabled by default which is no longer used by most of modern WordPress websites. The XML-RPC is frequently targeted by bots so it is also a good idea to block it in CloudFlare WAF if you’re not using it anymore. To disable the XML-RPC in your WordPress website, create a WAF rule like this:
Rule Name: Any descriptive name
- Field: URI Path
- Operator: contains
- Value: /xmlrpc.php
- And
- Field: Request Method
- Operator: equals
- Value: POST
Action: Block
If you want, you could directly use the following expression:
(http.request.uri.path contains "/xmlrpc.php" and http.request.method eq "POST")

Now deploy the firewall rule and that’s it. The XML-RPC requests will now be blocked before they even reach your website. Whenever any bot tries to make a POST request on your website using XML-RPC, they will get an error code: 1020.
IP Reputation Based Blocking
CloudFlare also supports a powerful IP reputation score based blocking. To create a WAF rule based on IP reputation, set the rule as follows:
Rule Name: Any descriptive name
Expression:
(ip.geoip.country in {"CN" "TW" "RU" "FL" "DE" "US" "GB" "SG" "CA"}) or cf.threat_score > 0
Action: Block
This rule will block the requests based-on country codes or having the IP reputation greater than 0. If you don’t want to mention the country codes, you can just use the cf.threat_score > 0 in expression alone.
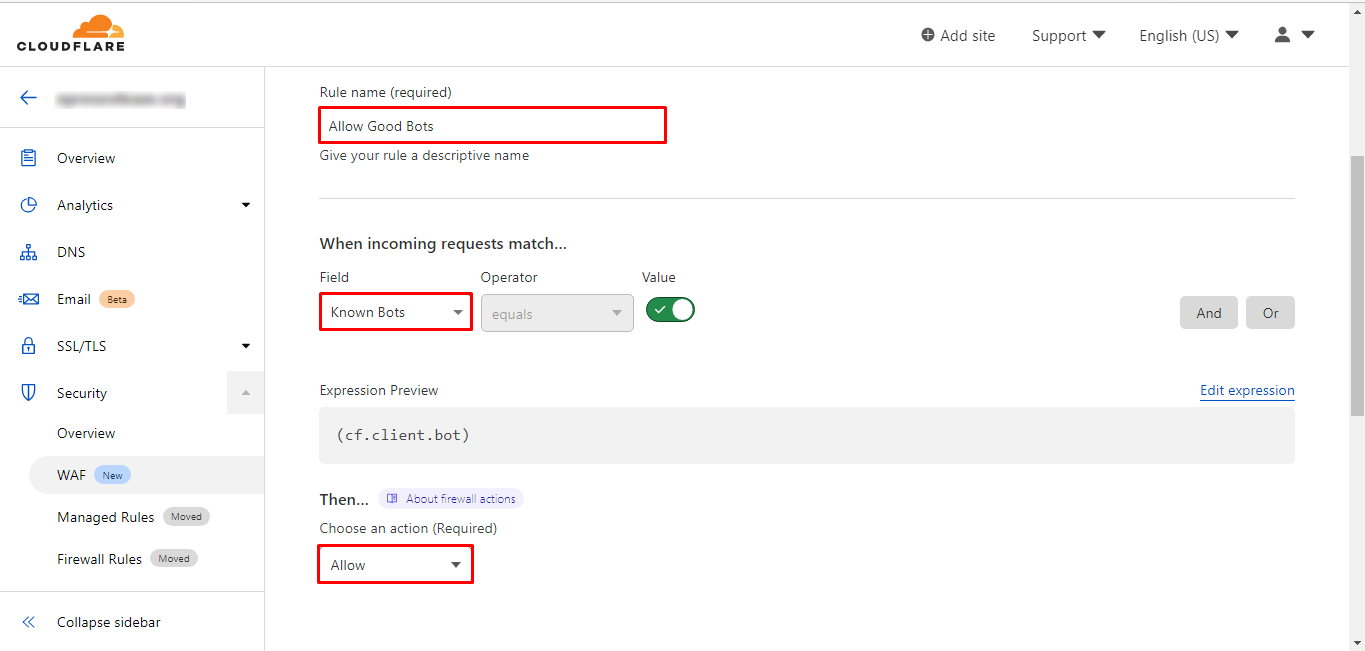
Explicitly Allow Known Good Bots
If you are using the IP reputation-based blocking as discussed above, there is a pretty good chance that it will block all the requests from most of bots including the good bots such as Google-bot, Bing-bot etc. Not all the bots are bad you know. If the good bots are blocked, they will not be able to crawl your website and it will impact website’s search engine ranking.
The good news is that CloudFlare keeps a record of Known Good Bots. While creating a firewall rule, you could target such bots using cf.client.bot expression to explicitly allow these known good bots. See the following screenshot to create a rule to allow known good bots in WAF:
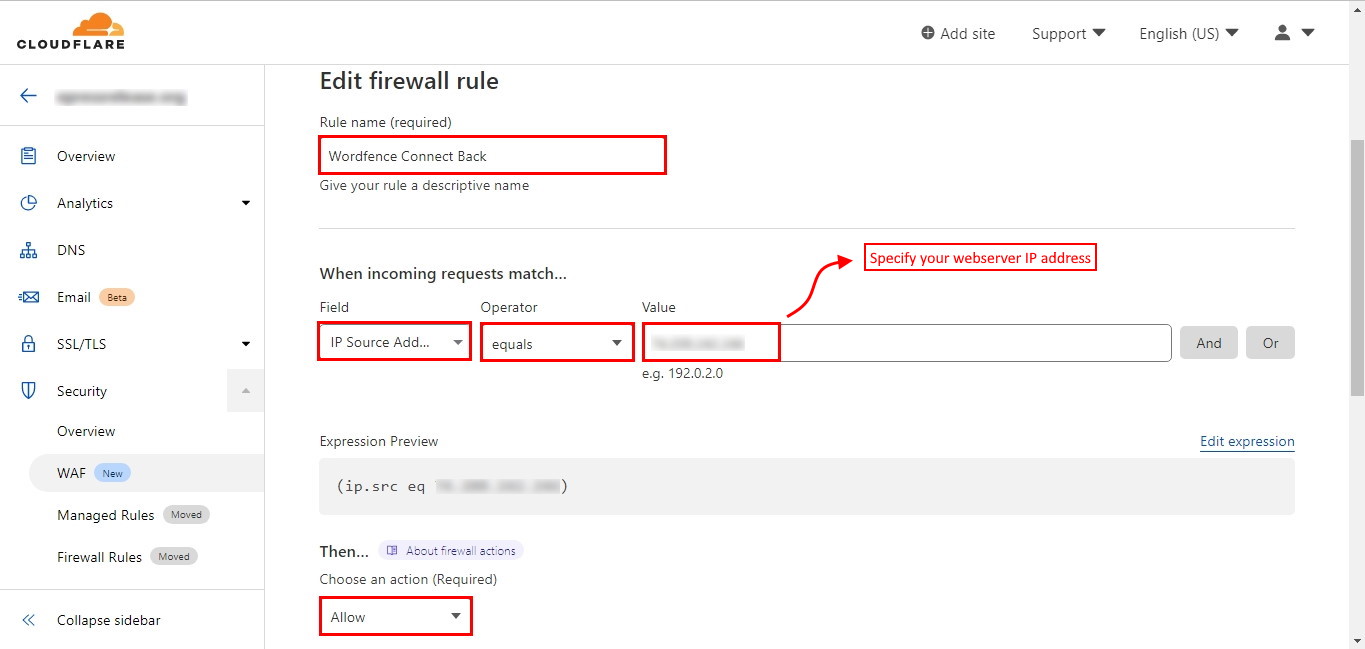
Allow Wordfence to Connect Back
If your site is a WordPress website and you’re using a security plugin like Wordfence, you also need to whitelist your web server’s IP address in CloudFlare WAF to allow Wordfence servers to connect back to your website and to be able to run the scheduled scans. To do that, create a firewall rule in CloudFlare like this:
These are just a few examples but there is a lot more stuff that you can do with free plan of CloudFlare. You can go ahead and explore various fields and options provided by WAF.
I was able to mitigate a lot of bot-generated traffic on my VPS by using the above mentioned rules only. Prior to these rules, the CPU usage in my VPS used to remain consistently high which affected the overall performance of website but ever since I configured these rules, the CPU usage is back to normal.