
- August 11, 2018
- Posted by: Surender Kumar
- Categories: Linux, Tips & Tricks
Password Protect Website Files in Apache Server
Sometimes it is necessary to password protect some directory or file on web server. For instance, I have created a directory named secretdir inside my website root directory. Inside secretdir, I used to upload files that I want to share with anybody. All you have to do is open your FTP program and upload the file into specified directory and share the URL with the person you want to share the file; something like following link:
http://yourwebsite.com/secretdir/secretfile.tgz
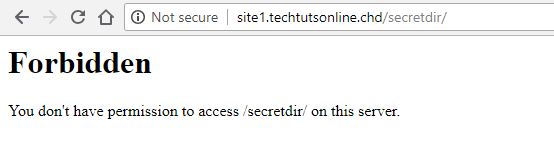
This is pretty handy but risky at the same time. If someone succeeds in enumerating the secretdir, he can download all the files stored it in without needing any authentication.
In this article, I will show you how you can password protect such secret directories and files.
- Make sure you install https-tools. Use the following command:
In Redhat/CentOS
sudo yum install httpd-tools
In Ubuntu and other debian linux
sudo apt-get install apache2-utils
- Now create an htpasswd file with following command:
sudo htpasswd -c /home/surender/.webpass spider
Above command will create .webpass hidden file into my home directory and add a user named spider. The command will prompt you to enter new password for spider user. Type the password twice. The username & password will be saved into .webpass file in encrypted form.
- Now we need to make sure apache web-server can access this file. The web server is running under ‘apache’ user account in RedHat or CentOS and ‘www-data’ user account in Ubuntu or other debian distributions. To make sure your webserver can access the .webpass file created earlier, use following commands:
For Redhat and CentOS:
sudo chown apache:apache /home/surender/.webpass
sudo chmod 644 /home/surender/.webpass
For Ubuntu and other debian distros:
sudo chown www-data:www-data /home/surender/.webpass
sudo chmod 644 /home/surender/.webpass
- Now, navigate into your secret directory (secretdir in our case) and create an .htaccess file. Add the following lines to .htaccess file
Options -Indexes
AuthType Basic
AuthName "Restricted to Authorized People"
AuthUserFile /home/surender/.webpass
Require user spider
The above code is self-explanatory but let me briefly explain each line.
- Options -Indexes : This line stops directory browsing so that contents of directory will not be listed.
- AuthType Basic : This line sets the Basic authentication requirement for directory and its content.
- AuthName “Restricted to Authorized People” : This line sets the message the client is presented with. You can change “Restricted to Authorized People” message to whatever you want.
- AuthUserFile /home/surender/.webpass : This line defines http user database file. Make sure apache service can read this file.
- Require user spider : This line defines the username that is authorized to access the content. The .webpass file can contain multiple users but this line restricts the access to spider user only.
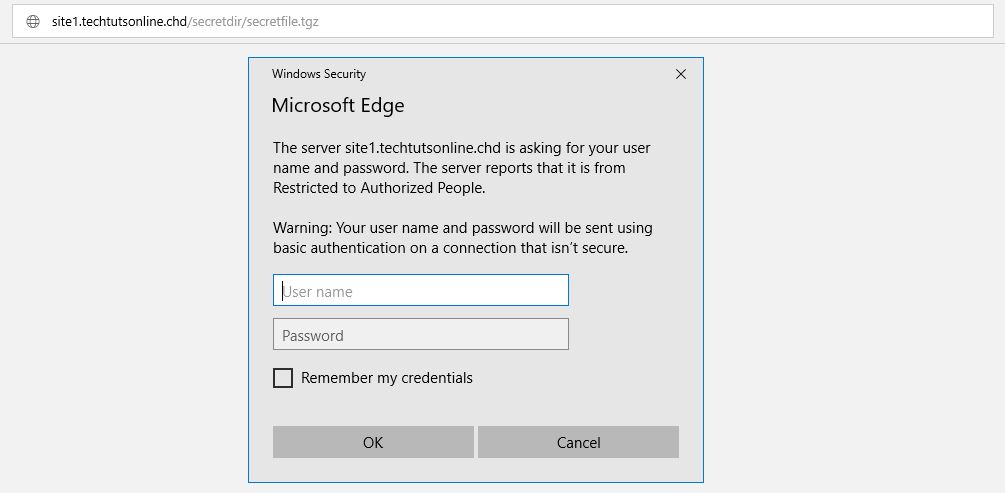
Test your configuration
To check if our configuration if fine, enter the complete URL of file like so:
http://site1.techtutsonline.chd/secretdir/secretfile.tgz
where http://site1.techtutsonline.chd is my website and secretfile.tgz is a file stored in a directory named secretdir.
If your configuration is correct, you should be prompted for username/password by your browser.
 If you do not have the password, you will get 401 Unauthorized message.
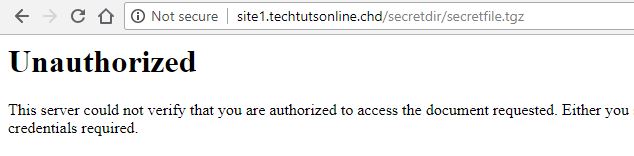 That’s what we wanted.
Now, whenever you want to share someone a file like this, you will have to provide him the username and password to download the file.