
- July 31, 2015
- Posted by: Surender Kumar
- Category: Cisco ASA
Interface Configuration in Cisco ASA (Transparent Mode)
Table of Contents
In this section, we will discuss about the interface configuration for all models in transparent firewall mode.
The default operational mode of Cisco ASA is Routed. To change the firewall operational mode to transparent, run the command as shown below:
ciscoasa(config)# firewall transparent
WARNING: Removing all contexts in the system
Removing context 'admin' (1)... Done
ciscoasa(config)#
Changing the firewall mode from Routed to transparent (or vice-versa) will remove all security context configuration from ASA.
For multiple context mode, complete the tasks in this section in the context execution space. Enter the changeto context_name command to change to the context you want to configure. Example is shown below:
ciscoasa#
ciscoasa# changeto context admin
ciscoasa/admin#
If you do not want the overhead of security contexts, or want to maximize your use of security contexts, you can group interfaces together in a bridge group, and then configure multiple bridge groups, one for each network. Bridge group traffic is isolated from other bridge groups; traffic is not routed to another bridge group within the ASA, and traffic must exit the ASA before it is routed by an external router back to another bridge group in the ASA. Although the bridging functions are separate for each bridge group, many other functions are shared between all bridge groups. For example, all bridge groups share a syslog server or AAA server configuration.
Configuring Bridge Groups
Each bridge group requires a management IP address. The ASA uses this IP address as the source address for packets originating from the bridge group. The management IP address must be on the same subnet as the connected network. For IPv4 traffic, the management IP address is required to pass any traffic. For IPv6 traffic, you must configure the link-local addresses to pass traffic at minimum, but a global management address is recommended for full functionality, including remote management and other management operations.
To configure Bridge Group, follow the steps shown below:
Step 1 Create a bridge group using interface bvi bridge_group_number, where bridge_group_number is an integer between 1 and 100.
ciscoasa(config)# interface bvI 1
ciscoasa(config-if)#
Step 2 Specify the management IP address for the bridge group.
ciscoasa(config-if)# ip address 192.168.10.1 255.255.255.0 standby 192.168.10.2
Do not assign a host address (/32 or 255.255.255.255) to the bridge group. Also, do not use other subnets that contain fewer than 3 host addresses (one each for the upstream router, downstream router, and transparent firewall) such as a /30 subnet (255.255.255.252). The ASA drops all ARP packets to or from the first and last addresses in a subnet. Therefore, if you use a /30 subnet and assign a reserved address from that subnet to the upstream router, then the ASA drops the ARP request from the downstream router to the upstream router.
Configuring General Interface Parameters
The following procedure describes how to set the name, security level, and bridge group for each transparent interface.
Step 1 If you are not already in interface configuration mode, enter the interface configuration mode using interface {{redundant number | port-channel number | physical_interface}[.subinterface] | mapped_name} command, where redundant number is the redundant interface ID, such as redundant 1 and the port-channel number argument is the EtherChannel interface ID, such as port-channel 1. Append the subinterface ID to the physical or redundant interface ID separated by a period (.). In multiple context mode, enter the mapped_name if one was assigned using the allocate-interface command.
ciscoasa(config)# interface gigabitEthernet 0
Step 2 Assign the interface to a bridge group, where number is an integer between 1 and 100. You can assign up to four interfaces to a bridge group. You cannot assign the same interface to more than one bridge group.
ciscoasa(config-if)# bridge-group 1
Step 3 Assign the name to interface using nameif name command. The name is a text string up to 48 characters, and is not case-sensitive. You can change the name by reentering this command with a new value. Do not enter the no form, because that command causes all commands that refer to that name to be deleted.
ciscoasa(config-if)# nameif inside
INFO: Security level for "inside" set to 100 by default.
Step 4 Set the security level using security-level number command, where number is an integer between 0 (lowest) and 100 (highest).
ciscoasa(config-if)# security-level 100
Configuring a Management Interface in ASA 5510 and Higher
Complete the following steps to configure management interface on ASA 5510 or higher:
Step 1 Select the management interface
ciscoasa(config)# interface management 0
Step 2 Assign the name to interface using nameif name command. The name is a text string up to 48 characters, and is not case-sensitive.
ciscoasa(config-if)# nameif management
INFO: Security level for "management" set to 0 by default.
Step 3 Set the IP address manually. The standby IP address is used for failover.
ciscoasa(config-if)# ip address 192.168.1.1 255.255.2555.0 standby 192.168.1.2
Step 4 Set the security level using security-level number command, where number is an integer between 0 (lowest) and 100 (highest).
ciscoasa(config-if)# security-level 50
Allowing Same Security Level Communication
By default, interfaces on the same security level cannot communicate with each other, and packets cannot enter and exit the same interface. Allowing interfaces on the same security level to communicate with each other is useful if you want traffic to flow freely between all same security interfaces without access lists.
If you enable same security interface communication, you can still configure interfaces at different security levels as usual.
ciscoasa(config)# same-security-traffic permit inter-interface
Monitoring Interfaces
To monitor interfaces, enter one of the following commands:
- show interface : Displays interface statistics.
- show interface ip brief : Displays interface IP addresses and status.
- show bridge-group : Shows bridge group information.
Demonstration
I am going to use below mentioned network diagram to demonstrate How to configure Cisco ASA Transparent Mode.
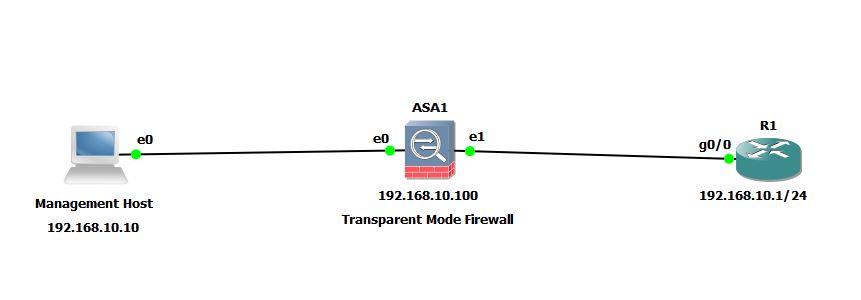
Notice that all the devices are in same IP subnet 192.168.10.0/24.
Configuration Steps:
- Change the ASA to Transparent Mode
- Enable and configure each physical interface as a part of same bridge-group.
- Assign an IP address to the Bridge Virtual Interface (BVI) for ASA management
- Enable the HTTP Server for ASA Management through ASDM.
I will first show you the configuration of ASA in Transparent Mode. I assume that the R1 and Management Host are already configured but the management host can not ping R1 since it is behind firewall.
VPCS> show ip all

NAME   IP/MASK              GATEWAY           MAC                DNS
VPCS1  192.168.10.10/24     192.168.10.1      00:50:79:66:68:00

VPCS> ping 192.168.10.1
192.168.10.1 icmp_seq=1 timeout
192.168.10.1 icmp_seq=3 timeout
192.168.10.1 icmp_seq=4 timeout
192.168.10.1 icmp_seq=5 timeout
Now, let’s start ASA configuration.
ciscoasa(config)# firewall transparent
ciscoasa(config)# show firewall
Firewall mode: Transparent
ciscoasa(config)#
ciscoasa(config)# interface gigabitEthernet 0
ciscoasa(config-if)# nameif inside1
INFO: Security level for "inside1" set to 0 by default.
ciscoasa(config-if)# security-level 100
ciscoasa(config-if)# bridge-group 1
ciscoasa(config-if)# no shut
ciscoasa(config-if)# interface gigabitEthernet 1
ciscoasa(config-if)# nameif inside2
INFO: Security level for "inside2" set to 0 by default.
ciscoasa(config-if)# security-level 100
ciscoasa(config-if)# bridge-group 1
ciscoasa(config-if)# no shut
ciscoasa(config)# interface bvi 1
ciscoasa(config-if)# ip address 192.168.10.100 255.255.255.0
The above configuration is pretty straightforward.
The nameif command assigns name to both connected interfaces
The security-level 100 command sets the security-level of interfaces to 100.
The bridge-group 1 command adds both connected interfaces to bridge-group 1.
The no shut command will enable the interfaces because in ASA by default interfaces are disabled.
The interface bvi 1 command creates a Bridge Virtual Interface (BVI) 1 on ASA.
The ip address command assigns the IP address to BVI.
By default ASA does not allow communication between interfaces having same security-level. To allow communication between these interfaces, run the below command on ASA.
ciscoasa(config)# same-security-traffic permit inter-interface
Now, The management host can successfully ping 192.168.10.1.
VPCS> show ip all

NAME   IP/MASK              GATEWAY           MAC                DNS
VPCS1  192.168.10.10/24     192.168.10.1      00:50:79:66:68:00

VPCS> ping 192.168.10.1 -t
84 bytes from 192.168.10.1 icmp_seq=7 ttl=255 time=6.169 ms
84 bytes from 192.168.10.1 icmp_seq=8 ttl=255 time=3.217 ms
84 bytes from 192.168.10.1 icmp_seq=9 ttl=255 time=3.727 ms
84 bytes from 192.168.10.1 icmp_seq=10 ttl=255 time=10.879 ms
84 bytes from 192.168.10.1 icmp_seq=11 ttl=255 time=11.876 ms
84 bytes from 192.168.10.1 icmp_seq=12 ttl=255 time=8.833 ms
84 bytes from 192.168.10.1 icmp_seq=13 ttl=255 time=3.796 ms
84 bytes from 192.168.10.1 icmp_seq=14 ttl=255 time=5.818 ms
84 bytes from 192.168.10.1 icmp_seq=15 ttl=255 time=9.141 ms
The ASA is now working in Transparent mode in which it is acting like a transparent bridge while it can still provide packet filtering and inspection.
ASA Management through ASDM
Once the management host can ping ASA, you can manage the Cisco ASA using Cisco’s Adaptive Security Device Manager (ASDM) GUI. To configure ASDM Access for ASA, follow the instructions given here .
This concludes our Interface Configuration in Cisco ASA (Transparent Mode) section.
1 Comment
Comments are closed.
Thanks for helping out, excellent information.