
- May 5, 2022
- Posted by: Surender Kumar
- Category: Android
Install TWRP Recovery and Custom ROM in RealMe 2 Pro
Table of Contents
Are you looking for a way to install TWRP recovery and a custom ROM in your RealMe 2 Pro phone? In this guide, I will show you how to unlock the bootloader, install TWRP recovery, install LineageOS – a custom ROM based on Android 11 AOSP.
Warning: By following this guide, the warranty of your phone will be void, the data will be erased and there are chances of a bricked device. Please backup your important data and then follow this guide at your own risk.
Prerequisites
- RealMe Pro 2 with USB debugging enabled
- USB cable
- Unlocked bootloader
- PC
- Internet [optional] – If you do not have Internet, you could download all the required files on another PC having internet connection and then transfer these files to your PC for offline use.
Download the Files
- Android USB Drivers – To get the OEM drivers for your phone, click here.
- ADB Minimal
- TWRP Recovery
- LineageOS Zip
- Google Apps
Download all the files and copy them to a folder and extract the ADB minimal zip file to same folder. At the end, your folder structure should look something like this:
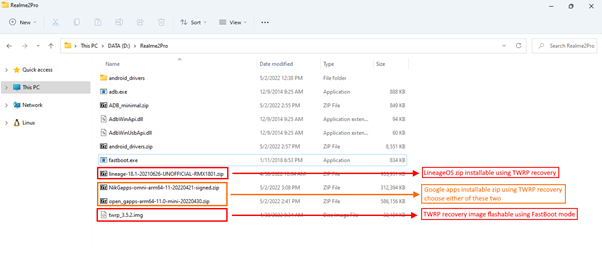
Copy the marked zip files to your phone’s internal storage since you will need them while your phone is booted in recovery mode. You don’t need to manually copy the twrp_3.5.2.img file as we will flash it using a command in fastboot mode. By the way, you could also copy them by connecting the USB cable while in TWRP recovery mode.
Unlock Bootloader
Most of Android phones come with a locked bootloader to prevent intentional (or unintentional) damage to your phone by any [malicious] software. The locked bootloader also prevents users from flashing custom recoveries and ROMs. Before trying to install a custom recovery and ROM, the first thing you need to do is unlock the bootloader. Unlocking the bootloader will erase everything on your phone. Once again make sure to backup your important stuff before proceeding with this guide.
To unlock the bootloader of Realme 2 Pro, follow the steps mentioned:
-
- Make sure USB debugging and OEM unlocking options are enabled in Developer options.
- Connect your phone to PC using USB cable and type the following command:
adb reboot bootloader
This will reboot your phone into bootloader mode.
- Now type fastboot devices command to see if your phone is recognized in fastboot mode. If you see your phone listed, you’re good to go to next step. If your phone isn’t listed, you need to install android drivers manually as discussed in this article.
- To unlock the bootloader, type the following command:
fastboot flashing unlock


Unlock bootloader using fastboot command - Now you will see the following warning message on your phone’s screen.
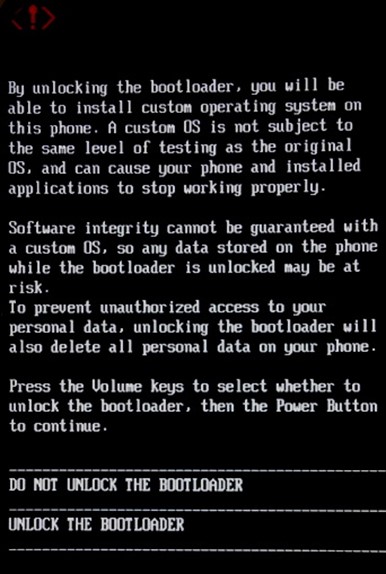

Bootloader unlock warning
On your phone, use volume keys to select UNLOCK THE BOOTLOADER option and press the power button to confirm. Your phone will now reboot, everything will be erased and bootloader will be unlocked.
- Once you have the unlocked bootloader, move to the next section.
Install TWRP Recovery
To install the TWRP recovery, you need to boot the phone in fastboot (bootloader) mode. To do that, connect your phone to PC using the USB cable and use the following steps:
- Open a command prompt (cmd.exe) and use the following command to navigate inside the directory where you copied the downloaded files.
cd D:\Realme2Pro
Make sure you change the D:\Realme2Pro with your own path.
- Now type the following command:
adb devices
You will see a prompt on your phone to trust the computer. Click OK on your phone. If your phone is properly detected and authorized, you should see it listed as shown in the screenshot.
- Now type the following command:>
adb reboot bootloader


This command will restart your phone in fastboot mode. By the way, to boot your phone into bootloader mode directly without USB, press and hold the Volume Down button, then press and hold the Power button.
- Once your phone is in fastboot mode, use the following command to confirm if it is detected by PC using adb:
fastboot devices
If everything is good, your phone should be listed in there.
- If your phone is listed, type the following command to flash the TWRP recovery image.
fastboot flash recovery twrp_3.5.2.img
Make sure you replace the twrp_3.5.2.img with the name of TWRP recovery image on your own PC.
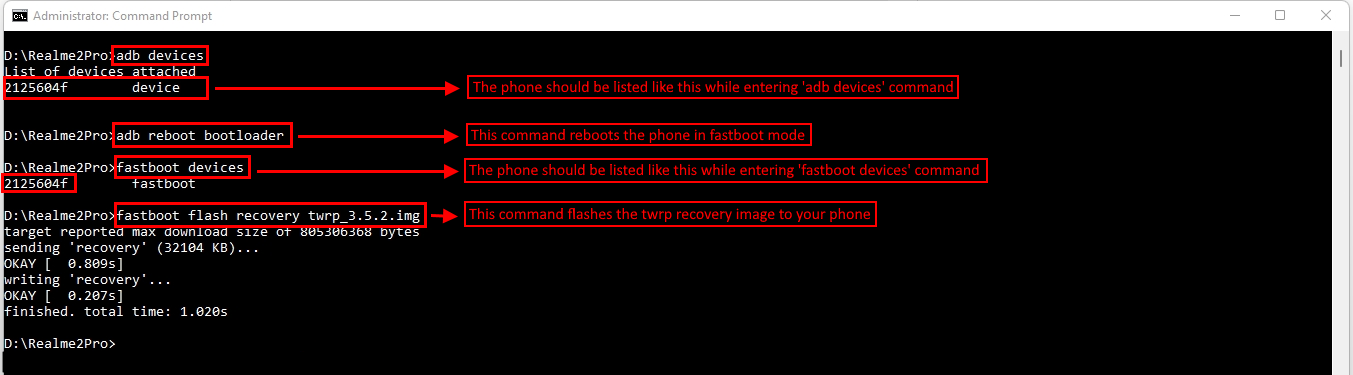
If you see a success message with above command, you can press the volume keys on phone and when you see Recovery Mode on top of phone screen, press the power button to directly boot into the TWRP recovery mode.
You should now see your phone booted to TWRP recovery. If you have already copied the downloaded zip files, you could now disconnect the phone from USB. If not, this is time to copy the zip files. Once done, you are free to disconnect the USB and use TWRP GUI on phone to flash the custom ROM.
Install Custom ROM
Once you have followed the above steps, you should have a working TWRP recovery on your phone. To install the custom ROM, you need to reboot to recovery mode. Depending upon which mode you are currently in, you need to use a suitable command.
If you’re following along this guide, you should already be in TWRP recovery mode when you run the fastboot reboot recovery command.
If your phone is currently booted in normal mode, you could connect the USB and type the following command to reboot it to TWRP recovery:
adb reboot recovery
If you don’t want to follow above methods, you could power-off your phone. Now press and hold Volume Up button, and then press and hold the Power button at the same time. Once you see a logo, you can let the keys go. The phone should now boot in TWRP recovery mode.
To install the custom ROM, follow the steps on your phone:
- Tap on Wipe, and the tap on Advanced Wipe.
- Now check the boxes against Dalvik / ART Cache, Cache, System, Vendor, Data and then swipe the button to wipe the selected partitions.
- When swipe is completed without any error, tap on back button to go back to home screen of TWRP recovery.
- On home screen, tap on Install.
- Now browse and tap on the LineageOS zip file you downloaded earlier and swipe to flash it.
- When this is done, browse for the flashable zip file of OpenGApps or NikGApps and swipe to flash it. Once the GApps zip is flashed, tap on back button and then tap on Reboot.
- Your phone will now reboot and will you now have a TWRP recovery and LineageOS custom ROM installed.