
- July 4, 2015
- Posted by: Surender Kumar
- Category: Cisco Routers
Configure DNS and DHCP on Cisco Router
Table of Contents
Domain Name Service (DNS)
Domain Name Service or is a protocol which is used to resolve Fully Qualified Domain Name (FQDN) into IP address and vice-versa. You can think of FQDN as the name of some website like www.techtutsonline.com. It is easier to remember the name as compared to IP addresses. That is why DNS is used everywhere while accessing websites through internet as well connecting to shared resources inside LAN.
Dynamic Host Configuration Protocol (DHCP)
DHCP is a protocol which is used by network devices to automatically obtain network configuration information like IP Address, Subnet mask, Default gateway, DNS Servers etc.
You know that both of DNS and DHCP are so important services, you might want to setup them to be used in your network. Today every low-end routers come up with builtin DNS and DHCP functionality. All you have to do is to enable and confgure them to be used in your network. In this section I am going to discuss how to configure DNS and DHCP on Cisco routers.
I will use the following network diagram to demonstrate the configuration
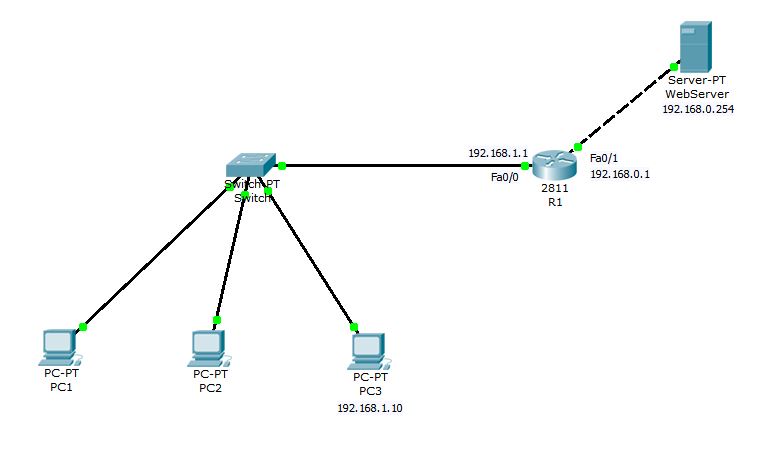
In above network topology, WebServer (192.168.0.254) is running a website www.techtutsonline.com and our goal is to configure DNS and DHCP on Router R1 so that PC1, PC2 can obtain IP configurations and access the website using FQDN instead of using IP address.
Now, Let’s get started.
DNS Configuration
R1#config term
R1(config)#ip dns server
R1(config)#ip domain-lookup
R1(config)#
the ip dns-server command is used to enable DNS service on router and ip domain-lookup command is used to enable IP to domain name translation on router.
Now, we need to add forwarder address so that R1 can make recursive query to other DNS server if it does not have any record in its own database. We will use Server 192.168.0.254 because this server is also running DNS service along with Web service. You can use upto 6 addresses as forwarders and if you are configuring the router for your network to reach internet, I would recommend using your ISP’s DNS or any public DNS server address like google’s DNS (8.8.8.8).
R1(config)#ip name-server 192.168.0.254
R1(config)#ip host 192.168.1.10
If you want this DNS to resolve your local PC to IP address, you can add host (A) record manually by using ip host command. In our sample network, the PC3 is assigned static address 192.168.1.10.
Verify DNS
You can verify if DNS is working by running ping to PC3 on R1.
R1#
R1#ping PC3

Type escape sequence to abort.
Sending 5, 100-byte ICMP Echos to 192.168.1.10, timeout is 2 seconds:
!!!!!
Success rate is 100 percent (5/5), round-trip min/avg/max = 8/9/12 ms

R1#ping www.techtutsonline.com
Translating "www.techtutsonline.com"...domain server (192.168.0.254)
Type escape sequence to abort.
Sending 5, 100-byte ICMP Echos to 192.168.0.254, timeout is 2 seconds:
!!!!!
Success rate is 100 percent (5/5), round-trip min/avg/max = 2/3/5 ms

R1#
R1 can resolve FQDN address www.techtutsonline.com to 192.168.0.254 using domain server 192.168.0.254.
To verify if R1 is doing recursive queries to next DNS server, move to PC3 and run ping to techtutsonline.com and see if it resolves to IP 192.168.0.254. If it does, means you can also browse the website http://www.techtutsonline.com right from PC3.
PC>ping techtutsonline.com

Pinging 192.168.0.254 with 32 bytes of data:

Reply from 192.168.0.254: bytes=32 time=16ms TTL=127
Reply from 192.168.0.254: bytes=32 time=13ms TTL=127
Reply from 192.168.0.254: bytes=32 time=13ms TTL=127
Reply from 192.168.0.254: bytes=32 time=13ms TTL=127

Ping statistics for 192.168.0.254:
    Packets: Sent = 4, Received = 4, Lost = 0 (0% loss),
Approximate round trip times in milli-seconds:
    Minimum = 13ms, Maximum = 16ms, Average = 13ms

PC>
You can see above that techtutsonline.com is correctly resolved to 192.168.0.254.
Now try to open the website from PC3.
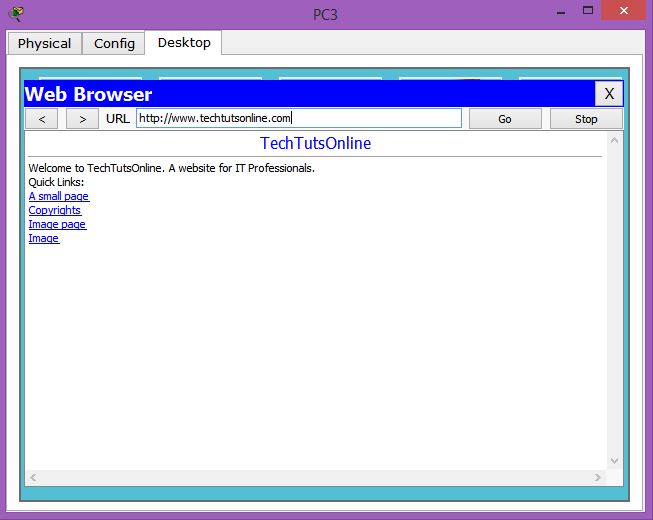
It proves that DNS service is now working on Router R1.
DHCP Configuration
Now, let’s configure DHCP server on R1 so that PC1 and PC2 can obtain TCP/IP configuration from R1.
R1#config term
R1(config)#service dhcp
The global configuration mode command service dhcp is used to enable DHCP service on router. The next step is to create DHCP pool where we will define the IP address range which R1 will assign to DHCP clients. I am going to create it with the name DHCP-POOL
R1(config)#ip dhcp pool DHCP-POOL
R1(dhcp-config)#network 192.168.1.0 255.255.255.0
R1(dhcp-config)#default-router 192.168.1.1
R1(dhcp-config)#dns-server 192.168.1.1
R1(dhcp-config)#domain-name techtutsonline.com
R1(dhcp-config)#end
R1#
The network 192.168.1.0 255.255.255.0 command as shown above will tell the router that entire 192.168.1.1 through 192.168.1.254 would be assigned to DHCP clients requesting the configuration. But as you know, we have already used 192.168.1.1 on router and 192.168.1.10 on PC3, we have to exclude these two IPs. The ddefault-router command tells what should be default gateway for clients. The dns-server and domain-name commands are used to specify the DNS server address and domain name respectively.
R1(config)#ip dhcp excluded-address 192.168.1.1
R1(config)#ip dhcp excluded-address 192.168.1.10
R1(config)#
The ip dhcp excluded-address command is used to exclude the IP address range or single IP address.
This is all you need to configure DHCP on router. You can view the DHCP status on router using show ip dhcp bindig command.
R1#show ip dhcp binding
IP address       Client-ID/              Lease expiration        Type
                 Hardware address
192.168.1.3      0040.0BD9.77C0           --                     Automatic
192.168.1.4      0050.0F74.91D4           --                     Automatic
R1#
You can also see that PC1 and PC2 has been assigned the TCP/IP configuration.
PC1>ipconfig /all

Physical Address................: 0040.0BD9.77C0
IP Address......................: 192.168.1.3
Subnet Mask.....................: 255.255.255.0
Default Gateway.................: 192.168.1.1
DNS Servers.....................: 192.168.1.1
DHCP is very useful if you have very large network where static address configuration is not possible.