
- July 2, 2015
- Posted by: Surender Kumar
- Category: Cisco Routers
Access Control Lists
Table of Contents
In Computer Networks, Access Control Lists (ACL) or Access List is basically a list of command(s) or rule(s) that control the flow of packets to and from the networking device like router, switch or firewall. However the implementation may be slightly different but their main purpose and behavior is same across different platforms.
Access-list is something like programmatic statements which takes the specific decision when some specific condition is met. One of the most common use of access control lists is filtering unwanted traffic when implementing security policies in computer networks. Once the access-list is built, it can be applied on any interface to either inbound or outbound traffic. Applying an access list causes the network device to analyze each and every packet crossing that interface in the specified direction and take the appropriate action.
Rules to Create Effective ACLs
- Access-list is always processed in sequential order that is from top (first line) to bottom (ending line). It means every packet received in or out of interface will be processed by every line of access-list until a match occurs.
- Once the match occurred, the packet will not be processed by remaining statements of access-list and it will be forwarded or dropped according to condition specified.
- At the end of each access list, there is an implicit “deny” statement which means if a packet does not match the condition in any of the access list lines, the packet will be dropped finally.
- Create the access lists in such an order so that the more specific tests are at the top.
- You can only apply one access list per interface per direction. Means when applying access lists, you can have only one inbound access list and one outbound access list per interface.
- After creating an access-list, always remember to apply that on any interface. It wont work if you forget to apply it on any interface after creating.
- Access-lists do not filter the traffic originating from device (switch, router or firewall). They work on the traffic passing through the device.
- Always try to apply standard access-lists as close to the destination as possible because standard access-lists can only filter based on source address.
- Always try to apply extended access-lists as close to the source as possible because extended access-lists can filter on the basis of source and destination addresses as well as protocols. By placing extended access-list close to the source address, you can filter traffic before it eats up your network’s bandwidth.
Types of Access Lists
According to behavior or working, there are mainly two types of access lists:
- Standard IP Access Lists: Standard IP access lists use only the source IP address in an IP packet as the condition test. All decisions are made on the basis of source IP address.
- Extended IP Access Lists: Extended IP access lists can filter traffic on the basis of source and destination IP addresses, protocol, and the port number. This is the reason that extended access lists have ability to make much granular decisions as compared to standard access-lists.
According to placement direction, access lists are of two types:
- Inbound access lists: An access list which is applied to filter inbound packets on an interface, the packets are processed through the access list before being actually routed to the outbound interface. Any packets that are denied won’t be routed because they are dropped before the routing process takes place.
- Outbound access lists: An access list which is applied to filter outbound packets on an interface, packets are routed to the outbound interface and
then processed through the access list before being sent over media.
There were two major problems with default Standard or Extended IP access lists:
First, You have to reference them by number, which does not make the access-list descriptive about its work. The range of both Standard and Extended IP access lists is given below:
| Type | Range |
| IP Standard | 1–99 |
| IP Extended | 100–199 |
| IP Standard (Expanded Range) | 1300–1999 |
| IP Extended (Expanded Range) | 2000–2699 |
Second, Whenever you want to remove individual lines out of an access-list, with numbered access-list, you can not delete individual line. Instead, you have to delete your existing access list and re-create the entire list.
This is where Named Access Control Lists come handy.
Named Access Control Lists: With NACL, you can create either standard or extended access list with some descriptive name such as NAT-Traffic or VPN-Traffic which can give the idea of their work from their name. ACL name is descriptive in itself. Secondly, Named access-lists allow you to remove any particular statement while leaving the whole access-list intact.
Before going into access list configuration, I want to discuss about the concept of Wildcard Masking.
Wildcard Mask
Access Control Lists use Wildcard Mask to specify an individual host, a network, or a certain range of a network or networks. For better understanding of wildcard, you need to understand the block size (which we have already discussed in subnetting section). Block size is used to specify a range of addresses like 4, 8, 16, 32, 64, 128. If you need to specify 12 hosts, you will choose block size of 16 and if you want to specify 40 hosts, you need to choose 64 block size.
Wildcard mask is just opposite of subnet mask. The easy way to calculate the wildcard mask is to subtract the subnet mask from 255.255.255.255.
Quick example to calculate wildcard mask:
For subnet mask 255.255.255.224 (/27), the wildcard mask is 0.0.0.31. See how?
Simply subtract each octet value from 255.
255 255 255 255-255 . 255 . 255 . 224 -----------------------0 . 0 . 0 . 31
How wildcard works with Access Control Lists
The four zeros represent each octet of the address. Whenever a zero is present, it means that octet in the address must exactly match the corresponding reference octet .
This tells the router to match up the first three octets exactly, but the fourth octet can be any value.
Standard Access Control List Configuration
Standard IP access lists filter network traffic by examining the source IP address in a packet. Standard IP access list is created by using the access-list numbers 1–99 or 1300–1999 (expanded range). Access-list types are generally differentiated using a number. Based on the number used when the access list is created, the router knows which type of syntax to expect as the list is entered. Numbers 1–99 or 1300–1999, tells the router that you want to create a standard IP access list and the router will expect syntax requiring only the source IP address as test condition.
I am going to use below network diagram to demonstrate the access control lists.
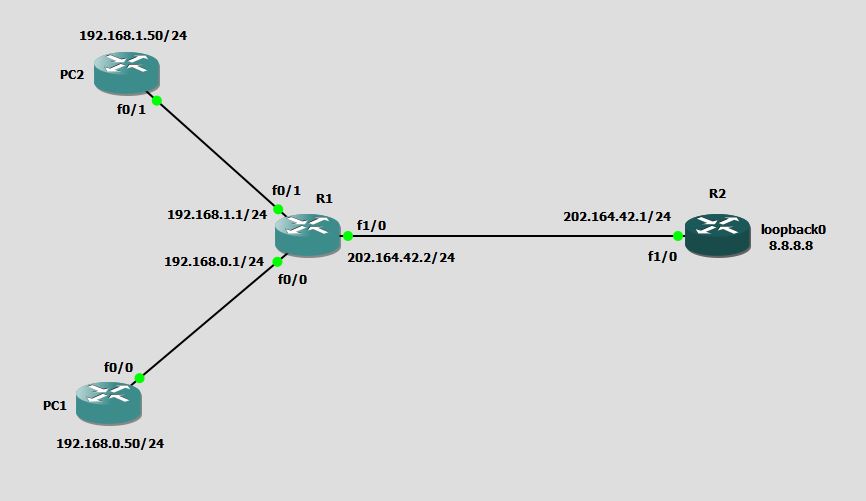
I have done basic network configuration and both PC1 and PC2 can reach 8.8.8.8 which is loopback0 on R2.
You know that PC1 and PC2 belong to different IP subnets.
Question 1: Only Allow network 192.168.0.0 to reach R2, while blocking every other network.
Solution: First step is to decide where you need to create the access list and second step is to decide which interface the access list should be applied upon and which direction.
You can see both of the above said networks are connected to R1. So, you need to create the access list on R1.
Creating standard access list
R1#conf t
Enter configuration commands, one per line.  End with CNTL/Z.
R1(config)#access-list ?
  <1-99>            IP standard access list
  <100-199>         IP extended access list
  <1000-1099>       IPX SAP access list
  <1100-1199>       Extended 48-bit MAC address access list
  <1200-1299>       IPX summary address access list
  <1300-1999>       IP standard access list (expanded range)
  <200-299>         Protocol type-code access list
  <2000-2699>       IP extended access list (expanded range)
  <300-399>         DECnet access list
  <600-699>         Appletalk access list
  <700-799>         48-bit MAC address access list
  <800-899>         IPX standard access list
  <900-999>         IPX extended access list
  compiled          Enable IP access-list compilation
  dynamic-extended  Extend the dynamic ACL absolute timer
  rate-limit        Simple rate-limit specific access list
The access-list command is used to create access list. You can see I have used ? to list various possible values after access-list command and router IOS presented me a bunch of options. I can use value 1 – 99 for standard access list and 100 – 199 for extended access list. But since we are creating standard ACL, I will choose any number from 1 to 99, let’s choose 10.
R1(config)#access-list 10 ?
  deny    Specify packets to reject
  permit  Specify packets to forward
  remark  Access list entry comment
Again after choosing 10, I have 3 options to go. Deny, permit and remark. As the name suggests deny statement will reject the packets, permit statement will permit the packets and remark statement will just add comment to access list.
Rule to remember is that there is always an implicit deny statement at the end of every access list. Therefore, you need not to use deny statement until and unless it is asked in question. Reminding the question, you are asked to only permit the network 192.168.0.0 to reach R2 and block every other network.
R1(config)#access-list 10 permit ?
  Hostname or A.B.C.D  Address to match
  any                  Any source host
  host                 A single host address

R1(config)#access-list 10 permit 192.168.0.0 ?
  A.B.C.D  Wildcard bits
  log      Log matches against this entry
  <cr>

R1(config)#access-list 10 permit 192.168.0.0 0.0.0.255
R1(config)#end
You can see above that I have added only one condition to our access-list since we are asked to allow only one network 192.168.0.0. everything else will be blocked by implicit deny statement at end.
Applying standard access list
Now that we have created our first standard ACL, it is time to apply it on appropriate interface. Remember the rule that always try to apply standard access-lists as close to the destination as possible because standard access-lists can only filter based on source address. Since access-list 10 we have just created is a standard ACL. The best place on router R1 which is close to destination is interface fastEthernet1/0. We are asked to control the traffic destined toward R2. So, you can determine that for R1 to reach R2, access-list should be applied for outbound traffic on interface fastEthernet1/0.
R1(config)#interface fastEthernet 1/0
R1(config-if)#ip access-group ?
  <1-199>      IP access list (standard or extended)
  <1300-2699>  IP expanded access list (standard or extended)
  WORD         Access-list name

R1(config-if)#ip access-group 10 ?
  in   inbound packets
  out  outbound packets

R1(config-if)#ip access-group 10 out
R1(config-if)#end
R1#
In order to apply the access-list, go to interface config mode selecting specific interface id and use ip access-group command followed by access-list number and then direction as shown above.
Now, access-list 10 is applied, it will be listed under interface name in running-config as shown below.
 R1#show running-config interface fastEthernet 1/0
Building configuration...

Current configuration : 160 bytes
!
interface FastEthernet1/0
 ip address 202.164.42.2 255.255.255.0
 ip access-group 10 out
 ip virtual-reassembly
 duplex auto
 speed auto
end
And the status can be checked using show access-lists 10 command on R1.
R1#show access-lists 10
Standard IP access list 10
    10 permit 192.168.0.0, wildcard bits 0.0.0.255
R1#
To verify that access-list is doing its job, run the ping to 8.8.8.8 from PC1 and PC2 respectively (remember we are simulating whole subnets using PC1 and PC2).
PC1#ping 8.8.8.8

Type escape sequence to abort.
Sending 5, 100-byte ICMP Echos to 8.8.8.8, timeout is 2 seconds:
.!!!!
Success rate is 80 percent (4/5), round-trip min/avg/max = 60/68/76 ms
PC1#
Ping from PC1 to R2 loopback0 is successful as expected.
PC2#ping 8.8.8.8

Type escape sequence to abort.
Sending 5, 100-byte ICMP Echos to 8.8.8.8, timeout is 2 seconds:
UUUUU
Success rate is 0 percent (0/5)
PC2#
You can see that ping from PC2 (subnet 192.168.1.0) says destination unreachable (U).
Now, verify the status of access-list 10 on R1 using show access-lists 10 command as shown below.
R1#show access-lists 10
Standard IP access list 10
    10 permit 192.168.0.0, wildcard bits 0.0.0.255 (5 matches)
R1#
Did you notice 5 matches at the end? This proves that access-list has been hit by source IP. This count will keep increasing when you ping 8.8.8.8 from PC1 but it does not increase when you run ping to 8.8.8.8 from PC2 because there is permit statement and access-list will keep the counter of permit statement.
To see access-list in action, you can use debug ip packet command but I would not recommend it if you are working on production network.
R1#debug ip packet
IP packet debugging is on
R1#
*Jul  3 11:42:52.875: IP: tableid=0, s=192.168.1.50 (FastEthernet0/1), d=8.8.8.8 (FastEthernet1/0), routed via FIB
*Jul  3 11:42:52.875: IP: s=192.168.1.50 (FastEthernet0/1), d=8.8.8.8 (FastEthernet1/0), len 100, access denied
*Jul  3 11:42:52.879: IP: tableid=0, s=192.168.1.1 (local), d=192.168.1.50 (FastEthernet0/1), routed via FIB
*Jul  3 11:42:52.879: IP: s=192.168.1.1 (local), d=192.168.1.50 (FastEthernet0/1), len 56, sending
*Jul  3 11:42:52.947: IP: tableid=0, s=192.168.1.50 (FastEthernet0/1), d=8.8.8.8 (FastEthernet1/0), routed via FIB
*Jul  3 11:42:52.947: IP: s=192.168.1.50 (FastEthernet0/1), d=8.8.8.8 (FastEthernet1/0), len 100, access denied
*Jul  3 11:42:52.951: IP: tableid=0, s=192.168.1.1 (local), d=192.168.1.50 (FastEthernet0/1), routed via FIB
*Jul  3 11:42:52.951: IP: s=192.168.1.1 (local), d=192.168.1.50 (FastEthernet0/1), len 56, sending
*Jul  3 11:42:53.019: IP: tableid=0, s=192.168.1.50 (FastEthernet0/1), d=8.8.8.8 (FastEthernet1/0), routed via FIB
*Ju
R1#l  3 11:42:53.019: IP: s=192.168.1.50 (FastEthernet0/1), d=8.8.8.8 (FastEthernet1/0), len 100, access denied
*Jul  3 11:42:53.023: IP: tableid=0, s=192.168.1.1 (local), d=192.168.1.50 (FastEthernet0/1), routed via FIB
*Jul  3 11:42:53.023: IP: s=192.168.1.1 (local), d=192.168.1.50 (FastEthernet0/1), len 56, sending
*Jul  3 11:42:53.055: IP: tableid=0, s=192.168.1.50 (FastEthernet0/1), d=8.8.8.8 (FastEthernet1/0), routed via FIB
*Jul  3 11:42:53.055: IP: s=192.168.1.50 (FastEthernet0/1), d=8.8.8.8 (FastEthernet1/0), len 100, access denied
*Jul  3 11:42:53.059: IP: tableid=0, s=192.168.1.1 (local), d=192.168.1.50 (FastEthernet0/1), routed via FIB
*Jul  3 11:42:53.059: IP: s=192.168.1.1 (local), d=192.168.1.50 (FastEthernet0/1), len 56, sending
*Jul  3 11:42:53.095: IP: tableid=0, s=192.168.1.50 (FastEthernet0/1), d=8.8.8.8 (FastEthernet1/0), routed via FIB
*Jul  3 11:42:53.095: IP: s=192.168.1.50 (FastEthernet0/1), d=8.8.8.8 (FastEthernet1/0), len 100, access denied
*Jul  3 11:
R1#42:53.099: IP: tableid=0, s=192.168.1.1 (local), d=192.168.1.50 (FastEthernet0/1), routed via FIB
*Jul  3 11:42:53.099: IP: s=192.168.1.1 (local), d=192.168.1.50 (FastEthernet0/1), len 56, sending
R1#
The debug ip packet and debug ip packet detail command can help you troubleshoot issues but these commands are CPU intensive. So, use with caution.
Creating perfect access-lists require a lot of practice. So, the more you practice, the more you become expert. Let’s do another example of standard access list.
Question 2: Only block network 192.168.0.0 to reach R2, while allowing every other subnet in the network diagram given below:
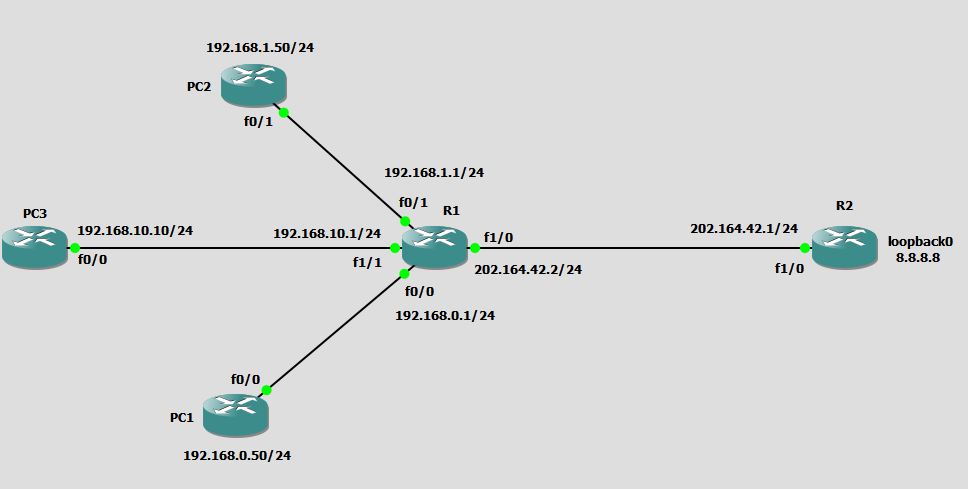
Solution: This time we are asked to block only single subnet 192.168.0.0 while allowing every other network.
R1#config term
R1(config)#access-list 20 deny 192.168.0.0 0.0.0.255
R1(config)#access-list 20 permit any
R1(config)#end
R1#
This time I have create access-list 20 with two test conditions. Guess why?
Well ! This is because we have to deny a specific network 192.168.0.0/24 and then permit every other network. If I would not have added access-list 20 permit any statement, the implicit deny statement would have blocked everything by default.
R1#conf t
Enter configuration commands, one per line.  End with CNTL/Z.
R1(config)#int fa1/0
R1(config-if)#ip access-group 20 out
R1(config-if)#end
R1#
Access-list 20 is now applied on interface fastEthernet1/0.
Let’s test it
PC1#ping 8.8.8.8

Type escape sequence to abort.
Sending 5, 100-byte ICMP Echos to 8.8.8.8, timeout is 2 seconds:
UUUUU
Success rate is 0 percent (0/5)
PC1#
Ping from PC1 failed. We have been asked to do this.
 PC2#ping 8.8.8.8

Type escape sequence to abort.
Sending 5, 100-byte ICMP Echos to 8.8.8.8, timeout is 2 seconds:
!!!!!
Success rate is 100 percent (5/5), round-trip min/avg/max = 60/62/64 ms
PC2#
Ping from PC2 is successful, as expected.
PC3#ping 8.8.8.8

Type escape sequence to abort.
Sending 5, 100-byte ICMP Echos to 8.8.8.8, timeout is 2 seconds:
!!!!!
Success rate is 100 percent (5/5), round-trip min/avg/max = 64/72/96 ms
PC3#
Ping from PC3 is also successful. The access-list 20 will only block network 192.168.0.0 while every other network can reach R2.
Extended Access Control List Configuration
Extended access lists allow you to specify source and destination addresses as well as the protocol and port number that identify the type of traffic needed to filter. By using extended access lists, you can effectively allow users access to a physical LAN and stop them from accessing specific hosts or even specific services on those hosts.
Below is the sample network I will be using to demonstrate Extended Access Control List configuration.
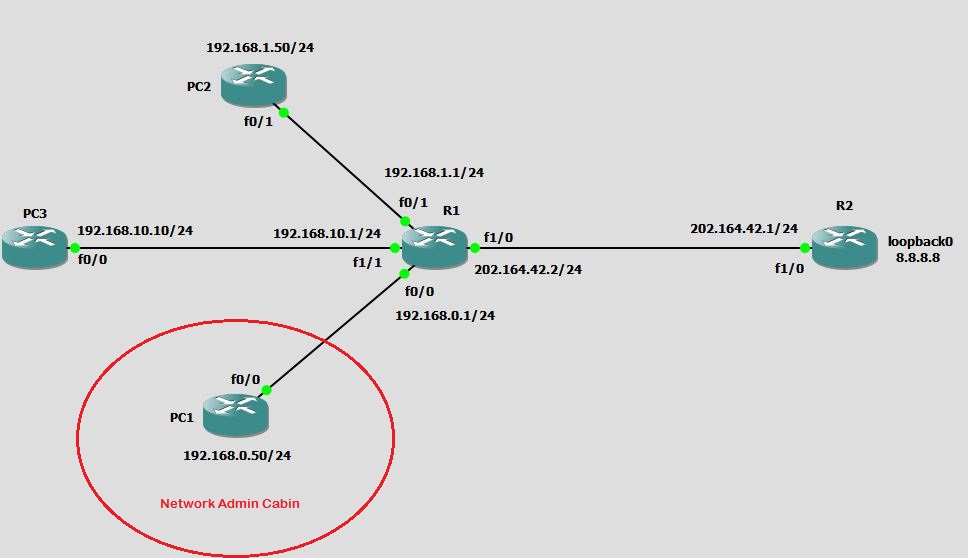 Question 1: You are working as network admin in the company. You want to secure the telnet on R2 so that only PC1 (which is located in Network Admin Cabin) can telnet the Router R2 via 8.8.8.8 and 202.164.42.1 but none other. However everyone should be able to reach (ping) router R2.
Answer: Since we want to control telnet protocol, extended access-list gives you the option to specify source, destination, protocol and port. Therefore, you can achieve this by using Extended ACL.
Before creating ACL, let’s see if we can telnet R2 from every PC.
PC1#telnet 8.8.8.8
Trying 8.8.8.8 ... Open

User Access Verification

Username:
PC2#telnet 8.8.8.8
Trying 8.8.8.8 ... Open

User Access Verification

Username:
If you are able to see Trying 8.8.8.8 … Open, it means telnet is working.
Creating extended access list
R1(config)#access-list ?
  <1-99>            IP standard access list
  <100-199>         IP extended access list
  <1000-1099>       IPX SAP access list
  <1100-1199>       Extended 48-bit MAC address access list
  <1200-1299>       IPX summary address access list
  <1300-1999>       IP standard access list (expanded range)
  <200-299>         Protocol type-code access list
  <2000-2699>       IP extended access list (expanded range)
  <300-399>         DECnet access list
  <600-699>         Appletalk access list
  <700-799>         48-bit MAC address access list
  <800-899>         IPX standard access list
  <900-999>         IPX extended access list
  compiled          Enable IP access-list compilation
  dynamic-extended  Extend the dynamic ACL absolute timer
  rate-limit        Simple rate-limit specific access list
This time we are creating extended ACL. So we can choose anything between 100 to 199.
R1(config)#access-list 100 ?
  deny     Specify packets to reject
  dynamic  Specify a DYNAMIC list of PERMITs or DENYs
  permit   Specify packets to forward
  remark   Access list entry comment
We want to permit at least one host for specific type of traffic. So, I will select permit keyword as shown below. Remember that the most specific test condition should be on top.
  R1(config)#access-list 100 permit ?
  <0-255>  An IP protocol number
  ahp      Authentication Header Protocol
  eigrp    Cisco's EIGRP routing protocol
  esp      Encapsulation Security Payload
  gre      Cisco's GRE tunneling
  icmp     Internet Control Message Protocol
  igmp     Internet Gateway Message Protocol
  ip       Any Internet Protocol
  ipinip   IP in IP tunneling
  nos      KA9Q NOS compatible IP over IP tunneling
  ospf     OSPF routing protocol
  pcp      Payload Compression Protocol
  pim      Protocol Independent Multicast
  tcp      Transmission Control Protocol
  udp      User Datagram Protocol
Because telnet is a TCP protocol, So I will select tcp as shown below
R1(config)#access-list 100 permit tcp ?
  A.B.C.D  Source address
  any      Any source host
  host     A single source host
At this stage you can either specify a source IP address range or just a single host using host keyword. Since we are going to permit only PC1 (192.168.0.50), I will select host and then type the source address.
R1(config)#access-list 100 permit tcp host 192.168.0.50 ?
  A.B.C.D  Destination address
  any      Any destination host
  eq       Match only packets on a given port number
  gt       Match only packets with a greater port number
  host     A single destination host
  lt       Match only packets with a lower port number
  neq      Match only packets not on a given port number
  range    Match only packets in the range of port numbers
For destination, I will select any keyword and then select protocol equal to telnet using eq telnet keywords.
R1(config)#access-list 100 permit tcp host 192.168.0.50 any eq telnet
R1(config)#access-list 100 deny tcp any any eq telnet
R1(config)#access-list 100 permit ip any any
R1(config)#end
In the second line, I have denied telnet traffic from every source to every destination and then in third line, I have permitted every IP traffic from every source to every destination because we are asked to allow everyone to reach (ping) R2.
Applying extended access list 100
Since this is an extended access-list, So we have to place it as close to source as possible so that we can conserve the network bandwidth as well as router’s resources like CPU cycles and memory.
Therefore, the best place to apply access-list 100 on R1 is interface fastEthernet1/0 and it should be placed for outbound traffic.
R1(config)#int fa1/0
R1(config-if)#ip access-group 100 ?
  in   inbound packets
  out  outbound packets

R1(config-if)#ip access-group 100 out
R1(config-if)#end
R1#
Now it is time to test if access-list is working as expected.
PC1#
PC1#telnet 8.8.8.8
Trying 8.8.8.8 ... Open

User Access Verification

Username: admin
Password:*********
R2#
R2#
Wow! you can see that I have connected to R2 from PC1 (Network Admin PC) as expected.
Now lets try to connect from PC2:
PC2#
PC2#telnet 8.8.8.8
Trying 8.8.8.8 ...
% Destination unreachable; gateway or host down

PC2#
OoOops! It said gateway or host down. But wait a minute. Can we ping that host?
PC2#ping 8.8.8.8

Type escape sequence to abort.
Sending 5, 100-byte ICMP Echos to 8.8.8.8, timeout is 2 seconds:
!!!!!
Success rate is 100 percent (5/5), round-trip min/avg/max = 60/69/92 ms
PC2#
Yes. We can ping the address 8.8.8.8, means we can reach R1 but can not telnet.
PC3#telnet  8.8.8.8
Trying 8.8.8.8 ...
% Destination unreachable; gateway or host down

PC3#ping 8.8.8.8

Type escape sequence to abort.
Sending 5, 100-byte ICMP Echos to 8.8.8.8, timeout is 2 seconds:
!!!!!
Success rate is 100 percent (5/5), round-trip min/avg/max = 64/70/92 ms
PC3#
Same status from PC3. Our access-list is working perfectly fine since it is only permitting telnet to host 192.168.0.50 while blocking telnet for everyone else. But all other IP based traffic is still permitted from everyone.
This is exactly what we were asked to do in question.
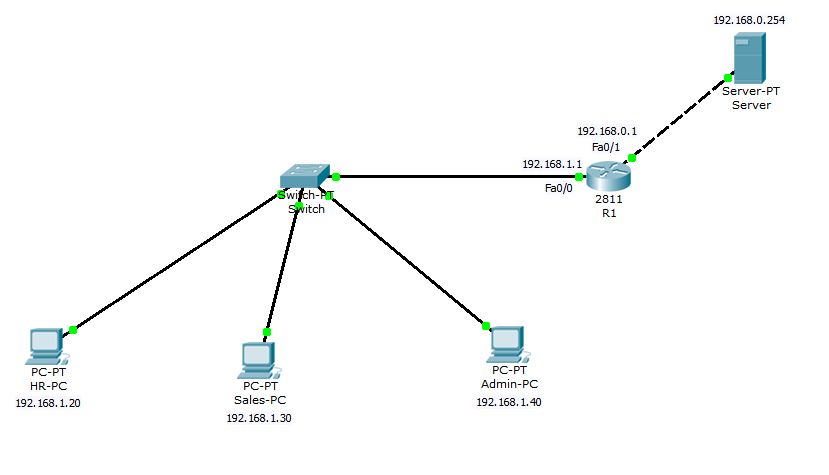
Question 2: In the below network, Server is running a website. Only HR-PC and Admin-PC should be able to access the website while Sales-PC should not. However Sales-PC should be allowed to use the other services running on the same Server. Achieve this using Named Access Control List (NACL) with minimum configuration commands as possible.
Solution: We can do this similar to our previous example but since we are asked to achieve this with least possible commands. I will create the named access-list with least possible test conditions.
Router(config)#ip access-list extended Deny-Web-SalesPC
Router(config-ext-nacl)#deny tcp 192.168.1.30 0.0.0.0 192.168.0.254 0.0.0.0 eq www
Router(config-ext-nacl)#permit ip any any
Router(config-ext-nacl)#end
Router#
Router#show ip access-lists
Extended IP access list Deny-Web-SalesPC
    deny tcp host 192.168.1.30 host 192.168.0.254 eq www
    permit ip any any
Router#
The syntax of Named Access Control List is slightly different. The normal ACL is created using access-list command followed by any number and NACL is create by ip access-list followed by standard or extended and then any name. In above configuration, I have created extended NACL with the name Deny-Web-SalesPC. You can use any descriptive name which suites you the most. Once you hit enter, you will be taken to NACL config mode denoted by Router(config-ext-nacl)#. Then you can simply use permit or deny statements as per your requirement.
Router#conf t
Enter configuration commands, one per line.  End with CNTL/Z.
Router(config)#int fa0/0
Router(config-if)#ip access-group Deny-Web-SalesPC in
Router(config-if)#^Z
Router#
I have applied the ACL on interface fastEthernet0/0 inside.
Now, you can see that Sales-PC can ping the Server but can not access the website.
PC>ping 192.168.0.254

Pinging 192.168.0.254 with 32 bytes of data:

Reply from 192.168.0.254: bytes=32 time=94ms TTL=127
Reply from 192.168.0.254: bytes=32 time=94ms TTL=127
Reply from 192.168.0.254: bytes=32 time=93ms TTL=127
Reply from 192.168.0.254: bytes=32 time=94ms TTL=127
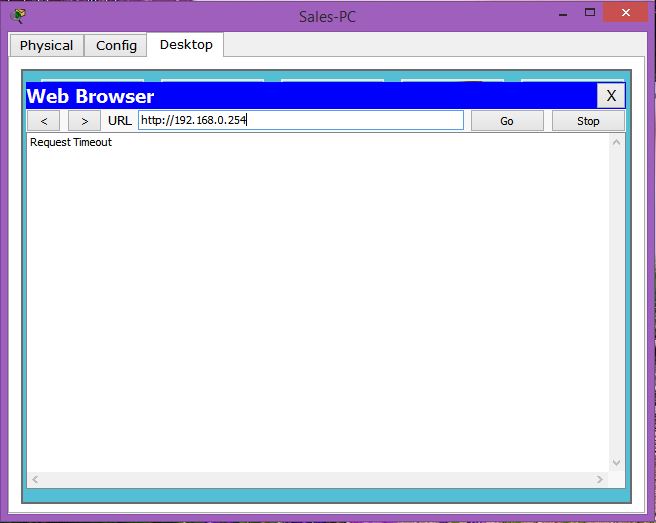
There is timeout while opening webpage.
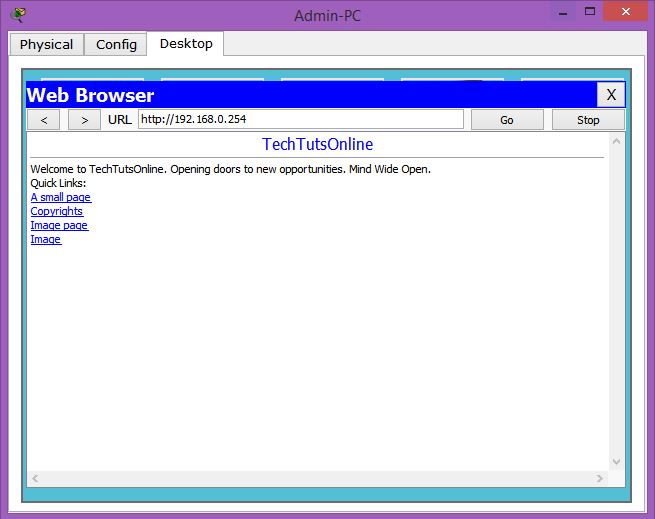
But you can check that the website is working on Admin-PC.
How to Add or Remove Lines from Existing ACL without Deleting ACL
If the ACL is created using simple access-list command, you can not edit these access-lists. In this case what you can do is to copy the all lines into notepad or any other text editor and then modify the lines according to your need and then copy the entire list, quickly remove the existing access-list and paste the new lines into terminal. It can minimize the downtime required if you are working in live production environment.
That is why I will always prefer using Named Access Control Lists (NACL) since it gives you the ability to remove and add lines without having to delete the entire access-list and without affecting the production network.
Let’s create a sample NACL with the name TEST, just for demonstration purpose.
R1(config)#ip access-list standard TEST
R1(config-std-nacl)#deny   192.168.1.0 0.0.0.255
R1(config-std-nacl)#deny   192.168.10.0 0.0.0.255
R1(config-std-nacl)#deny   192.168.20.0 0.0.0.255
R1(config-std-nacl)#deny   192.168.30.0 0.0.0.255
R1(config-std-nacl)#deny   192.168.40.0 0.0.0.255
R1(config-std-nacl)#deny   192.168.50.0 0.0.0.255
R1(config-std-nacl)#deny   192.168.60.0 0.0.0.255
R1(config-std-nacl)#deny   10.1.1.0 0.0.0.255
R1(config-std-nacl)#permit any
R1(config-std-nacl)#end
R1#
Now if you see it using show access-list command, you will see something like
R1#show access-lists TEST
Standard IP access list TEST
    10 deny   192.168.1.0, wildcard bits 0.0.0.255
    20 deny   192.168.10.0, wildcard bits 0.0.0.255
    30 deny   192.168.20.0, wildcard bits 0.0.0.255
    40 deny   192.168.30.0, wildcard bits 0.0.0.255
    50 deny   192.168.40.0, wildcard bits 0.0.0.255
    60 deny   192.168.50.0, wildcard bits 0.0.0.255
    70 deny   192.168.60.0, wildcard bits 0.0.0.255
    80 deny   10.1.1.0, wildcard bits 0.0.0.255
    90 permit any
R1#
Did you notice that every line is beginning with a number like 10, 20, 30 and so on? These numbers are called sequence numbers and they are automatically added when you add a new line in NACL. Sequence number help us to remove or add new lines into access-list without having to remove complete access-list and build it up again.
Now, consider that you are asked to remove the networks 192.168.40.0/24 and 192.168.60.0/24 from access-list and add the network 192.168.80.0/24 without causing any downtime. With NACL, it is pretty easy to do. Just look at the sequence number corresponding to networks you want to remove from list.
   50 deny   192.168.40.0, wildcard bits 0.0.0.255
   60 deny   192.168.50.0, wildcard bits 0.0.0.255
   70 deny   192.168.60.0, wildcard bits 0.0.0.255
and use the commands as shown below
R1#conf t
Enter configuration commands, one per line.  End with CNTL/Z.
R1(config)#
R1(config)#ip access-list standard TEST
R1(config-std-nacl)#no 50
R1(config-std-nacl)#no 70
R1(config-std-nacl)#end
R1#
The commands no 50 and no 70 are used to remove the relevant lines from access-list.
Now before adding the network 192.168.80.0/24, I will look at my access-list once again.
R1#show access-lists TEST
Standard IP access list TEST
    10 deny   192.168.1.0, wildcard bits 0.0.0.255
    20 deny   192.168.10.0, wildcard bits 0.0.0.255
    30 deny   192.168.20.0, wildcard bits 0.0.0.255
    40 deny   192.168.30.0, wildcard bits 0.0.0.255
    60 deny   192.168.50.0, wildcard bits 0.0.0.255
    80 deny   10.1.1.0, wildcard bits 0.0.0.255
    90 permit any
R1#
You can see, networks 192.168.40.0/24 and 192.168.60.0/24 are gone. Now again look at the sequence numbers and try to figure out where the new network should be placed in the access-list so that it is actually denied. If you make a mistake here you could end up with something as shown below.
 R1#show access-lists TEST
Standard IP access list TEST
    10 deny   192.168.1.0, wildcard bits 0.0.0.255
    20 deny   192.168.10.0, wildcard bits 0.0.0.255
    30 deny   192.168.20.0, wildcard bits 0.0.0.255
    40 deny   192.168.30.0, wildcard bits 0.0.0.255
    60 deny   192.168.50.0, wildcard bits 0.0.0.255
    80 deny   10.1.1.0, wildcard bits 0.0.0.255
    90 permit any
    100 deny   192.168.80.0, wildcard bits 0.0.0.255
If your access-list looks like above, it will not work. Don’t get me wrong here, but it is true that the network 192.168.80.0/24 which you actually wanted to deny, will be permitted. Why? Because of the line with sequence number 90. Remember that ACL is always processed from top to bottom until a match is made and once the match occurs, no more comparison takes place.
To make it actually working, you have to add the deny statement with sequence number which is less than 90 and the best place would be between 60 and 80 because most specific tests should be on top. So, now let’s do it in correct way.
R1#conf t
Enter configuration commands, one per line.  End with CNTL/Z.
R1(config)#ip access-list standard TEST
R1(config-std-nacl)#70 deny 192.168.80.0 0.0.0.255
R1(config-std-nacl)#end
R1#show access-lists TEST
Standard IP access list TEST
    10 deny   192.168.1.0, wildcard bits 0.0.0.255
    20 deny   192.168.10.0, wildcard bits 0.0.0.255
    30 deny   192.168.20.0, wildcard bits 0.0.0.255
    40 deny   192.168.30.0, wildcard bits 0.0.0.255
    60 deny   192.168.50.0, wildcard bits 0.0.0.255
    70 deny   192.168.80.0, wildcard bits 0.0.0.255
    80 deny   10.1.1.0, wildcard bits 0.0.0.255
    90 permit any
R1#
The ACL looks really nice now. I used sequence number 70 to actually inject the line between 60 and 80. You can use any number between 60 to 80. In this way we have modified the named access-list TEST without causing any downtime.
This concludes the access control lists section.
Applications of ACLs:
- ACLs are primarily used for security and traffic filtering.
- ACLs can also be used to filter routing updates using distribution lists.
- ACLs are also used in route maps and Policy Based Routing (PBR).
- ACLs are used in NAT for categorizing the traffic.
- ACLs are also used in IPsec VPN tunnels.
- ACLs are used in rate limit command to throttle down the specific type of traffic.
- ACL can also be used for debugging the traffic using debug ip packet command.
- ACLs can be used in Reflexive mode for IP Session Filtering. Reflexive ACL is generally used to allow outbound traffic originating from LAN and to deny inbound traffic which is initiated from outside of network (mostly internet).